2、侧边栏
侧边栏
侧边栏
创建侧边栏有助于:
- 将多个相关��文档分组
- 在每个文档上显示侧边栏
- 提供分页导航,带有下一个/上一个按钮
要在 Docusaurus 网站上使用侧边栏:
- 定义一个文件,导出 侧边栏对象 的字典。
- 直接或通过
@docusaurus/preset-classic将此对象传递到@docusaurus/plugin-docs插件中。
docusaurus.config.js
export default {
  presets: [
    [
      '@docusaurus/preset-classic',
      {
        docs: {
          sidebarPath: './sidebars.js',
        },
      },
    ],
  ],
};
本节概述了文档侧边栏的各种功能。在接下来的章节中,我们将更加系统地介绍以下概念:
默认侧边栏
如果未指定 sidebarPath,Docusaurus 自动生成侧边栏 会为你提供,通过使用 docs 文件夹的文件系统结构:
sidebars.js
export default {
  mySidebar: [
    {
      type: 'autogenerated',
      dirName: '.', // generate sidebar from the docs folder (or versioned_docs/<version>)
    },
  ],
};
你还可以明确定义侧边栏。
侧边栏对象
侧边栏的关键是类别、文档链接和其他超链接的层次结构。
type Sidebar =
  // Normal syntax
  | SidebarItem[]
  // Shorthand syntax
  | {[categoryLabel: string]: SidebarItem[]};
例如:
sidebars.js
export default {
  mySidebar: [
    {
      type: 'category',
      label: 'Getting Started',
      items: [
        {
          type: 'doc',
          id: 'doc1',
        },
      ],
    },
    {
      type: 'category',
      label: 'Docusaurus',
      items: [
        {
          type: 'doc',
          id: 'doc2',
        },
        {
          type: 'doc',
          id: 'doc3',
        },
      ],
    },
    {
      type: 'link',
      label: 'Learn more',
      href: 'https://example.com',
    },
  ],
};
这是一个侧边栏文件,导出一个侧边栏,名为 mySidebar。它具有三个顶层项目:两个类别和一个外部链接。每个类别中都有一些文档链接。
侧边栏文件可以包含 多个侧边栏对象,由其对象键标识。
type SidebarsFile = {
  [sidebarID: string]: Sidebar;
};
主题配置
可隐藏侧边栏
通过启用 themeConfig.docs.sidebar.hideable 选项,你可以使整个侧边栏可隐藏,让用户更好地关注内容。当在中型屏幕(例如平板电脑)上消费内容时,这尤其有用。
docusaurus.config.js
export default {
  themeConfig: {
    docs: {
      sidebar: {
        hideable: true,
      },
    },
  },
};
自动折叠侧边栏类别
themeConfig.docs.sidebar.autoCollapseCategories 选项将在展开一个类别时折叠所有同级类别。这可以避免用户打开太多类别,并帮助他们专注于所选部分。
docusaurus.config.js
export default {
  themeConfig: {
    docs: {
      sidebar: {
        autoCollapseCategories: true,
      },
    },
  },
};
传递自定义属性
要将自定义属性传递到侧边栏项目,请将可选的 customProps 对象添加到任何项目。这对于通过混合 React 组件渲染侧边栏项目来应用站点自定义非常有用。
{
  type: 'doc',
  id: 'doc1',
  customProps: {
    badges: ['new', 'green'],
    featured: true,
  },
};
侧边栏面包屑
默认情况下,面包屑使用当前页面的 "侧边栏路径" 渲染在顶部。
可以使用插件选项禁用此行为:
docusaurus.config.js
export default {
  presets: [
    [
      '@docusaurus/preset-classic',
      {
        docs: {
          breadcrumbs: false,
        },
      },
    ],
  ],
};
复杂侧边栏示例
来自 Docusaurus 网站的真实示例:
sidebars.js
import type {SidebarsConfig} from '@docusaurus/plugin-content-docs';
const sidebars: SidebarsConfig = {
  docs: [
    'introduction',
    {
      type: 'category',
      label: 'Getting Started',
      link: {
        type: 'generated-index',
      },
      collapsed: false,
      items: [
        'installation',
        'configuration',
        'playground',
        'typescript-support',
      ],
    },
    {
      type: 'category',
      label: 'Guides',
      link: {
        type: 'generated-index',
        title: 'Docusaurus Guides',
        description:
          "Let's learn about the most important Docusaurus concepts!",
        keywords: ['guides'],
        image: '/img/docusaurus.png',
      },
      items: [
        'guides/creating-pages',
        {
          type: 'category',
          label: 'Docs',
          link: {
            type: 'doc',
            id: 'guides/docs/introduction',
          },
          items: [
            'guides/docs/create-doc',
            {
              type: 'category',
              label: 'Sidebar',
              link: {
                type: 'doc',
                id: 'guides/docs/sidebar/index',
              },
              items: [
                'guides/docs/sidebar/items',
                'guides/docs/sidebar/autogenerated',
                'guides/docs/sidebar/multiple-sidebars',
              ],
            },
            'guides/docs/versioning',
            'guides/docs/multi-instance',
          ],
        },
        'blog',
        {
          type: 'category',
          label: 'Markdown Features',
          link: {
            type: 'doc',
            id: 'guides/markdown-features/introduction',
          },
          items: [
            'guides/markdown-features/react',
            'guides/markdown-features/tabs',
            'guides/markdown-features/code-blocks',
            'guides/markdown-features/admonitions',
            'guides/markdown-features/toc',
            'guides/markdown-features/assets',
            'guides/markdown-features/links',
            'guides/markdown-features/plugins',
            'guides/markdown-features/math-equations',
            'guides/markdown-features/diagrams',
            'guides/markdown-features/head-metadata',
          ],
        },
        'styling-layout',
        'swizzling',
        'static-assets',
        'search',
        'browser-support',
        'seo',
        'using-plugins',
        'deployment',
        {
          type: 'category',
          label: 'Internationalization',
          link: {type: 'doc', id: 'i18n/introduction'},
          items: [
            {
              type: 'doc',
              id: 'i18n/tutorial',
              label: 'Tutorial',
            },
            {
              type: 'doc',
              id: 'i18n/git',
              label: 'Using Git',
            },
            {
              type: 'doc',
              id: 'i18n/crowdin',
              label: 'Using Crowdin',
            },
          ],
        },
        'guides/whats-next',
      ],
    },
    {
      type: 'category',
      label: 'Advanced Guides',
      link: {type: 'doc', id: 'advanced/index'},
      items: [
        'advanced/architecture',
        'advanced/plugins',
        'advanced/routing',
        'advanced/ssg',
        'advanced/client',
      ],
    },
    {
      type: 'category',
      label: 'Upgrading',
      link: {
        type: 'doc',
        id: 'migration/index',
      },
      items: [
        'migration/v3',
        {
          type: 'category',
          label: 'To Docusaurus v2',
          items: [
            'migration/v2/migration-overview',
            'migration/v2/migration-automated',
            'migration/v2/migration-manual',
            'migration/v2/migration-versioned-sites',
            'migration/v2/migration-translated-sites',
          ],
        },
      ],
    },
  ],
  api: [
    'cli',
    'docusaurus-core',
    {
      type: 'autogenerated',
      dirName: 'api',
    },
  ],
};
export default sidebars;
侧边栏项目
我们在上一节的例子中介绍了三种类型的 item 类型:doc、category、link,其用法相当直观。我们将正式介绍他们的 API。还有第四种:autogenerated,我们稍后会详细解释。
- 文档:链接到文档页面,将其与侧边栏关联
- 关联:链接到任何内部或外部页面
- 类别:创建侧边栏项目的下拉菜单
- 自动生成:自动生成侧边栏切片
- HTML:在项目的位置渲染纯 HTML
- 参考:链接到文档页面,而不使该项目参与导航生成
文档:链接到文档
使用 doc 类型链接到文档页面并将该文档分配到侧边栏:
type SidebarItemDoc =
  // Normal syntax
  | {
      type: 'doc';
      id: string;
      label: string; // Sidebar label text
      className?: string; // Class name for sidebar label
      customProps?: Record<string, unknown>; // Custom props
    }

  // Shorthand syntax
  | string; // docId shortcut
示例:
sidebars.js
export default {
  mySidebar: [
    // Normal syntax:
    {
      type: 'doc',
      id: 'doc1', // document ID
      label: 'Getting started', // sidebar label
    },

    // Shorthand syntax:
    'doc2', // document ID
  ],
};
如果你使用 doc 简写或 autogenerated 侧边栏,你将无法通过项目定义自定义侧边栏标签。但是,你可以在该文档中使用 sidebar_label Markdown 前面的内容,它的优先级高于侧边栏项目中的 label 键。同样,你可以使用 sidebar_custom_props 声明文档页面的自定义元数据。
doc 项设置 隐式侧边栏关联。不要将同一个文档分配给多个侧边栏:将类型更改为 ref。
侧边栏自定义属性是将任意文档元数据传播到客户端的有用方法,因此你可以在使用任何与文档相关的钩子来获取文档对象时获取附加信息。
链接:链接到任何页面
使用 link 类型链接到任何非文档页面(内部或外部)。
type SidebarItemLink = {
  type: 'link';
  label: string;
  href: string;
  className?: string;
  description?: string;
};
示例:
sidebars.js
export default {
  myLinksSidebar: [
    // External link
    {
      type: 'link',
      label: 'Facebook', // The link label
      href: 'https://facebook.com', // The external URL
    },

    // Internal link
    {
      type: 'link',
      label: 'Home', // The link label
      href: '/', // The internal path
    },
  ],
};
HTML:渲染自定义标记
使用 html 类型在项目的 <li> 标记内渲染自定义 HTML。
这对于插入自定义项目(例如分隔符、章节标题、广告和图片)非常有用。
type SidebarItemHtml = {
  type: 'html';
  value: string;
  defaultStyle?: boolean; // Use default menu item styles
  className?: string;
};
示例:
sidebars.js
export default {
  myHtmlSidebar: [
    {
      type: 'html',
      value: '<img src="sponsor.png" alt="Sponsor" />', // The HTML to be rendered
      defaultStyle: true, // Use the default menu item styling
    },
  ],
};
菜单项已包含在 <li> 标记中,因此如果你的自定义项很简单(例如标题),只需提供一个字符串作为值并使用 className 属性对其进行样式设置:
sidebars.js
export default {
  myHtmlSidebar: [
    {
      type: 'html',
      value: 'Core concepts',
      className: 'sidebar-title',
    },
  ],
};
类别:创建层次结构
使用 category 类型创建侧边栏项目的层次结构。
type SidebarItemCategory = {
  type: 'category';
  label: string; // Sidebar label text.
  items: SidebarItem[]; // Array of sidebar items.
  className?: string;
  description?: string;

  // Category options:
  collapsible: boolean; // Set the category to be collapsible
  collapsed: boolean; // Set the category to be initially collapsed or open by default
  link: SidebarItemCategoryLinkDoc | SidebarItemCategoryLinkGeneratedIndex;
};
示例:
sidebars.js
export default {
  docs: [
    {
      type: 'category',
      label: 'Guides',
      collapsible: true,
      collapsed: false,
      items: [
        'creating-pages',
        {
          type: 'category',
          label: 'Docs',
          items: ['introduction', 'sidebar', 'markdown-features', 'versioning'],
        },
      ],
    },
  ],
};
当你不需要自定义时使用 简写语法:
sidebars.js
export default {
  docs: {
    Guides: [
      'creating-pages',
      {
        Docs: ['introduction', 'sidebar', 'markdown-features', 'versioning'],
      },
    ],
  },
};
类别链接
通过类别链接,单击类别可以将你导航到另一个页面。
使用类别链接来介绍文档类别。
自动生成的类别可以使用 _category_.yml 文件来声明链接。
生成的索引页
你可以自动生成一个索引页,显示该类别的所有直接子项。slug 允许你自定义生成页面的路由,默认为 /category/[categoryName]。
sidebars.js
export default {
  docs: [
    {
      type: 'category',
      label: 'Guides',
      link: {
        type: 'generated-index',
        title: 'Docusaurus Guides',
        description: 'Learn about the most important Docusaurus concepts!',
        slug: '/category/docusaurus-guides',
        keywords: ['guides'],
        image: '/img/docusaurus.png',
      },
      items: ['pages', 'docs', 'blog', 'search'],
    },
  ],
};
查看它在 Docusaurus 指南页面 上的实际应用。
使用 generated-index 链接作为获取介绍性文档的快速方法。
文档链接
类别可以链接到现有文档。
sidebars.js
export default {
  docs: [
    {
      type: 'category',
      label: 'Guides',
      link: {type: 'doc', id: 'introduction'},
      items: ['pages', 'docs', 'blog', 'search'],
    },
  ],
};
查看它在 i18n 介绍页面 上的实际应用。
在文档页面中嵌入生成的索引🎉
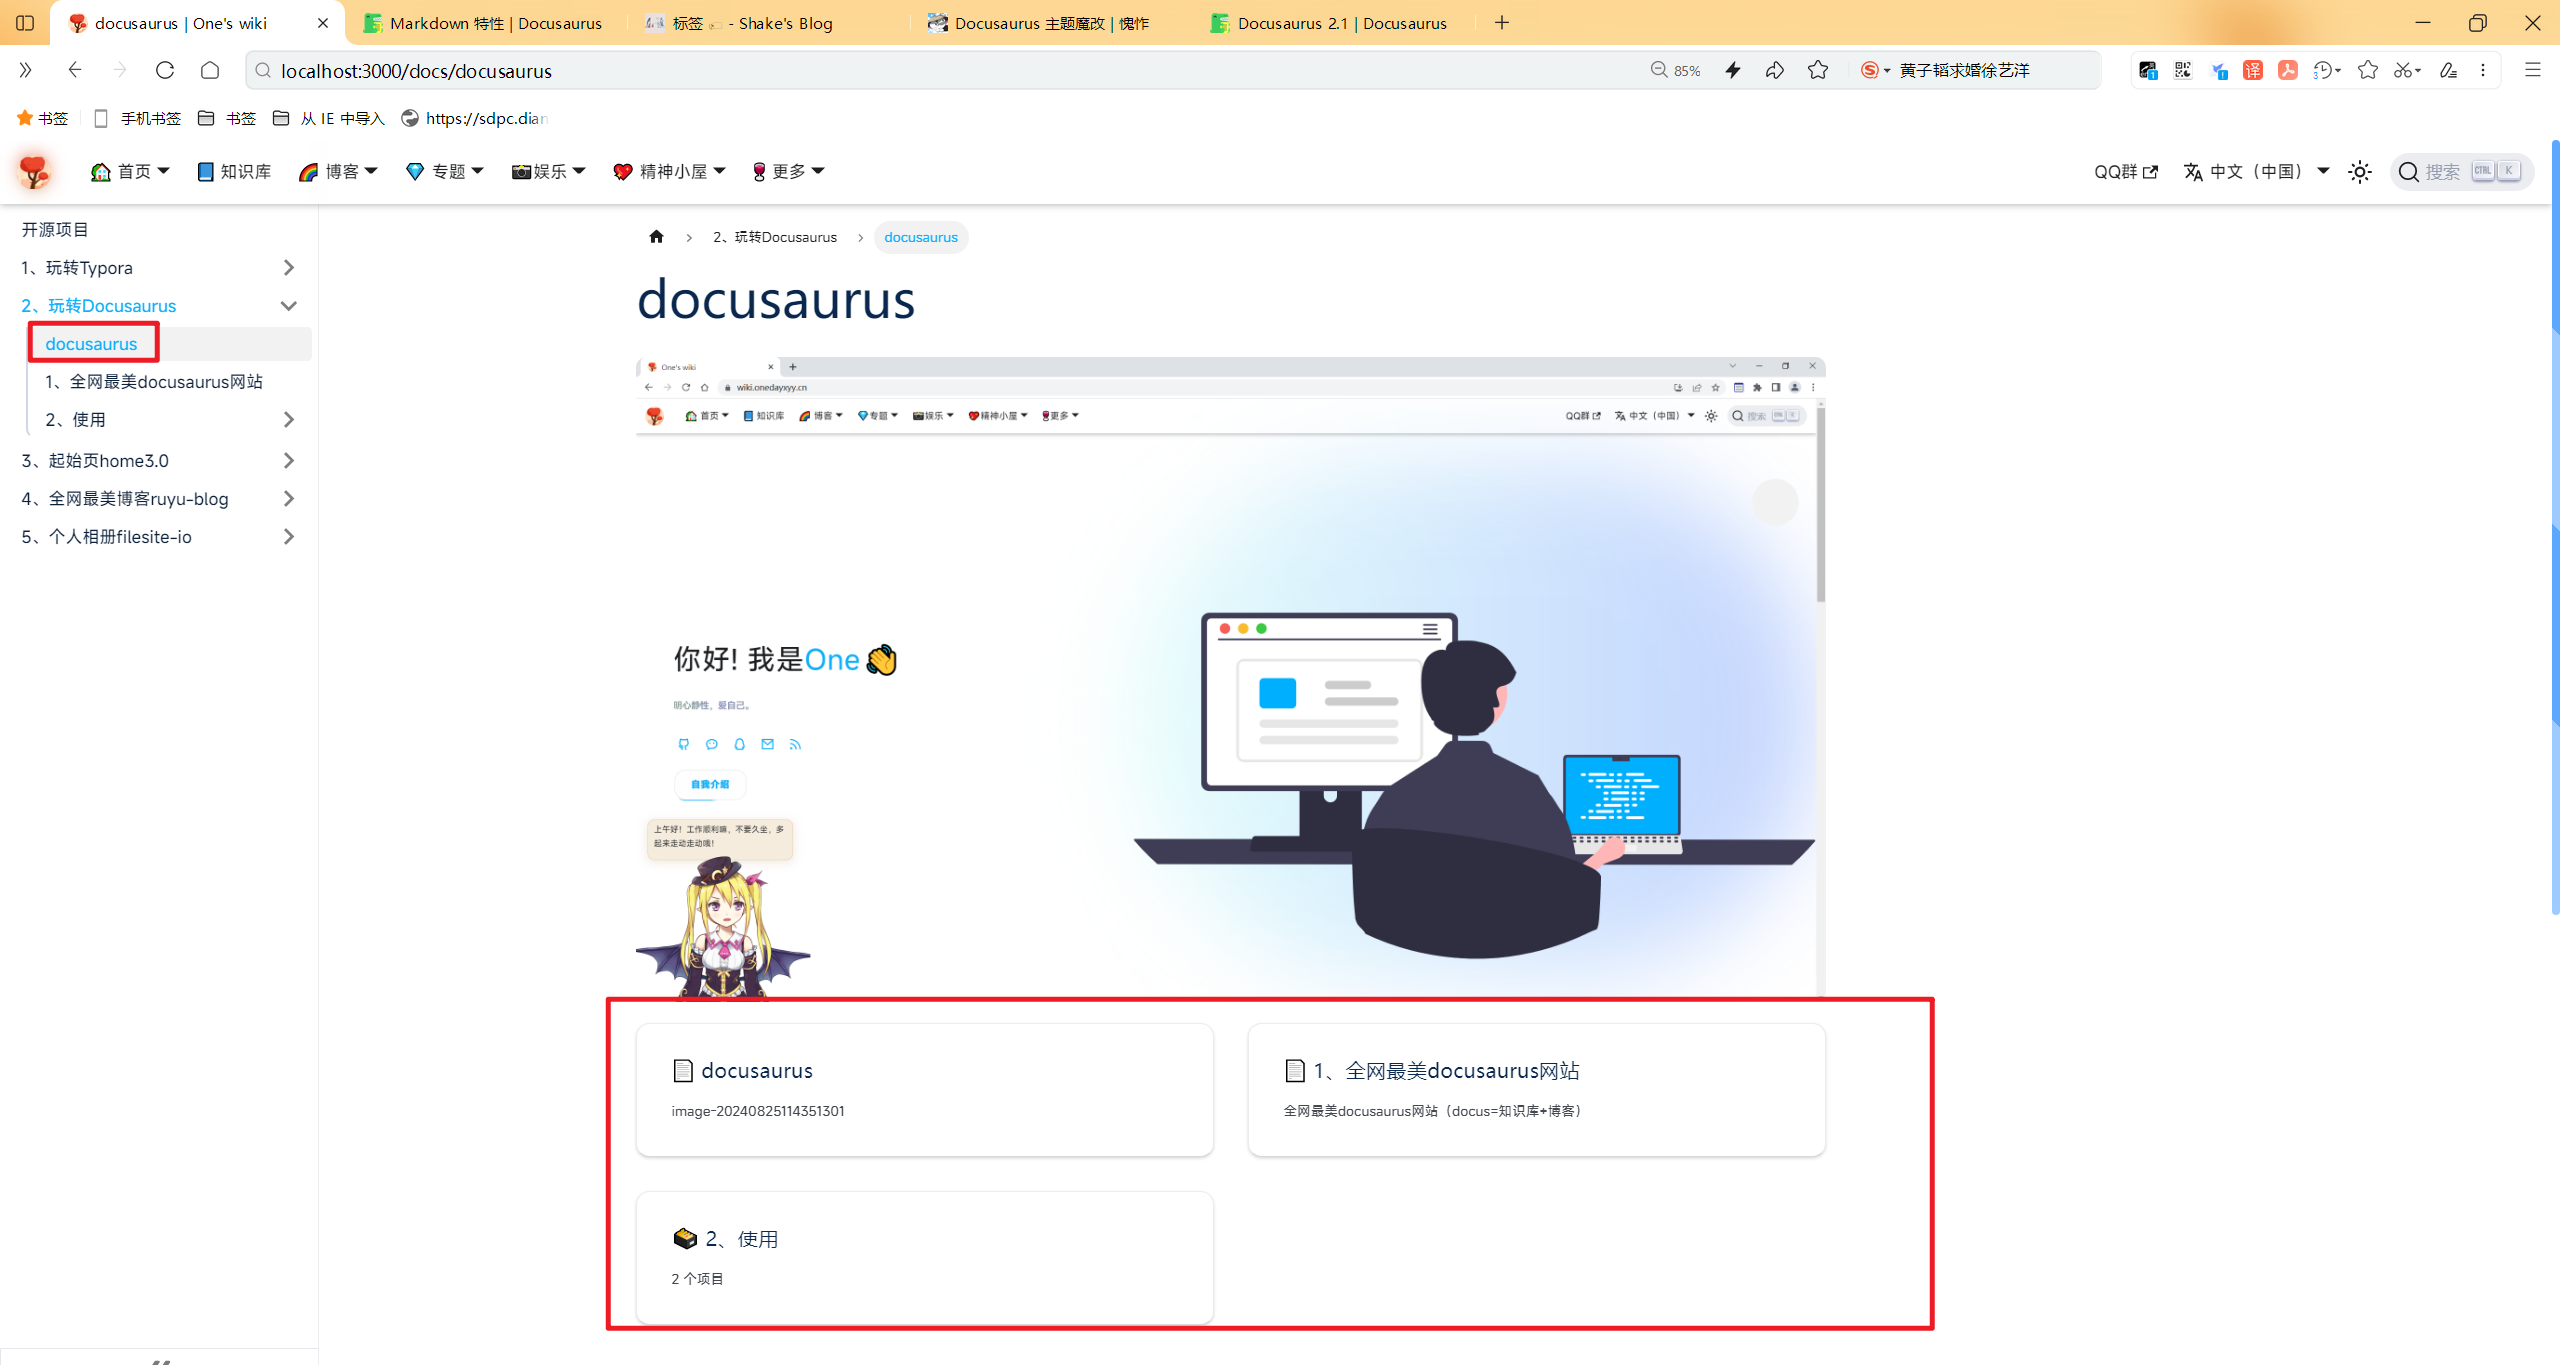
- 配置方法
你也可以使用 DocCardList 组件将生成的卡片列表嵌入到普通文档页面中。它将显示当前文档父类别的所有侧边栏项目。
配置如下2行代码即可:
import DocCardList from '@theme/DocCardList';

<DocCardList/>
- 效果
可折叠类别
我们支持展开/折叠类别的选项。默认情况下,类别是可折叠的,但你可以使用 collapsible: false 禁用折叠。
sidebars.js
export default {
  docs: [
    {
      type: 'category',
      label: 'Guides',
      items: [
        'creating-pages',
        {
          type: 'category',
          collapsible: false,
          label: 'Docs',
          items: ['introduction', 'sidebar', 'markdown-features', 'versioning'],
        },
      ],
    },
  ],
};
要使所有类别默认不可折叠,请将 plugin-content-docs 中的 sidebarCollapsible 选项设置为 false:
docusaurus.config.js
export default {
  presets: [
    [
      '@docusaurus/preset-classic',
      {
        docs: {
          sidebarCollapsible: false,
        },
      },
    ],
  ],
};
sidebars.js 中的选项优先于插件配置,因此当 sidebarCollapsible 全局设置为 false 时,可以使某些类别可折叠。
默认扩展类别
默认情况下,可折叠类别是折叠的。如果你希望它们在第一次渲染时展开,你可以将 collapsed 设置为 false:
sidebars.js
export default {
  docs: {
    Guides: [
      'creating-pages',
      {
        type: 'category',
        label: 'Docs',
        collapsed: false,
        items: ['markdown-features', 'sidebar', 'versioning'],
      },
    ],
  },
};
与 collapsible 类似,你也可以将全局配置 options.sidebarCollapsed 设置为 false。sidebars.js 中的各个 collapsed 选项仍优先于此配置。
docusaurus.config.js
export default {
  presets: [
    [
      '@docusaurus/preset-classic',
      {
        docs: {
          sidebarCollapsed: false,
        },
      },
    ],
  ],
};
当类别具有 collapsed: true 但有 collapsible: false(通过 sidebars.js 或通过插件配置)时,后者优先,类别仍渲染为展开状态。
使用简写
你可以使用速记语法更简洁地表达典型的侧边栏项目,而无需进行太多自定义。这有两个部分:文档速记 和 类别简写。
文档速记
类型为 doc 的项目可以只是表示其 ID 的字符串:
- Longhand
- Shorthand
sidebars.js
export default {
  sidebar: [
    {
      type: 'doc',
      id: 'myDoc',
    },
  ],
};
因此可以将上面的示例简化为:
sidebars.js
export default {
  mySidebar: [
    {
      type: 'category',
      label: 'Getting Started',
      items: [
        'doc1',
      ],
    },
    {
      type: 'category',
      label: 'Docusaurus',
      items: [
        'doc2',
        'doc3',
      ],
    },
    {
      type: 'link',
      label: 'Learn more',
      href: 'https://example.com',
    },
  ],
};
类别简写
类别项可以用一个对象来表示,该对象的键是其标签,值是子项数组。
- Longhand
- Shorthand
sidebars.js
export default {
  sidebar: [
    {
      type: 'category',
      label: 'Getting started',
      items: ['doc1', 'doc2'],
    },
  ],
};
这使我们能够将该示例简化为:
sidebars.js
export default {
  mySidebar: [
    {
      'Getting started': ['doc1'],
    },
    {
      Docusaurus: ['doc2', 'doc3'],
    },
    {
      type: 'link',
      label: 'Learn more',
      href: 'https://example.com',
    },
  ],
};
此转换后的每个速记对象将只包含一个条目。现在考虑下面进一步简化的示例:
sidebars.js
export default {
  mySidebar: [
    {
      'Getting started': ['doc1'],
      Docusaurus: ['doc2', 'doc3'],
    },
    {
      type: 'link',
      label: 'Learn more',
      href: 'https://example.com',
    },
  ],
};
请注意两个连续的类别简写如何被压缩为具有两个条目的一个对象。此语法生成侧边栏切片:你不应该将该对象视为一个散装项目 - 该对象已展开,每个条目都成为一个单独的项目,并且它们与其余项目(在本例中为 "了解更多" 链接)拼接在一起以形成最终的侧边栏级别 。在讨论 自动生成的侧边栏 时,侧边栏切片也很重要。
只要你将一组项目简化为一个类别简写,你也可以省略该封闭数组。
- Before
- After
sidebars.js
export default {
  sidebar: [
    {
      'Getting started': ['doc1'],
      Docusaurus: [
        {
          'Basic guides': ['doc2', 'doc3'],
          'Advanced guides': ['doc4', 'doc5'],
        },
      ],
    },
  ],
};
自动生成
Docusaurus 可以根据你的文件系统结构自动创建侧边栏:每个文件夹创建一个侧边栏类别,每个文件创建一个文档链接。
type SidebarItemAutogenerated = {
  type: 'autogenerated';
  dirName: string; // Source folder to generate the sidebar slice from (relative to docs)
};
Docusaurus 可以从你的文档文件夹生成完整的侧边栏:
sidebars.js
export default {
  myAutogeneratedSidebar: [
    {
      type: 'autogenerated',
      dirName: '.', // '.' means the current docs folder
    },
  ],
};
Docusaurus 将 autogenerated 项目转换为侧边栏切片(也在 类别简写 中讨论):类型为 doc 或 category 的项目列表,因此你可以在一个侧边栏级别中拼接多个目录中的多个 autogenerated 项目,将它们与常规侧边栏项目交错。
A real-world example
考虑这个文件结构:
docs
├── api
│   ├── product1-api
│   │   └── api.md
│   └── product2-api
│       ├── basic-api.md
│       └── pro-api.md
├── intro.md
└── tutorials
    ├── advanced
    │   ├── advanced1.md
    │   ├── advanced2.md
    │   └── read-more
    │       ├── resource1.md
    │       └── resource2.md
    ├── easy
    │   ├── easy1.md
    │   └── easy2.md
    ├── tutorial-end.md
    ├── tutorial-intro.md
    └── tutorial-medium.md
并假设每个文档的 ID 只是其文件名。如果你像这样定义自动生成的侧边栏:
sidebars.js
export default {
  mySidebar: [
    'intro',
    {
      type: 'category',
      label: 'Tutorials',
      items: [
        'tutorial-intro',
        {
          type: 'autogenerated',
          dirName: 'tutorials/easy', // Generate sidebar slice from docs/tutorials/easy
        },
        'tutorial-medium',
        {
          type: 'autogenerated',
          dirName: 'tutorials/advanced', // Generate sidebar slice from docs/tutorials/advanced
        },
        'tutorial-end',
      ],
    },
    {
      type: 'autogenerated',
      dirName: 'api', // Generate sidebar slice from docs/api
    },
    {
      type: 'category',
      label: 'Community',
      items: ['team', 'chat'],
    },
  ],
};
它将被解决为:
sidebars.js
export default {
  mySidebar: [
    'intro',
    {
      type: 'category',
      label: 'Tutorials',
      items: [
        'tutorial-intro',
        // Two files in docs/tutorials/easy
        'easy1',
        'easy2',
        'tutorial-medium',
        // Two files and a folder in docs/tutorials/advanced
        'advanced1',
        'advanced2',
        {
          type: 'category',
          label: 'read-more',
          items: ['resource1', 'resource2'],
        },
        'tutorial-end',
      ],
    },
    // Two folders in docs/api
    {
      type: 'category',
      label: 'product1-api',
      items: ['api'],
    },
    {
      type: 'category',
      label: 'product2-api',
      items: ['basic-api', 'pro-api'],
    },
    {
      type: 'category',
      label: 'Community',
      items: ['team', 'chat'],
    },
  ],
};
请注意自动生成源目录本身如何不会成为类别:只有它们包含��的项目才可以。这就是我们所说的 "侧边栏切片"。
类别索引约定
Docusaurus 可以自动将类别链接到其索引文档。
类别索引文档是遵循以下文件名约定之一的文档:
- 命名为
index(不区分大小写):docs/Guides/index.md - 命名为
README(不区分大小写):docs/Guides/README.mdx - 与父文件夹同名:
docs/Guides/Guides.md
这相当于使用带有 文档链接 的类别:
sidebars.js
export default {
  docs: [
    {
      type: 'category',
      label: 'Guides',
      link: {type: 'doc', id: 'Guides/index'},
      items: [],
    },
  ],
};
将介绍性文档命名为 README.md 可以使其在使用 GitHub 界面浏览文件夹时显示,而使用 index.md 可以使行为更符合 HTML 文件的服务方式。
如果一个文件夹只有一个索引页,它将变成一个链接而不是类别。这对于资源配置很有用:
some-doc
├── index.md
├── img1.png
└── img2.png
自动生成的侧边栏元数据
对于手写侧边栏定义,你可以通过 sidebars.js 向侧边栏项目提供元数据;对于自动生成的,Docusaurus 将从项目各自的文件中读取它们。此外,你可能需要调整每个项目的相对位置,因为默认情况下,侧边栏切片中的项目将按字母顺序生成(使用文件和文件夹名称)。
文档项元数据
label、className 和 customProps 属性在前面分别声明为 sidebar_label、sidebar_class_name 和 sidebar_custom_props。可以通过 sidebar_position 前面的内容以相同的方式指定位置。
docs/tutorials/tutorial-easy.md
---
sidebar_position: 2
sidebar_label: Easy
sidebar_class_name: green
---

# Easy Tutorial

This is the easy tutorial!
类别项目元数据
在相应的文件夹中添加 _category_.json 或 _category_.yml 文件。你可以指定任何类别元数据以及 position 元数据。label、className、position 和 customProps 将默认为类别链接文档的相应值(如果有)。
- JSON
- YAML
docs/tutorials/category.json
{
  "position": 2.5,
  "label": "Tutorial",
  "collapsible": true,
  "collapsed": false,
  "className": "red",
  "link": {
    "type": "generated-index",
    "title": "Tutorial overview"
  },
  "customProps": {
    "description": "This description can be used in the swizzled DocCard"
  }
}
docs/tutorials/category.yml
position: 2.5 # float position is supported
label: 'Tutorial'
collapsible: true # make the category collapsible
collapsed: false # keep the category open by default
className: red
link:
  type: generated-index
  title: Tutorial overview
customProps:
  description: This description can be used in the swizzled DocCard
如果明确指定 link,Docusaurus 将不会应用任何 默认约定。
文档链接可以相对指定,例如 如果类别是使用 guides 目录生成的,则 "link": {"type": "doc", "id": "intro"} 将解析为 ID guides/intro,只有在具有前一个 ID 的文档不存在时才会回退到 intro。
你还可以使用 link: null 选择退出默认约定,并且不生成任何类别索引页。
位置元数据仅在侧边栏切片中使用:Docusaurus 不会重新排序侧边栏的其他项目。
使用数字前缀
顺序自动生成的侧边栏的一个简单方法是为文档和文件夹添加数字前缀,这也使它们在按文件名排序时以相同的顺序出现在文件系统中:
docs
├── 01-Intro.md
├── 02-Tutorial Easy
│   ├── 01-First Part.md
│   ├── 02-Second Part.md
│   └── 03-End.md
├── 03-Tutorial Advanced
│   ├── 01-First Part.md
│   ├── 02-Second Part.md
│   ├── 03-Third Part.md
│   └── 04-End.md
└── 04-End.md
为了更容易采用,Docusaurus 支持多种数字前缀模式。
默认情况下,Docusaurus 将从文档 ID、标题、标签和 URL 路径中删除数字前缀。
更喜欢使用 附加元数据。
更新号码前缀可能很烦人,因为它可能需要更新多个现有的 Markdown 链接:
docs/02-Tutorial Easy/01-First Part.md
- Check the [Tutorial End](../04-End.mdx);
+ Check the [Tutorial End](../05-End.mdx);
自定义侧边栏项目生成器
你可以在文档插件(或预设)配置中提供自定义 sidebarItemsGenerator 函数:
docusaurus.config.js
export default {
  plugins: [
    [
      '@docusaurus/plugin-content-docs',
      {
        async sidebarItemsGenerator({
          defaultSidebarItemsGenerator,
          numberPrefixParser,
          item,
          version,
          docs,
          categoriesMetadata,
          isCategoryIndex,
        }) {
          // Example: return an hardcoded list of static sidebar items
          return [
            {type: 'doc', id: 'doc1'},
            {type: 'doc', id: 'doc2'},
          ];
        },
      },
    ],
  ],
};
重用并增强默认生成器,而不是从头开始编写生成器:我们提供的默认生成器 的长度为 250 行。
根据你的用例添加、更新、过滤、重新排序侧边栏项目:
docusaurus.config.js
// Reverse the sidebar items ordering (including nested category items)
function reverseSidebarItems(items) {
  // Reverse items in categories
  const result = items.map((item) => {
    if (item.type === 'category') {
      return {...item, items: reverseSidebarItems(item.items)};
    }
    return item;
  });
  // Reverse items at current level
  result.reverse();
  return result;
}

export default {
  plugins: [
    [
      '@docusaurus/plugin-content-docs',
      {
        async sidebarItemsGenerator({defaultSidebarItemsGenerator, ...args}) {
          const sidebarItems = await defaultSidebarItemsGenerator(args);
          return reverseSidebarItems(sidebarItems);
        },
      },
    ],
  ],
};
使用多个侧边栏
你可以为要分组在一起的每组 Markdown 文件创建侧边栏。
考虑这个例子:
sidebars.js
export default {
  tutorialSidebar: {
    'Category A': ['doc1', 'doc2'],
  },
  apiSidebar: ['doc3', 'doc4'],
};
当浏览 doc1 或 doc2 时,会显示 tutorialSidebar;当浏览 doc3 或 doc4 时,会显示 apiSidebar。
了解侧边栏关联
按照上面的示例,如果 commonDoc 包含在两个侧边栏中:
sidebars.js
export default {
  tutorialSidebar: {
    'Category A': ['doc1', 'doc2', 'commonDoc'],
  },
  apiSidebar: ['doc3', 'doc4', 'commonDoc'],
};
Docusaurus 如何知道浏览 commonDoc 时显示哪个侧边栏?回答:它不会,并且我们不保证它会选择哪个侧边栏。
当你将文档 Y 添加到侧边栏 X 时,它会创建双向绑定:侧边栏 X 包含文档 Y 的链接,当浏览文档 Y 时,将显示侧边栏 X。但有时,我们想要打破隐式绑定:
- 如何在侧边栏 X 中生成文档 Y 的链接而不使侧边栏 X 显示在 Y 上?例如,当我将 doc Y 包含在多个侧边栏中(如上例所示)时,我想明确告诉 Docusaurus 显示一个侧边栏?
- 如何在浏览文档 Y 时显示侧边栏 X,但侧边栏 X 不应包含指向 Y 的链接?例��如,当 Y 是 "文档主页" 并且侧边栏纯粹用于导航时?
Front Matter 选项 displayed_sidebar 将强制设置侧边栏关联。对于同一个示例,你仍然可以使用 doc 简写,无需任何特殊配置:
sidebars.js
export default {
  tutorialSidebar: {
    'Category A': ['doc1', 'doc2'],
  },
  apiSidebar: ['doc3', 'doc4'],
};
然后添加一个前题:
commonDoc.md
---
displayed_sidebar: apiSidebar
---
它明确告诉 Docusaurus 在浏览 commonDoc 时显示 apiSidebar。使用相同的方法,你可以使不包含文档 Y 的侧边栏 X 出现在文档 Y 上:
home.md
---
displayed_sidebar: tutorialSidebar
---
即使 tutorialSidebar 不包含 home 的链接,在查看 home 时仍然会显示它。
如果设置 displayed_sidebar: null,则此页面上将不会显示任何侧边栏,并且随后也不会显示分页。
生成分页
Docusaurus 使用侧边栏在每个文档页面的底部生成 "next" 和 "previous" 分页链接。它严格使用显示的侧边栏:如果没有关联侧边栏,它也不会生成分页。但是,不保证链接为 "next" 和 "previous" 的文档显示相同的侧边栏:它们包含在此侧栏中,但在其前面的内容中,它们可能有不同的 displayed_sidebar。
如果通过设置 displayed_sidebar front Matter 显示侧边栏,并且该侧边栏不包含文档本身,则不显示分页。
你可以使用前页 pagination_next 和 pagination_prev 自定义分页。考虑这个侧边栏:
sidebars.js
export default {
  tutorial: [
    'introduction',
    {
      installation: ['windows', 'linux', 'macos'],
    },
    'getting-started',
  ],
};
"windows" 上的分页下一个链接指向 "linux",但这没有意义:你希望读者在安装后继续进行 "入门"。在这种情况下,你可以手动设置分页:
windows.md
---
pagination_next: getting-started
---

# Installation on Windows
你还可以禁用显示带有 pagination_next: null 或 pagination_prev: null 的分页链接。
默认情况下,分页标签是侧边栏标签。你可以使用前面的内容 pagination_label 来自定义该文档在分页中的显示方式。
ref 项目
ref 类型在各方面都与 doc 型 相同,只是它不参与生成导航元数据。它仅将自身注册为链接。当 生成分页 和 显示侧边栏 时,ref 项被完全忽略。
当你希望从多个侧边栏链接到同一文档时,它特别有用。该文档仅属于一个侧边栏(其注册为 type: 'doc' 或来自自动生成的目录的侧边栏),但其链接将出现在其注册的所有侧边栏中。
考虑这个例子:
sidebars.js
export default {
  tutorialSidebar: {
    'Category A': [
      'doc1',
      'doc2',
      {type: 'ref', id: 'commonDoc'},
      'doc5',
    ],
  },
  apiSidebar: ['doc3', 'doc4', 'commonDoc'],
};
你可以将 ref 类型视为相当于执行以下操作:
- 将
displayed_sidebar: tutorialSidebar设置为commonDoc(侧边栏关联中忽略ref) - 设置
pagination_next: doc5为doc2,设置pagination_prev: doc2为doc5(分页生成时忽略ref)