6、博客
该文档创建于2024-09-04,最后�更新于2024-09-03。
博客
目录
[toc]
正文
博客功能使你能够立即部署功能齐全的博客。
Docusaurus 中的功能如博客、文档或页面都是由插件提供,而博客功能由插件 plugin-content-blog 提供支持。
Docusaurus 博客功能由博客插件提供支持。
检查 博客插件 API 参考文档 以获得详尽的选项列表。
初始设置
一般安装 Docusaurus 应用默认自带博客插件的,无需额外安装。
要设置站点的博客,请首先创建 blog 目录。
然后,在 docusaurus.config.js 内添加指向你博客的项目链接,直接通过 https://域名/blog 访问博客首页列表页面。
docusaurus.config.js
export default {
  themeConfig: {
    // ...
    navbar: {
      items: [
        // ...
        {to: 'blog', label: 'Blog', position: 'left'}, // or position: 'right'
      ],
    },
  },
};
添加帖子
要在博客中发布,请在博客目录中创建一个 Markdown 文件。
例如,在 website/blog/2019-09-05-hello-docusaurus.md 处创建一个文件:
website/blog/2019-09-05-hello-docusaurus.md
---
title: Welcome Docusaurus
description: This is my first post on Docusaurus.
slug: welcome-docusaurus-v2
authors:
  - name: Joel Marcey
    title: Co-creator of Docusaurus 1
    url: https://github.com/JoelMarcey
    image_url: https://github.com/JoelMarcey.png
    socials:
      x: joelmarcey
      github: JoelMarcey
  - name: Sébastien Lorber
    title: Docusaurus maintainer
    url: https://sebastienlorber.com
    image_url: https://github.com/slorber.png
    socials:
      x: sebastienlorber
      github: slorber
tags: [hello, docusaurus-v2]
image: https://i.imgur.com/mErPwqL.png
hide_table_of_contents: false
---

Welcome to this blog. This blog is created with [**Docusaurus 2**](https://docusaurus.nodejs.cn/).

<!-- truncate -->

This is my first post on Docusaurus 2.

A whole bunch of exploration to follow.
头条新闻 对于向你的博客文章添加更多元数据(例如作者信息)非常有用,但 Docusaurus 将能够在没有前面内容的情况下推断出所有必要的元数据。对于所有可能的字段,请参阅 API 文档。
<!-- truncate --> 这个标签的作用是在正文中截取一部分文字作为列表页的文章简介显示。没有该标签,列表页面会显示全文。
文章的前置部分参数更多的详见 API 文档
这里讲解几个有代表性的
date:文章的创建时间,默认从文件名或者目录名中获取,比如:2023-10-09-blog-post.md,2023-10-09-blog-post/index.md,2023/10/09/blog-post.md。如果文章前置部分没有定义date参数,文件和目录名中也不包含日期,则从该文件的创建时间推断出。draft:该参数一旦设置为true,则文章只会在开发模式中显示,也就是常见的草稿状态。unlisted:设置该参数为true时,在开发环境和发布环境的列表页中都无法显示该文章,区别于draft参数,它可以通过文章链接访问,同时在sitemaps文件中 也不包含该文章。hide_table_of_contents:隐藏右侧的标题目录。
博客列表
博客的索引页(默认位于 /blog)是博客列表页,集中显示所有博客文章。
在博客文章中使用 <!--truncate--> 标记来表示查看所有已发布的博客文章时将显示为摘要的内容。<!--truncate--> 以上的任何内容都将成为摘要的一部分。请注意,截断标记上方的部分必须是独立的可渲染 Markdown。例如:
website/blog/my-post.md
---
title: Markdown blog truncation example
---

All these will be part of the blog post summary.

<!-- truncate -->

But anything from here on down will not be.
对于使用 .mdx 扩展名的文件,请使用 MDX 注释 {/* truncate */} 代替:
website/blog/my-post.mdx
---
title: MDX blog truncation Example
---

All these will be part of the blog post summary.

{/* truncate */}

But anything from here on down will not be.
默认情况下,每个博客列表页面上显示 10 篇文章,但你可以使用插件配置中的 postsPerPage 选项控制分页。如果设置 postsPerPage: 'ALL',分页将被禁用,所有帖子将显示在第一页。你还可以向博客列表页面添加元描述以获得更好的搜索引擎优化:
docusaurus.config.js
export default {
  // ...
  presets: [
    [
      '@docusaurus/preset-classic',
      {
        blog: {
          blogTitle: 'Docusaurus blog!',
          blogDescription: 'A Docusaurus powered blog!',
          postsPerPage: 'ALL',
        },
      },
    ],
  ],
};
博客侧边栏
博客侧边栏显示最近的博客文章。默认显示的项目数为 5,但你可以使用插件配置中的 blogSidebarCount 选项进行自定义。通过设置 blogSidebarCount: 0,侧边栏将完全禁用,容器也会被删除。这将增加主容器的宽度。特别地,如果你设置了 blogSidebarCount: 'ALL',则将显示所有帖子。
你还可以使用 blogSidebarTitle 选项更改侧边栏标题文本。例如,如果你设置了 blogSidebarCount: 'ALL',而不是默认的 "最近的帖子",你可能宁愿将其设置为 "所有帖子":
docusaurus.config.js
export default {
  presets: [
    [
      '@docusaurus/preset-classic',
      {
        blog: {
          blogSidebarTitle: 'All posts',
          blogSidebarCount: 'ALL',
        },
      },
    ],
  ],
};
博客发布日期
Docusaurus 将从许多模式(例如 YYYY-MM-DD-my-blog-post-title.md 或 YYYY/MM/DD/my-blog-post-title.md)中提取 YYYY-MM-DD 日期。这使你能够轻松地按年、按月对博客文章进行分组,或使用扁平结构。
折叠代码:
Supported date extraction patterns
| 图案 | 示例 |
|---|---|
| 单文件 | 2021-05-28-my-blog-post-title.md |
| MDX 文件 | 2021-05-28-my-blog-post-title.mdx |
单文件夹+index.md | 2021-05-28-my-blog-post-title/index.md |
| 按日期命名的文件夹 | 2021-05-28/my-blog-post-title.md |
| 按日期嵌套文件夹 | 2021/05/28/my-blog-post-title.md |
| 按日期部分嵌套文件夹 | 2021/05-28-my-blog-post-title.md |
嵌套文件夹 + index.md | 2021/05/28/my-blog-post-title/index.md |
| 日期位于路径中间 | category/2021/05-28-my-blog-post-title.md |
Docusaurus 可以使用上述任何命名模式从帖子中提取日期。建议选择一种模式并将其应用于所有帖子以避免混淆。
使用文件夹可以方便地将博客文章图片与 Markdown 文件放在一起。
此命名约定是可选的,你也可以提供日期作为前面的内容。由于 Front Matter 遵循支持日期时间表示法的 YAML 语法,因此如果你需要更细粒度的发布日期,可以使用 Front Matter。例如,如果你在同一天发布了多个帖子,你可以根据一天中的时间对它们进行排序:
earlier-post.md
---
date: 2021-09-13T10:00
---
later-post.md
---
date: 2021-09-13T18:00
---
博客文章作者
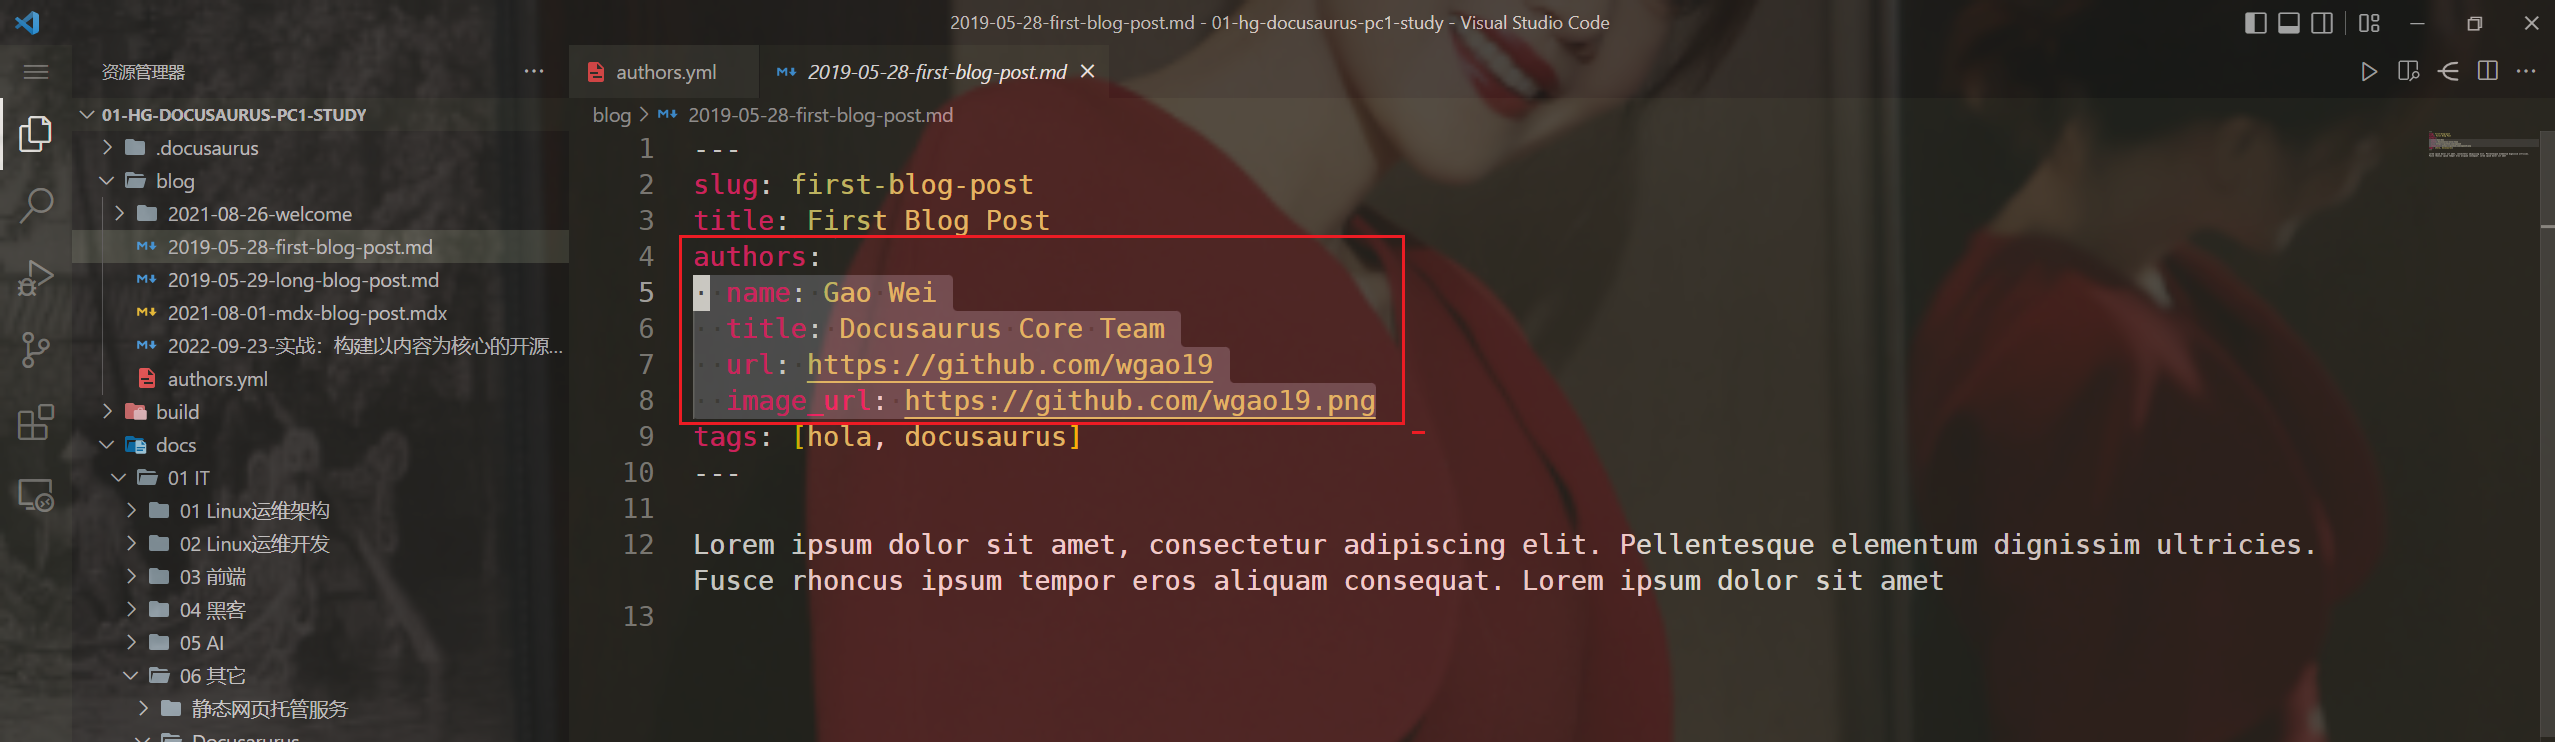
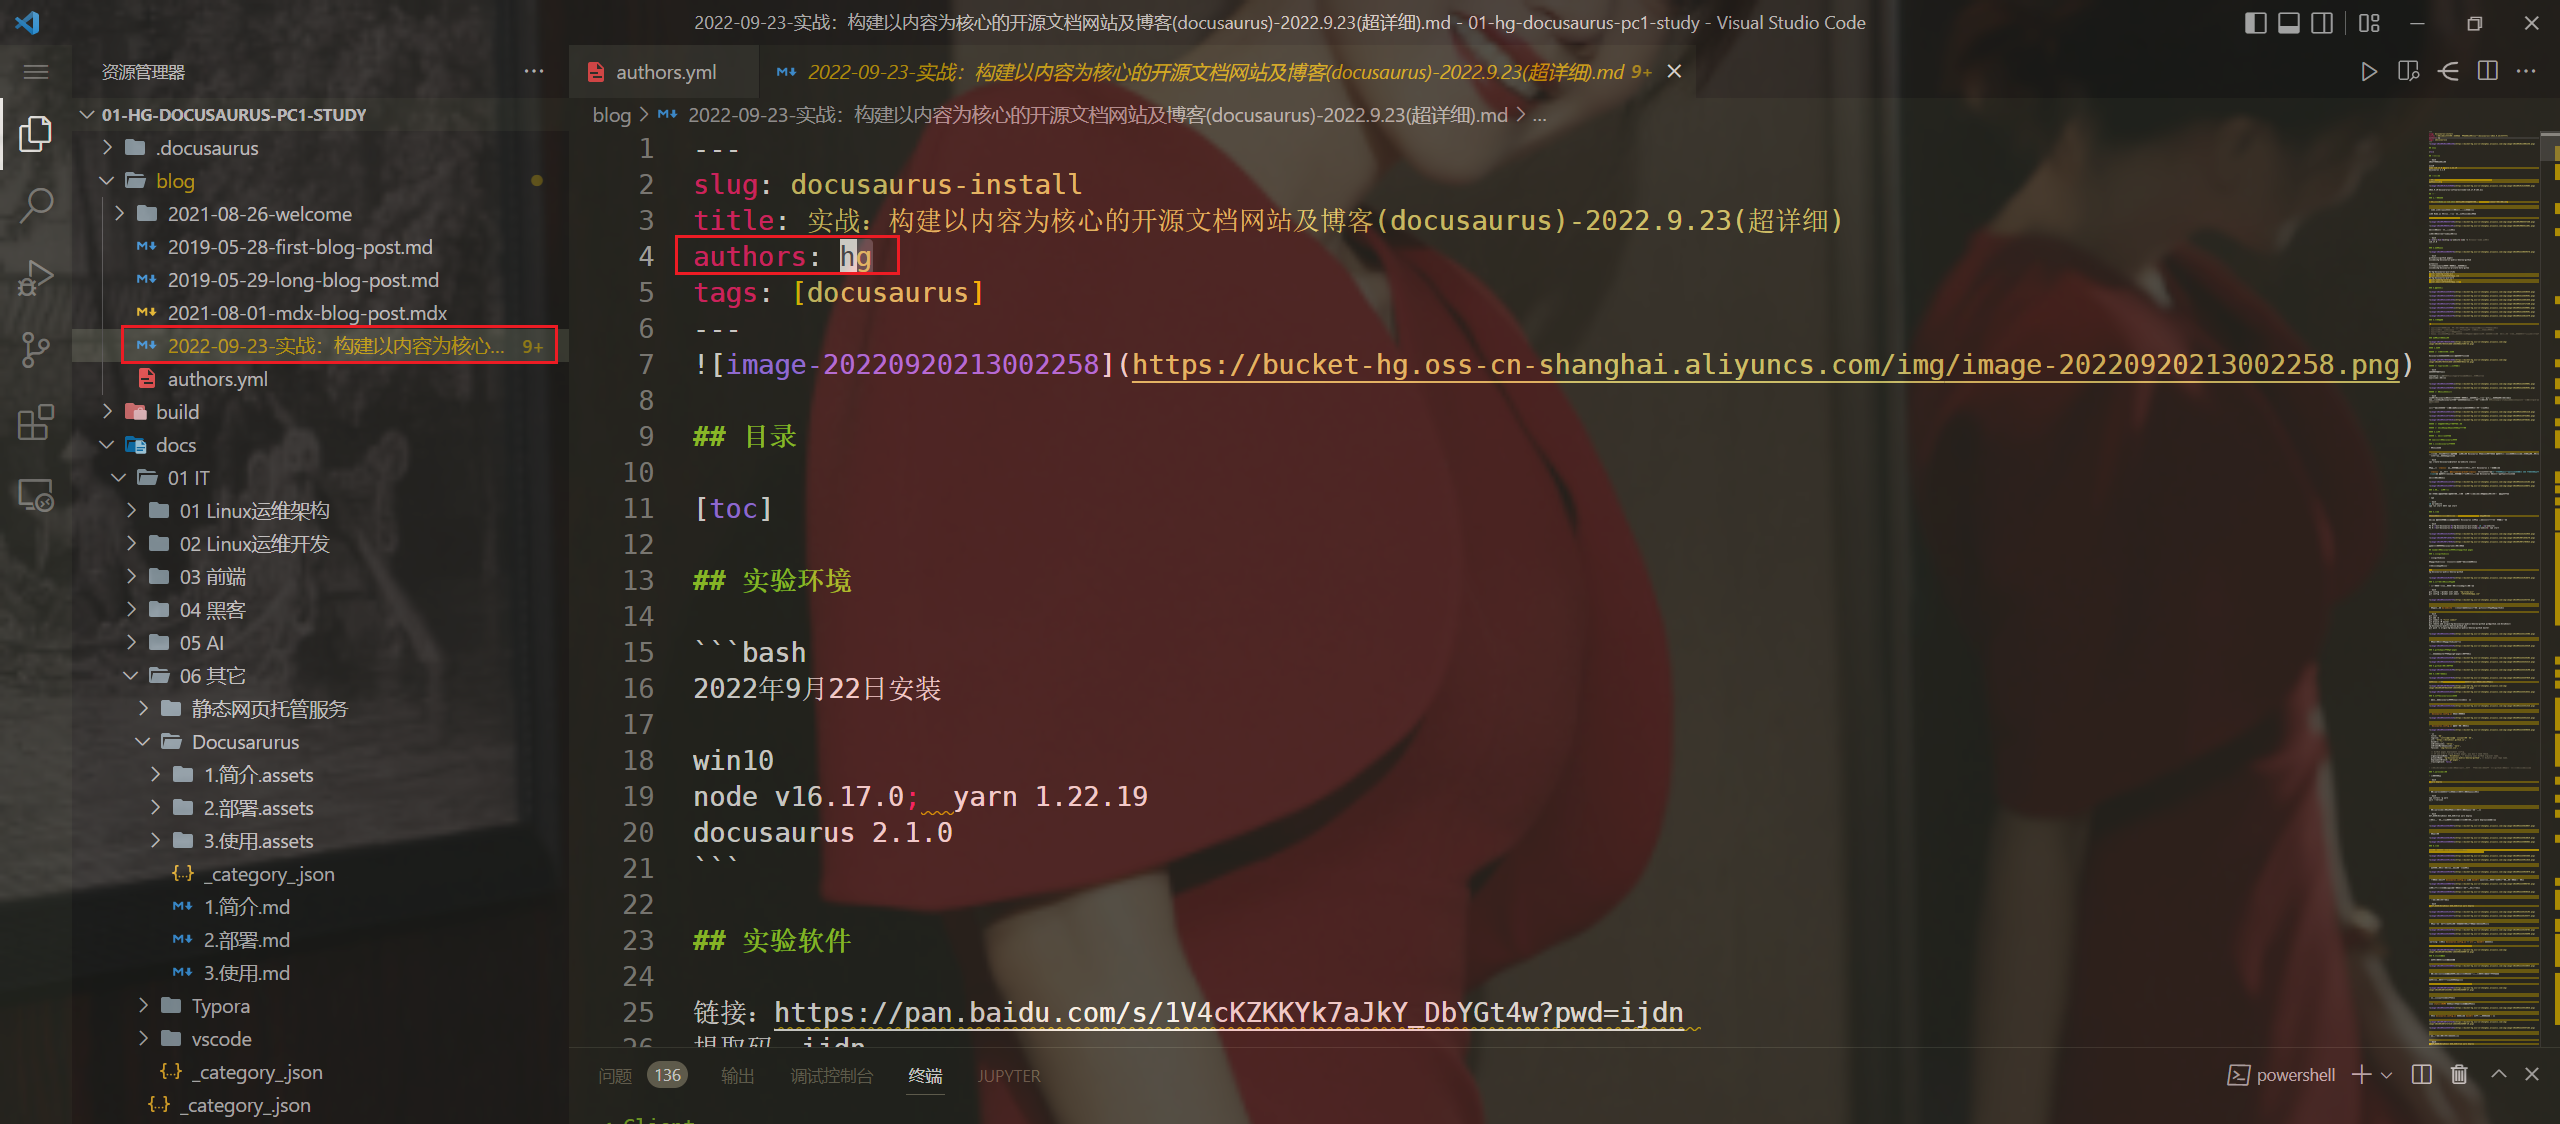
使用 authors Front Matter 字段声明博客文章作者。作者应该至少有 name 或 image_url。Docusaurus 使用 url、email 和 title 等信息,但允许任何其他信息。
可以将博客作者添加到authors.yml

🍀 方法1:写在文章yaml里

🍀 方法2:写在authors.yml里

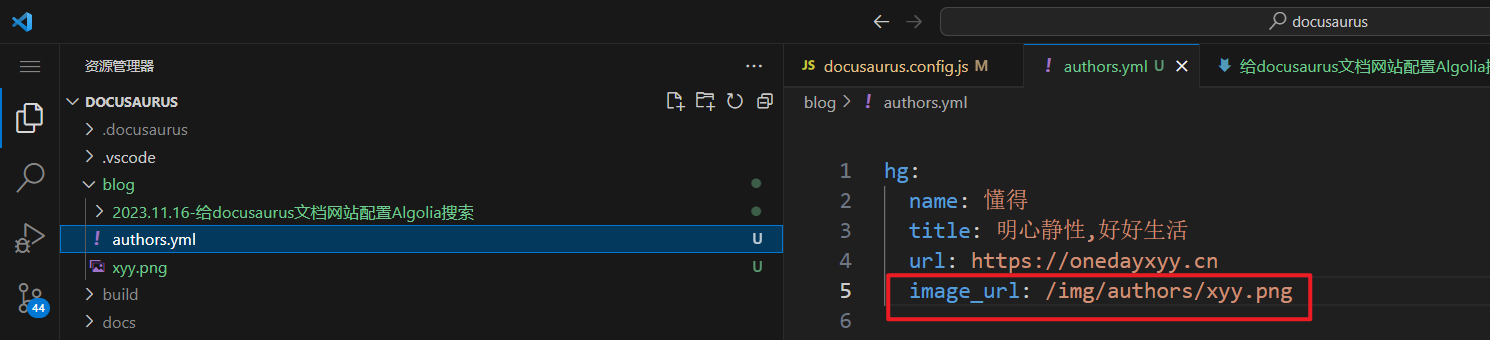
image_url参数如何设置为本地图片?
==(已解决)==
2023年11月17日
- 环境
docusaurus 3.0.0
node v18.18.0
npm 9.1.2
win10
- 需求
docusaurus博客功能里,authors.yml的image_url参数如何设置为本地图片?
- gpt问答
docusaurus博客功能里,authors.yml的image_url参数如何设置为本地图片?
在 Docusaurus 的博客功能中,authors.yml 文件通常用于定义博客作者的信息,包括他们的头像等。如果你想使用本地图片作为头像,可以按照以下步骤进行设置:
-
将本地图片放入项目目录: 将你的作者头像图片复制或移动到 Docusaurus 项目的某个目录,比如
static/img/authors。/my-docusaurus-project
|-- static
|-- img
|-- authors
|-- your-local-image.jpg -
编辑 authors.yml 文件: 在
authors.yml文件中,为相应的作者添加image_url参数,并提供相对于static目录的路径。yaml- username: john_doe
name: John Doe
title: Software Engineer
image_url: /img/authors/your-local-image.jpg注意,
image_url的路径是相对于static目录的路径。 -
重新构建项目: 在你的 Docusaurus 项目根目录下运行以下命令,以确保更新的配置生效:
bashnpm run build或者,如果你正在使用
yarn:bashyarn build
这样,Docusaurus 将使用你提供的本地图片路径作为博客作者的头像。确保图片路径是正确的,并且重新构建项目以查看更改。
- 以上方法经测试,可成功解决
内联作者
博客文章作者可以直接在前面的内容中声明:
- Single author
- Multiple authors
my-blog-post.md
---
authors:
  name: Joel Marcey
  title: Co-creator of Docusaurus 1
  url: https://github.com/JoelMarcey
  image_url: https://github.com/JoelMarcey.png
  email: jimarcey@gmail.com
  socials:
    x: joelmarcey
    github: JoelMarcey
---
my-blog-post.md
---
authors:
  - name: Joel Marcey
    title: Co-creator of Docusaurus 1
    url: https://github.com/JoelMarcey
    image_url: https://github.com/JoelMarcey.png
    email: jimarcey@gmail.com
    socials:
      x: joelmarcey
      github: JoelMarcey
  - name: Sébastien Lorber
    title: Docusaurus maintainer
    url: https://sebastienlorber.com
    image_url: https://github.com/slorber.png
    socials:
      x: sebastienlorber
      github: slorber
---
此选项最适合初学者或临时、不定期的作者。
更喜欢使用 authors 前面的内容,但旧版 author_* 前面的内容仍然受支持:
全球作者
对于普通博客文章作者来说,维护每篇博客文章中内嵌的作者信息可能很乏味。
可以在配置文件中全局声明这些作者:
website/blog/authors.yml
jmarcey:
  name: Joel Marcey
  title: Co-creator of Docusaurus 1
  url: https://github.com/JoelMarcey
  image_url: https://github.com/JoelMarcey.png
  email: jimarcey@gmail.com
  socials:
    x: joelmarcey
    github: JoelMarcey

slorber:
  name: Sébastien Lorber
  title: Docusaurus maintainer
  url: https://sebastienlorber.com
  image_url: https://github.com/slorber.png
  socials:
    x: sebastienlorber
    github: slorber
使用 authorsMapPath 插件选项来配置路径。还支持 JSON。
在博客文章的前面,你可以引用全局配置文件中声明的作者:
- Single author
- Multiple authors
my-blog-post.md
---
authors: jmarcey
---
my-blog-post.md
---
authors: [jmarcey, slorber]
---
authors 系统非常灵活,可以适应更高级的用例:
Mix inline authors and global authors
大多数时候你可以使用全局作者,并且仍然使用内联作者:
my-blog-post.md
---
authors:
  - jmarcey
  - slorber
  - name: Inline Author name
    title: Inline Author Title
    url: https://github.com/inlineAuthor
    image_url: https://github.com/inlineAuthor
---
Local override of global authors
你可以根据每个博客文章自定义全局作者数据:
my-blog-post.md
---
authors:
  - key: jmarcey
    title: Joel Marcey's new title
  - key: slorber
    name: Sébastien Lorber's new name
---
Localize the author's configuration file
配置文件可以本地化,只需在以下位置创建它的本地化副本:
website/i18n/[locale]/docusaurus-plugin-content-blog/authors.yml
作者,无论是通过前言还是通过作者地图声明,都需要有名称或头像,或两者兼而有之。如果帖子的所有作者都没有名字,Docusaurus 将紧凑地显示他们的头像。效果见 这个测试帖。

饲料生成
RSS 订阅 要求设置作者的电子邮件以便作者出现在提要中。
作者页面
作者页面功能是可选的,主要用于多作者博客。
你可以通过向 全局作者配置 添加 page: true 属性来为每个作者单独激活它:
website/blog/authors.yml
slorber:
  name: Sébastien Lorber
  page: true # Turns the feature on - route will be /authors/slorber

jmarcey:
  name: Joel Marcey
  page:
    # Turns the feature on - route will be /authors/custom-author-url
    permalink: '/custom-author-url'
博客插件现在将生成:
关于内联作者
博客md文章里图片可以使用相对路径
2023年11月17日
- 环境
docusaurus 3.0.0
node v18.18.0
npm 9.1.2
win10
博客文章文件夹可以方便地放置博客文章图片哦:(这个体验很不错哦)


博客文章标签
标签在前言中声明,并引入了另一个分类维度。
可以内联定义标签,或引用在 tags file 中声明的预定义标签(可选,通常为 blog/tags.yml)。
以下示例:
docusaurus引用了在blog/tags.yml中声明的预定义标签键Releases是一个内联标签,因为它在blog/tags.yml中不存在
blog/my-post.md
---
title: 'My blog post'
tags:
  - Releases
  - docusaurus
---

Content
blog/tags.yml
docusaurus:
  label: 'Docusaurus'
  permalink: '/docusaurus'
  description: 'Blog posts related to the Docusaurus framework'
案例:


博客文章slug
注意下这个哦,还是很不错的:
这个对分享某篇文章很友好:

阅读时间
Docusaurus 根据字数生成每篇博客文章的阅读时间估计。我们提供了一个选项来定制它。
docusaurus.config.js
export default {
  presets: [
    [
      '@docusaurus/preset-classic',
      {
        blog: {
          showReadingTime: true, // When set to false, the "x min read" won't be shown
          readingTime: ({content, frontMatter, defaultReadingTime}) =>
            defaultReadingTime({content, options: {wordsPerMinute: 300}}),
        },
      },
    ],
  ],
};
readingTime 回调接收三个参数:博客内容文本作为字符串,前文作为字符串键及其值的记录,以及默认的阅读时间函数。它返回一个数字(以分钟为单位的阅读时间)或 undefined(禁用此页面的阅读时间)。
默认读取时间可以接受附加选项:wordsPerMinute 作为数字(默认值:300),wordBound 作为从字符串到布尔值的函数。如果传递给 wordBound 的字符串应该是单词绑定的(默认为空格、制表符和换行符),则该函数应返回 true。
使用回调来满足你的所有自定义需求:
- Per-post disabling
- Passing options
- Using custom algorithms
禁用一页上的阅读时间:
docusaurus.config.js
export default {
  presets: [
    [
      '@docusaurus/preset-classic',
      {
        blog: {
          showReadingTime: true,
          readingTime: ({content, frontMatter, defaultReadingTime}) =>
            frontMatter.hide_reading_time
              ? undefined
              : defaultReadingTime({content}),
        },
      },
    ],
  ],
};
用法:
---
hide_reading_time: true
---

This page will no longer display the reading time stats!
将选项传递给默认阅读时间函数:
docusaurus.config.js
export default {
  presets: [
    [
      '@docusaurus/preset-classic',
      {
        blog: {
          readingTime: ({content, defaultReadingTime}) =>
            defaultReadingTime({content, options: {wordsPerMinute: 100}}),
        },
      },
    ],
  ],
};
使用阅读时间的自定义实现:
docusaurus.config.js
import myReadingTime from './myReadingTime';

export default {
  presets: [
    [
      '@docusaurus/preset-classic',
      {
        blog: {
          readingTime: ({content}) => myReadingTime(content),
        },
      },
    ],
  ],
};
Feed
你可以通过传递 feedOptions 来生成 RSS / Atom / JSON feed。默认情况下,会生成 RSS 和 Atom 提要。要禁用 Feed 生成,请将 feedOptions.type 设置为 null。
type FeedType = 'rss' | 'atom' | 'json';

type BlogOptions = {
  feedOptions?: {
    type?: FeedType | 'all' | FeedType[] | null;
    title?: string;
    description?: string;
    copyright: string;

    language?: string; // possible values: http://www.w3.org/TR/REC-html40/struct/dirlang.html#langcodes
    limit?: number | false | null; // defaults to 20
    // XSLT permits browsers to style and render nicely the feed XML files
    xslt?:
      | boolean
      | {
          //
          rss?: string | boolean;
          atom?: string | boolean;
        };
    // Allow control over the construction of BlogFeedItems
    createFeedItems?: (params: {
      blogPosts: BlogPost[];
      siteConfig: DocusaurusConfig;
      outDir: string;
      defaultCreateFeedItems: (params: {
        blogPosts: BlogPost[];
        siteConfig: DocusaurusConfig;
        outDir: string;
      }) => Promise<BlogFeedItem[]>;
    }) => Promise<BlogFeedItem[]>;
  };
};
用法示例:
docusaurus.config.js
export default {
  // ...
  presets: [
    [
      '@docusaurus/preset-classic',
      {
        blog: {
          feedOptions: {
            type: 'all',
            copyright: `Copyright © ${new Date().getFullYear()} Facebook, Inc.`,
            createFeedItems: async (params) => {
              const {blogPosts, defaultCreateFeedItems, ...rest} = params;
              return defaultCreateFeedItems({
                // keep only the 10 most recent blog posts in the feed
                blogPosts: blogPosts.filter((item, index) => index < 10),
                ...rest,
              });
            },
          },
        },
      },
    ],
  ],
};
这些提要可以在以下位置找到:
- RSS
- Atom
- JSON
https://example.com/blog/rss.xml
https://example.com/blog/atom.xml
https://example.com/blog/feed.json
高级主题
纯博客模式
你可以在没有专用登录页面的情况下运行 Docusaurus 网站,而是将博客的帖子列表页面作为索引页面。将 routeBasePath 设置为 '/',通过根路由 example.com/ 而不是子路由 example.com/blog/ 为博客提供服务。
docusaurus.config.js
export default {
  // ...
  presets: [
    [
      '@docusaurus/preset-classic',
      {
        docs: false, // Optional: disable the docs plugin
        blog: {
          routeBasePath: '/', // Serve the blog at the site's root
          /* other blog options */
        },
      },
    ],
  ],
};
不要忘记删除 ./src/pages/index.js 处现有的主页,否则会有两个文件映射到同一路由!
如果禁用文档插件,请不要忘记删除配置文件中其他位置对文档插件的引用。值得注意的是,请确保删除与文档相关的导航栏项目。
对于那些只想使用文档的人来说,还有 "仅文档模式"。请阅读 仅文档模式 以获取详细说明或 routeBasePath 的更详细解释。
多个博客
默认情况下,经典主题假定每个网站只有一个博客,因此仅包含博客插件的一个实例。如果你想在一个网站上拥有多个博客,也是可能的!你可以通过在 plugins 选项中为 docusaurus.config.js 指定另一个博客插件来添加另一个博客。
将 routeBasePath 设置为你希望访问第二个博客的 URL 路由。请注意,这里的 routeBasePath 必须与第一个博客不同,否则可能会出现路径冲突!另外,将 path 设置为包含第二个博客条目的目录路径。
根据 多实例插件 的记录,你需要为插件分配一个唯一的 ID。
docusaurus.config.js
export default {
  // ...
  plugins: [
    [
      '@docusaurus/plugin-content-blog',
      {
        /**

         * Required for any multi-instance plugin
         */
        id: 'second-blog',
        /**

         * URL route for the blog section of your site.

         * *DO NOT* include a trailing slash.
         */
        routeBasePath: 'my-second-blog',
        /**

         * Path to data on filesystem relative to site dir.
         */
        path: './my-second-blog',
      },
    ],
  ],
};
例如,我们托管第二个博客 此处。
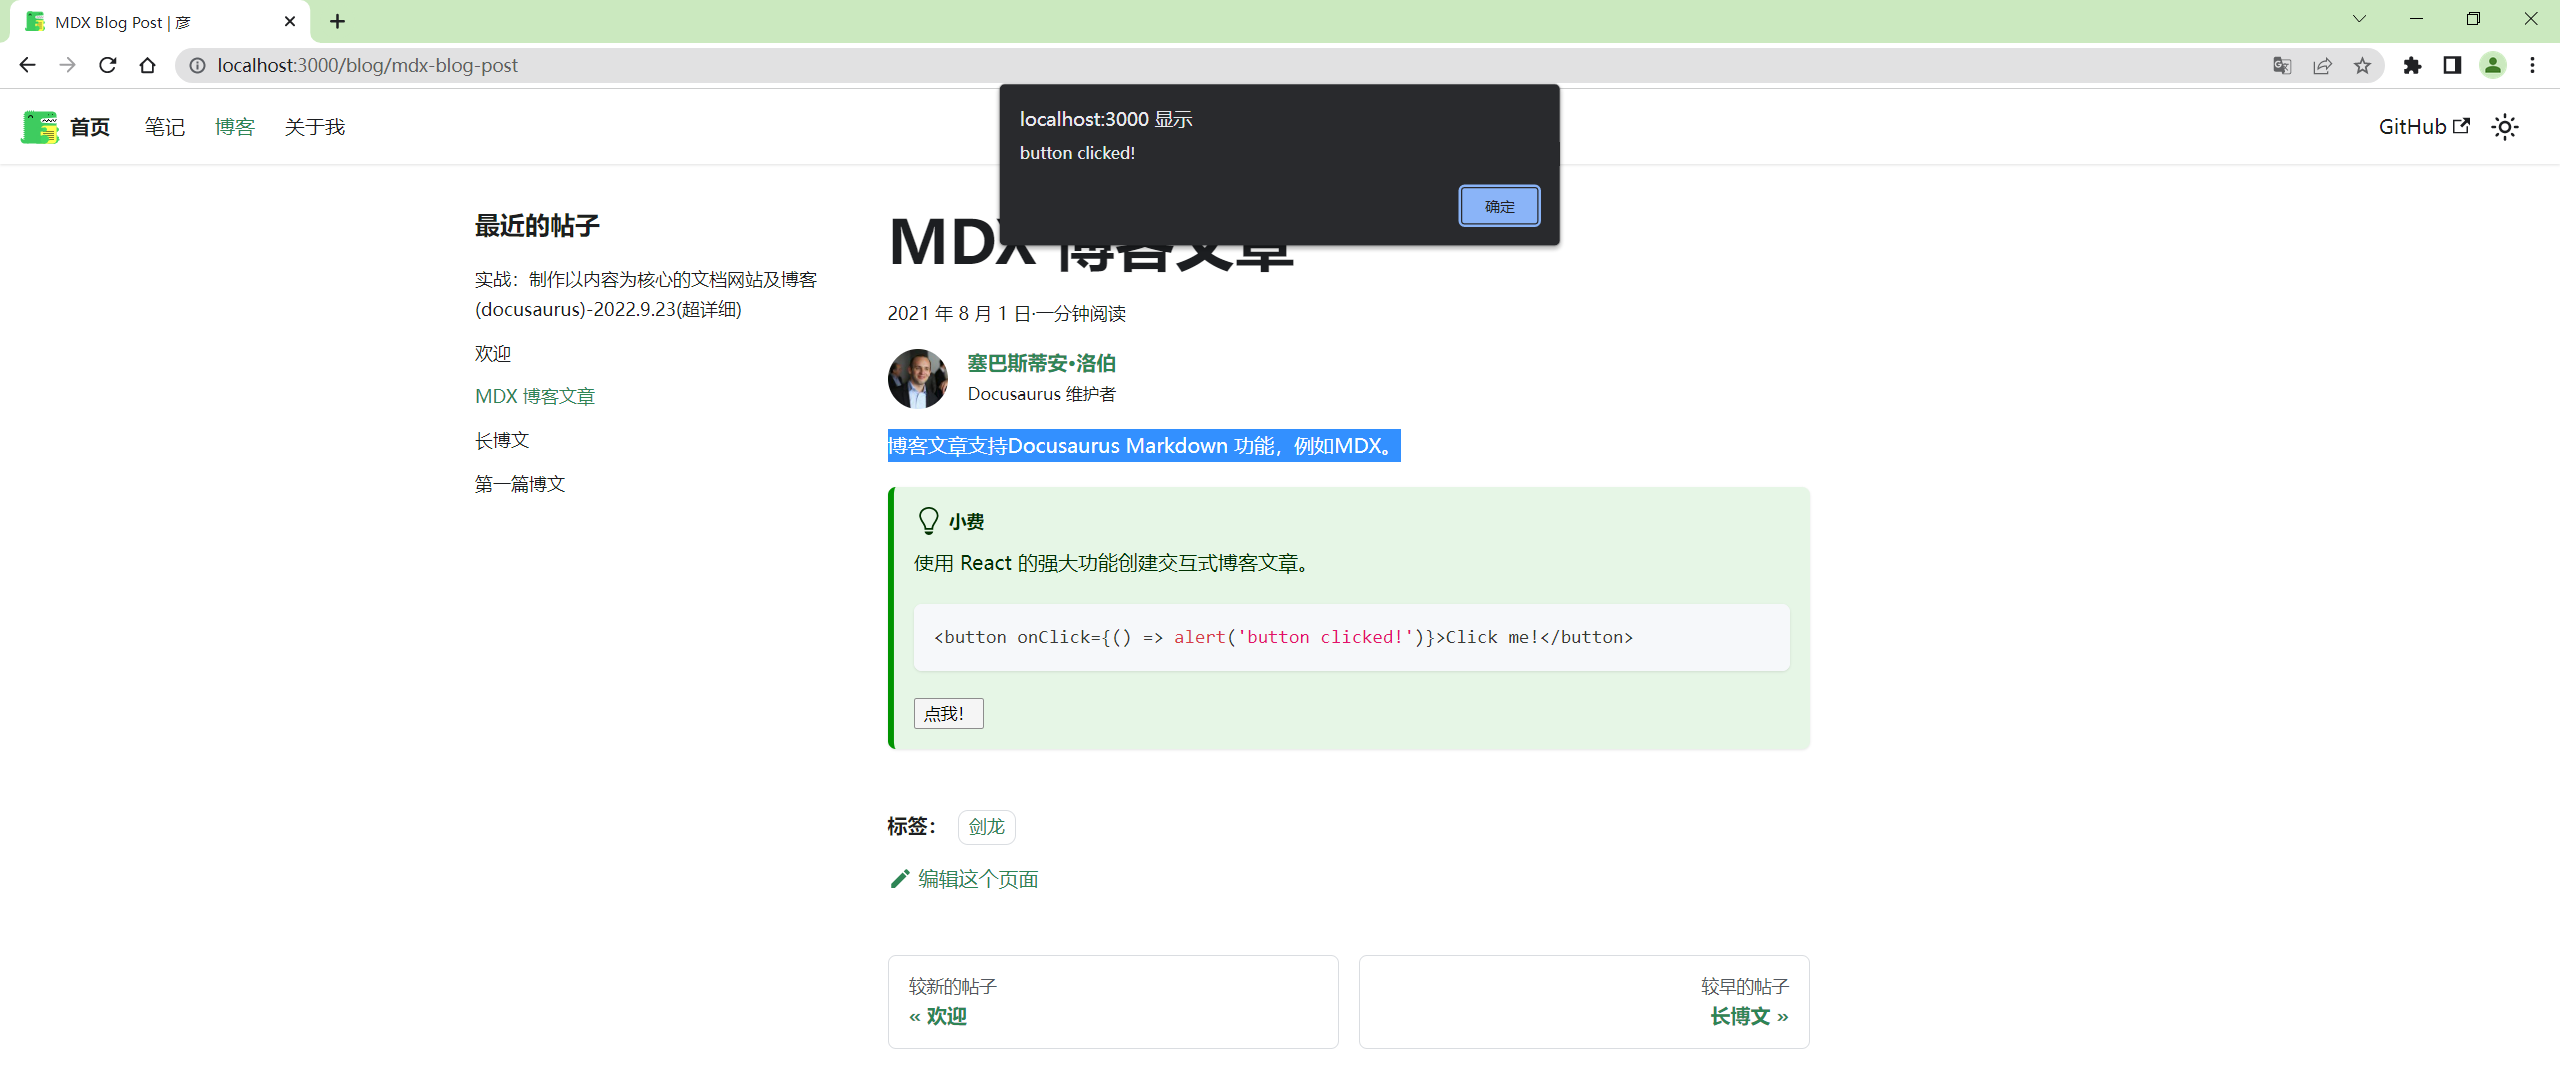
MDX 博客文章
博客文章支持Docusaurus Markdown 功能,例如MDX。

禁用博客功能
如果您不想要博客:只需删除此目录,并blog: false在您的 Docusaurus 配置中使用。