v2-2023.3.2-实战-yaml方式安装ingress-nginx(测试成功)(Deployment方式)【荐】
v2-2023.3.2-实战-yaml方式安装ingress-nginx(测试成功)(Deployment方式)【荐】
目录
[toc]
实验环境
实验环境:
1、win10,vmwrokstation虚机;
2、k8s集群:3台centos7.6 1810虚机,1个master节点,2个node节点
   k8s version:v1.22.2
   containerd: v1.5.5

 #同样在k8s version: v1.25.4,containerd: v1.6.10下也使用次环境;
实验软件
2023.3.2-实战:yaml方式安装ingress-nginx-2023.3.2(测试成功)
链接:https://pan.baidu.com/s/1MJ3Iid8lTfgQmE4i8T5kHA?pwd=2ql4 提取码:2ql4

1、安装过程
- 安装 ingress-nginx 有多种方式,我们这里直接使用下面的命令进行一键安装:
(1)下载部署文件
wget https://raw.githubusercontent.com/kubernetes/ingress-nginx/controller-v1.5.1/deploy/static/provider/cloud/deploy.yaml
#我软件包里已提供,是已经修改好了的;

(2)替换镜像 #如果使用我提供的yaml文件,这里的配置就不要做了;
# 可以替换对应的两个镜像
# cnych/ingress-nginx:v1.5.1
# cnych/ingress-nginx-kube-webhook-certgen:v20220916-gd32f8c343
将
image: registry.k8s.io/ingress-nginx/controller:v1.5.1@sha256:4ba73c697770664c1e00e9f968de14e08f606ff961c76e5d7033a4a9c593c629
替换为:
image: cnych/ingress-nginx:v1.5.1

将 #这个需要替换2处
image: registry.k8s.io/ingress-nginx/kube-webhook-certgen:v20220916-gd32f8c343@sha256:39c5b2e3310dc4264d638ad28d9d1d96c4cbb2b2dcfb52368fe4e3c63f61e10f
替换为:
image: cnych/ingress-nginx-kube-webhook-certgen:v20220916-gd32f8c343

(3)部署
[root@master1 ~]#kubectl apply -f deploy.yaml
namespace/ingress-nginx created
serviceaccount/ingress-nginx created
serviceaccount/ingress-nginx-admission created
role.rbac.authorization.k8s.io/ingress-nginx created
role.rbac.authorization.k8s.io/ingress-nginx-admission created
clusterrole.rbac.authorization.k8s.io/ingress-nginx created
clusterrole.rbac.authorization.k8s.io/ingress-nginx-admission created
rolebinding.rbac.authorization.k8s.io/ingress-nginx created
rolebinding.rbac.authorization.k8s.io/ingress-nginx-admission created
clusterrolebinding.rbac.authorization.k8s.io/ingress-nginx created
clusterrolebinding.rbac.authorization.k8s.io/ingress-nginx-admission created
configmap/ingress-nginx-controller created
service/ingress-nginx-controller created
service/ingress-nginx-controller-admission created
deployment.apps/ingress-nginx-controller created
job.batch/ingress-nginx-admission-create created
job.batch/ingress-nginx-admission-patch created
ingressclass.networking.k8s.io/nginx created
validatingwebhookconfiguration.admissionregistration.k8s.io/ingress-nginx-admission created
[root@master1 ~]#
- 上面的命令执行后会自动创建一个名为 ingress-nginx 的命名空间,会生成如下几个 Pod:
[root@master1 ~]# kubectl get pods -n ingress-nginx
NAME                                       READY   STATUS      RESTARTS   AGE
ingress-nginx-admission-create--1-xh62p    0/1     Completed   0          28s
ingress-nginx-admission-patch--1-dccjl     0/1     Completed   2          28s
ingress-nginx-controller-c66bc7c5c-pj2h8   1/1     Running     0          29s
- 此外还会创建如下两个 Service 对象:
[root@master1 ~]# kubectl get svc -n ingress-nginx
NAME                                 TYPE           CLUSTER-IP      EXTERNAL-IP   PORT(S)                      AGE
ingress-nginx-controller             LoadBalancer   10.96.228.157   <pending>     80:30933/TCP,443:31697/TCP   95s
ingress-nginx-controller-admission   ClusterIP      10.105.93.22    <none>        443/TCP                      95s
其中 ingress-nginx-controller-admission 是为准入控制器提供服务的,我们也是强烈推荐开启该准入控制器,这样当我们创建不合要求的 Ingress 对象后就会直接被拒绝了。另外一个 ingress-nginx-controller 就是ingress 控制器对外暴露的服务,我们可以看到默认是一个 LoadBalancer 类型的 Service,我们知道该类型是用于云服务商的,我们这里在本地环境,暂时不能使用,但是可以通过他的 NodePort 来对外暴露,后面我们会提供在本地测试环境提供 LoadBalancer 的方式。
- 到这里 ingress-nginx 就部署成功了,安装完成后还会创建一个名为 nginx 的 IngressClass 对象:
[root@master1 ~]# kubectl get ingressclass
NAME    CONTROLLER             PARAMETERS   AGE
nginx   k8s.io/ingress-nginx   <none>       3m43s

[root@master1 ~]#kubectl get ingressclass nginx -o yaml
apiVersion: networking.k8s.io/v1
kind: IngressClass
metadata:
  annotations:
    kubectl.kubernetes.io/last-applied-configuration: |
      {"apiVersion":"networking.k8s.io/v1","kind":"IngressClass","metadata":{"annotations":{},"labels":{"app.kubernetes.io/component":"controller","app.kubernetes.io/instance":"ingress-nginx","app.kubernetes.io/name":"ingress-nginx","app.kubernetes.io/part-of":"ingress-nginx","app.kubernetes.io/version":"1.5.1"},"name":"nginx"},"spec":{"controller":"k8s.io/ingress-nginx"}}
  creationTimestamp: "2023-03-01T14:49:35Z"
  generation: 1
  labels:
    app.kubernetes.io/component: controller
    app.kubernetes.io/instance: ingress-nginx
    app.kubernetes.io/name: ingress-nginx
    app.kubernetes.io/part-of: ingress-nginx
    app.kubernetes.io/version: 1.5.1
  name: nginx
  resourceVersion: "20342"
  uid: 7b4ad44f-1eff-405b-9da4-821808529177
spec:
  controller: k8s.io/ingress-nginx
[root@master1 ~]#
这里我们只提供了一个 controller 属性,对应的值和 ingress-nginx 的启动参数中的 controller-class 一致的。
[root@master1 ~]#cat deploy.yaml
431     spec:
432       containers:
433       - args:
434         - /nginx-ingress-controller
435         - --publish-service=$(POD_NAMESPACE)/ingress-nginx-controller
436         - --election-id=ingress-nginx-leader
437         - --controller-class=k8s.io/ingress-nginx
438         - --ingress-class=nginx
439         - --configmap=$(POD_NAMESPACE)/ingress-nginx-controller
440         - --validating-webhook=:8443
441         - --validating-webhook-certificate=/usr/local/certificates/cert
442         - --validating-webhook-key=/usr/local/certificates/key
2、第一个示例
- 我们先看下
ingress-controllerpod所在的节点
[root@master1 ~]#vim deploy.yaml
406 apiVersion: apps/v1
407 kind: Deployment
……
509       nodeSelector:
510         kubernetes.io/os: linux

[root@master1 ~]#kubectl get po -ningress-nginx -owide
NAME                                       READY   STATUS      RESTARTS   AGE     IP           NODE    NOMINATED NODE   READINESS GATES
ingress-nginx-admission-create--1-xh62p    0/1     Completed   0          7h50m   10.244.2.6   node2   <none>           <none>
ingress-nginx-admission-patch--1-dccjl     0/1     Completed   2          7h50m   10.244.1.8   node1   <none>           <none>
ingress-nginx-controller-c66bc7c5c-pj2h8   1/1     Running     0          7h50m   10.244.1.9   node1   <none>           <none> #可以看到时ingress-controller被调度在了node1上
- 安装成功后,现在我们来为一个 nginx 应用创建一个 Ingress 资源,如下所示:
# my-nginx.yaml
apiVersion: apps/v1
kind: Deployment
metadata:
  name: my-nginx
spec:
  selector:
    matchLabels:
      app: my-nginx
  template:
    metadata:
      labels:
        app: my-nginx
    spec:
      containers:
      - name: my-nginx
        image: nginx
        ports:
        - containerPort: 80
---
apiVersion: v1
kind: Service
metadata:
  name: my-nginx
  labels:
    app: my-nginx
spec:
  ports:
  - port: 80
    protocol: TCP
    name: http
  selector:
    app: my-nginx
---
apiVersion: networking.k8s.io/v1
kind: Ingress
metadata:
  name: my-nginx
  namespace: default
spec:
  ingressClassName: nginx  # 使用 nginx 的 IngressClass(关联的 ingress-nginx 控制器)
  rules:
  - host: first-ingress.172.29.9.52.nip.io  # 将域名映射到 my-nginx 服务
    http:
      paths:
      - path: /
        pathType: Prefix
        backend:
          service:  # 将所有请求发送到 my-nginx 服务的 80 端口
            name: my-nginx
            port:
              number: 80
# 不过需要注意大部分Ingress控制器都不是直接转发到Service,而是只是通过Service来获取后端的Endpoints列表(因此这里的svc只起到了一个服务发现的作用),直接转发到Pod,这样可以减少网络跳转,提高性能!!!
⚠️ 注意:
注意我们这里配置的域名是 first-ingress.172.18.0.2.nip.io,该地址其实会直接映射到 172.18.0.2 上面,该 IP 地址就是我的 Node 节点地址,因为我们这里 ingress 控制器是通过 NodePort 对外进行暴露的,所以可以通过 域名:nodePort 来访问服务。nip.io 是由 PowerDNS 提供支持的开源服务,允许我们可以直接通过使用以下格式将任何 IP 地址映射到主机名,这样我们就不需要在 etc/hosts 文件中配置映射了,对于 Ingress 测试非常方便。
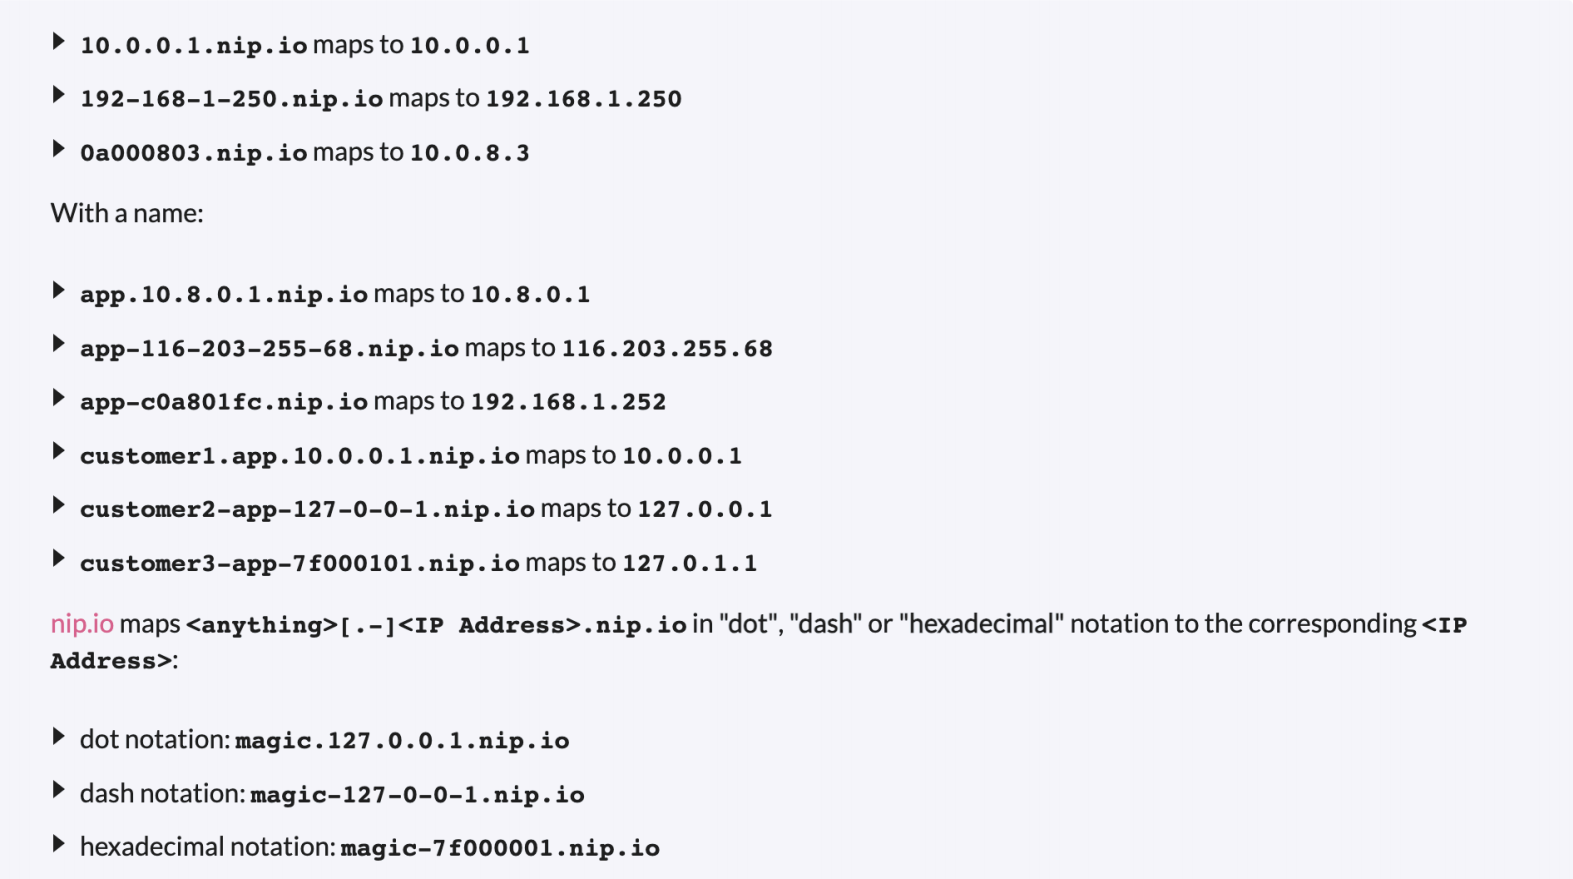
注意:nip.io不需要另外安装服务,我们只要安装如下命令配置就好。
- 这里直接创建上面的资源对象即可:
[root@master1 ~]#kubectl apply -f my-nginx.yaml
deployment.apps/my-nginx created
service/my-nginx created
ingress.networking.k8s.io/my-nginx created
[root@master1 ~]#kubectl get ingress
NAME       CLASS   HOSTS                              ADDRESS   PORTS   AGE
my-nginx   nginx   first-ingress.172.29.9.52.nip.io             80      27m

root@master1 ~]#kubectl get svc -ningress-nginx
NAME                                 TYPE           CLUSTER-IP      EXTERNAL-IP   PORT(S)                      AGE
ingress-nginx-controller             LoadBalancer   10.96.228.157   <pending>     80:30933/TCP,443:31697/TCP   7h51m
ingress-nginx-controller-admission   ClusterIP      10.105.93.22    <none>        443/TCP                      7h51m
在上面的 Ingress 资源对象中我们使用配置 ingressClassName: nginx 指定让我们安装的 ingress-nginx 这个控制器来处理我们的 Ingress 资源,配置的匹配路径类型为前缀的方式去匹配 / ,将来自域名 firstingress.172.29.9.52.nip.io 的所有请求转发到 my-nginx 服务的后端 Endpoints 中去,注意访问的时候需要带上 NodePort 端口。
- 测试
[root@master1 ~]#curl first-ingress.172.29.9.52.nip.io
curl: (7) Failed connect to first-ingress.172.29.9.52.nip.io:80; Connection refused

[root@master1 ~]#curl first-ingress.172.29.9.52.nip.io:30933 #注意:这里的ingrexx-nginx默认是一个 LoadBalancer 类型的 Service,我们知道该类型是用于云服务商的,我们这里在本地环境,暂时不能使用,但是可以通过他的 NodePort 来对外暴露。
<!DOCTYPE html>
<html>
<head>
<title>Welcome to nginx!</title>
<style>
html { color-scheme: light dark; }
body { width: 35em; margin: 0 auto;
font-family: Tahoma, Verdana, Arial, sans-serif; }
</style>
</head>
<body>
<h1>Welcome to nginx!</h1>
<p>If you see this page, the nginx web server is successfully installed and
working. Further configuration is required.</p>

<p>For online documentation and support please refer to
<a href="http://nginx.org/">nginx.org</a>.<br/>
Commercial support is available at
<a href="http://nginx.com/">nginx.com</a>.</p>

<p><em>Thank you for using nginx.</em></p>
</body>
</html>
[root@master1 ~]#
- 前面我们也提到了 ingress-nginx 控制器的核心原理就是将我们的 Ingress 这些资源对象映射翻译成 Nginx 配置文件 nginx.conf ,我们可以通过查看控制器中的配置文件来验证这点:
[root@master1 ~]#kubectl exec -it ingress-nginx-controller-c66bc7c5c-pj2h8 -n ingress-nginx -- cat /etc/nginx/nginx.conf
……

        upstream upstream_balancer {
                ### Attention!!!
                #
                # We no longer create "upstream" section for every backend.
                # Backends are handled dynamically using Lua. If you would like to debug
                # and see what backends ingress-nginx has in its memory you can
                # install our kubectl plugin https://kubernetes.github.io/ingress-nginx/kubectl-plugin.
                # Once you have the plugin you can use "kubectl ingress-nginx backends" command to
                # inspect current backends.
                #
                ###

                server 0.0.0.1; # placeholder

                balancer_by_lua_block {
                        balancer.balance()
                }

                keepalive 320;
                keepalive_time 1h;
                keepalive_timeout  60s;
                keepalive_requests 10000;

        }
……
        ## start server first-ingress.172.29.9.52.nip.io
        server {
                server_name first-ingress.172.29.9.52.nip.io ;

                listen 80  ;
                listen [::]:80  ;
                listen 443  ssl http2 ;
                listen [::]:443  ssl http2 ;

                set $proxy_upstream_name "-";

                ssl_certificate_by_lua_block {
                        certificate.call()
                }

                location / {

                        set $namespace      "default";
                        set $ingress_name   "my-nginx";
                        set $service_name   "my-nginx";
                        set $service_port   "80";
                        set $location_path  "/";
                        set $global_rate_limit_exceeding n;

                        rewrite_by_lua_block {
                                lua_ingress.rewrite({
                                        force_ssl_redirect = false,
                                        ssl_redirect = true,
                                        force_no_ssl_redirect = false,
                                        preserve_trailing_slash = false,
                                        use_port_in_redirects = false,
                                        global_throttle = { namespace = "", limit = 0, window_size = 0, key = { }, ignored_cidrs = { } },
                                })
                                balancer.rewrite()
                                plugins.run()
                        }

                        # be careful with `access_by_lua_block` and `satisfy any` directives as satisfy any
                        # will always succeed when there's `access_by_lua_block` that does not have any lua code doing `ngx.exit(ngx.DECLINED)`
                        # other authentication method such as basic auth or external auth useless - all requests will be allowed.
                        #access_by_lua_block {
                        #}

                        header_filter_by_lua_block {
                                lua_ingress.header()
                                plugins.run()
                        }

                        body_filter_by_lua_block {
                                plugins.run()
                        }

                        log_by_lua_block {
                                balancer.log()

                                monitor.call()

                                plugins.run()
                        }

                        port_in_redirect off;

                        set $balancer_ewma_score -1;
                        set $proxy_upstream_name "default-my-nginx-80";
                        set $proxy_host          $proxy_upstream_name;
                        set $pass_access_scheme  $scheme;

                        set $pass_server_port    $server_port;

                        set $best_http_host      $http_host;
                        set $pass_port           $pass_server_port;

                        set $proxy_alternative_upstream_name "";

                        client_max_body_size                    1m;

                        proxy_set_header Host                   $best_http_host;

                        # Pass the extracted client certificate to the backend

                        # Allow websocket connections
                        proxy_set_header                        Upgrade           $http_upgrade;

                        proxy_set_header                        Connection        $connection_upgrade;

                        proxy_set_header X-Request-ID           $req_id;
                        proxy_set_header X-Real-IP              $remote_addr;

                        proxy_set_header X-Forwarded-For        $remote_addr;

                        proxy_set_header X-Forwarded-Host       $best_http_host;
                        proxy_set_header X-Forwarded-Port       $pass_port;
                        proxy_set_header X-Forwarded-Proto      $pass_access_scheme;
                        proxy_set_header X-Forwarded-Scheme     $pass_access_scheme;

                        proxy_set_header X-Scheme               $pass_access_scheme;

                        # Pass the original X-Forwarded-For
                        proxy_set_header X-Original-Forwarded-For $http_x_forwarded_for;

                        # mitigate HTTPoxy Vulnerability
                        # https://www.nginx.com/blog/mitigating-the-httpoxy-vulnerability-with-nginx/
                        proxy_set_header Proxy                  "";

                        # Custom headers to proxied server

                        proxy_connect_timeout                   5s;
                        proxy_send_timeout                      60s;
                        proxy_read_timeout                      60s;

                        proxy_buffering                         off;
                        proxy_buffer_size                       4k;
                        proxy_buffers                           4 4k;

                        proxy_max_temp_file_size                1024m;

                        proxy_request_buffering                 on;
                        proxy_http_version                      1.1;

                        proxy_cookie_domain                     off;
                        proxy_cookie_path                       off;

                        # In case of errors try the next upstream server before returning an error
                        proxy_next_upstream                     error timeout;
                        proxy_next_upstream_timeout             0;
                        proxy_next_upstream_tries               3;

                        proxy_pass http://upstream_balancer;

                        proxy_redirect                          off;

                }

        }
        ## end server first-ingress.172.29.9.52.nip.io
……
我们可以在 nginx.conf 配置文件中看到上面我们新增的 Ingress 资源对象的相关配置信息,不过需要注意的是现在并不会为每个 backend 后端都创建一个 upstream 配置块,现在是使用 Lua 程序进行动态处理的,所以我们没有直接看到后端的 Endpoints 相关配置数据。
FAQ
详解流程
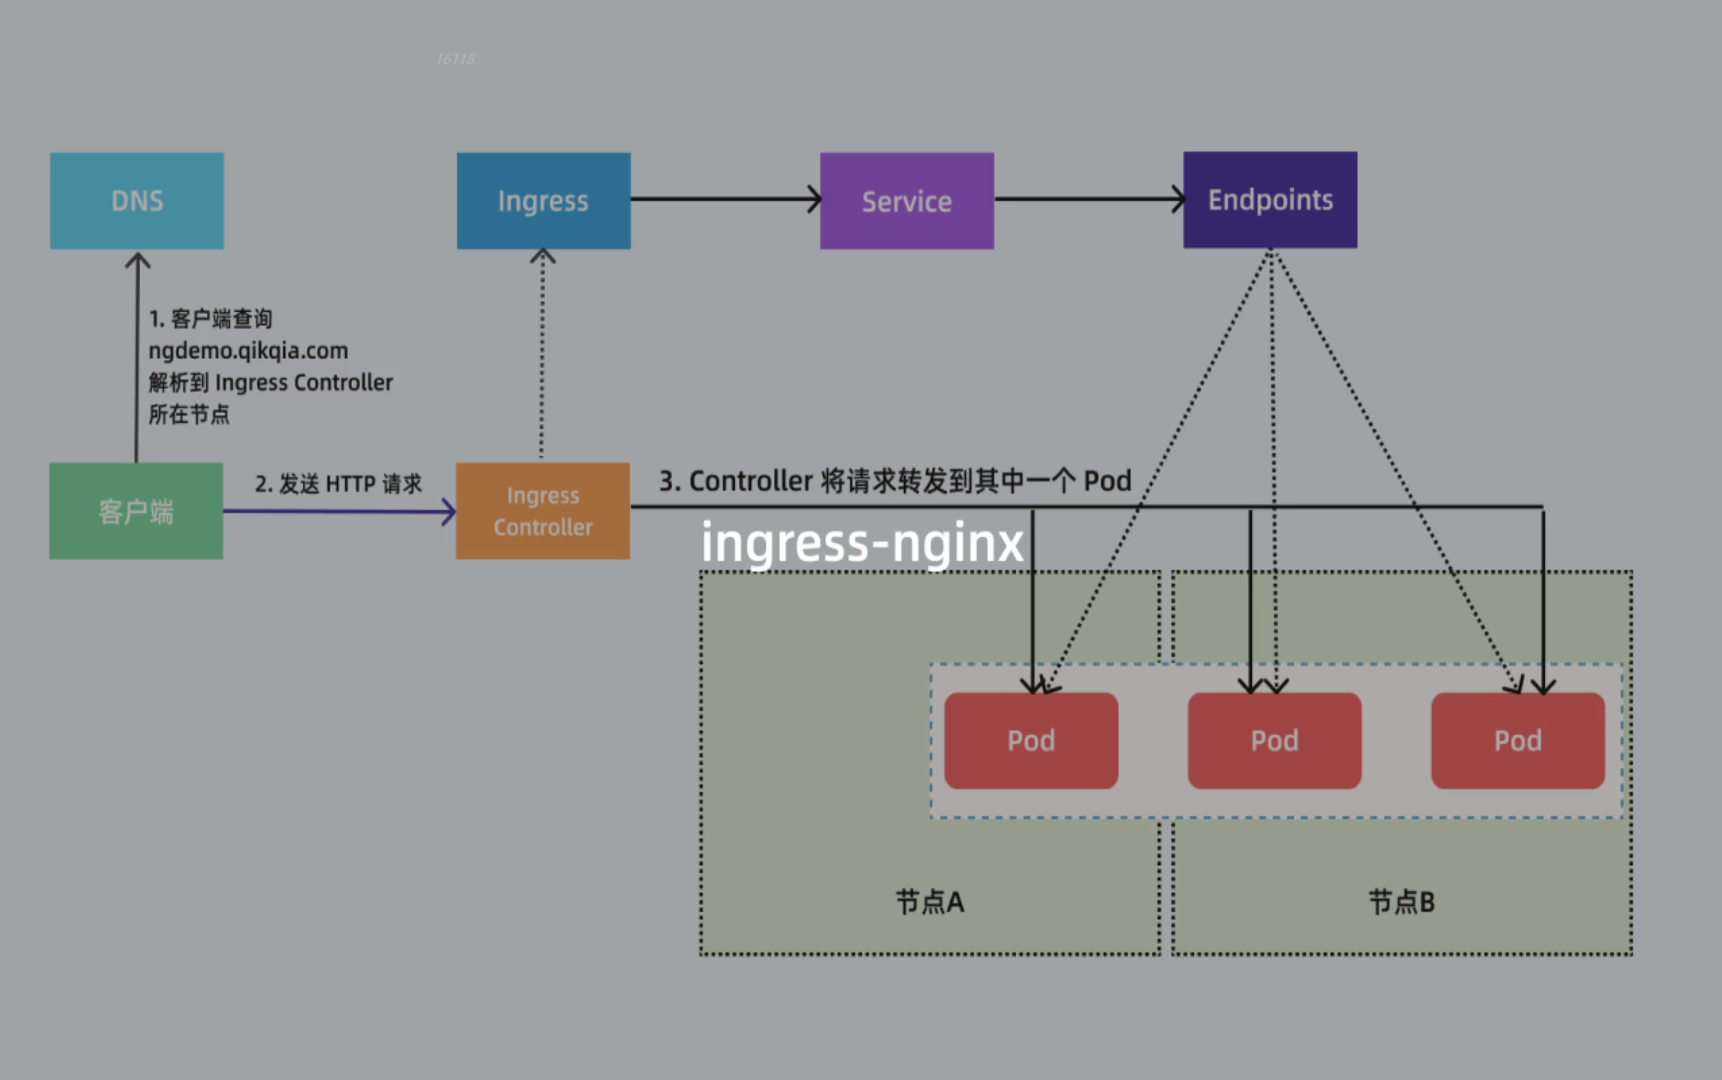
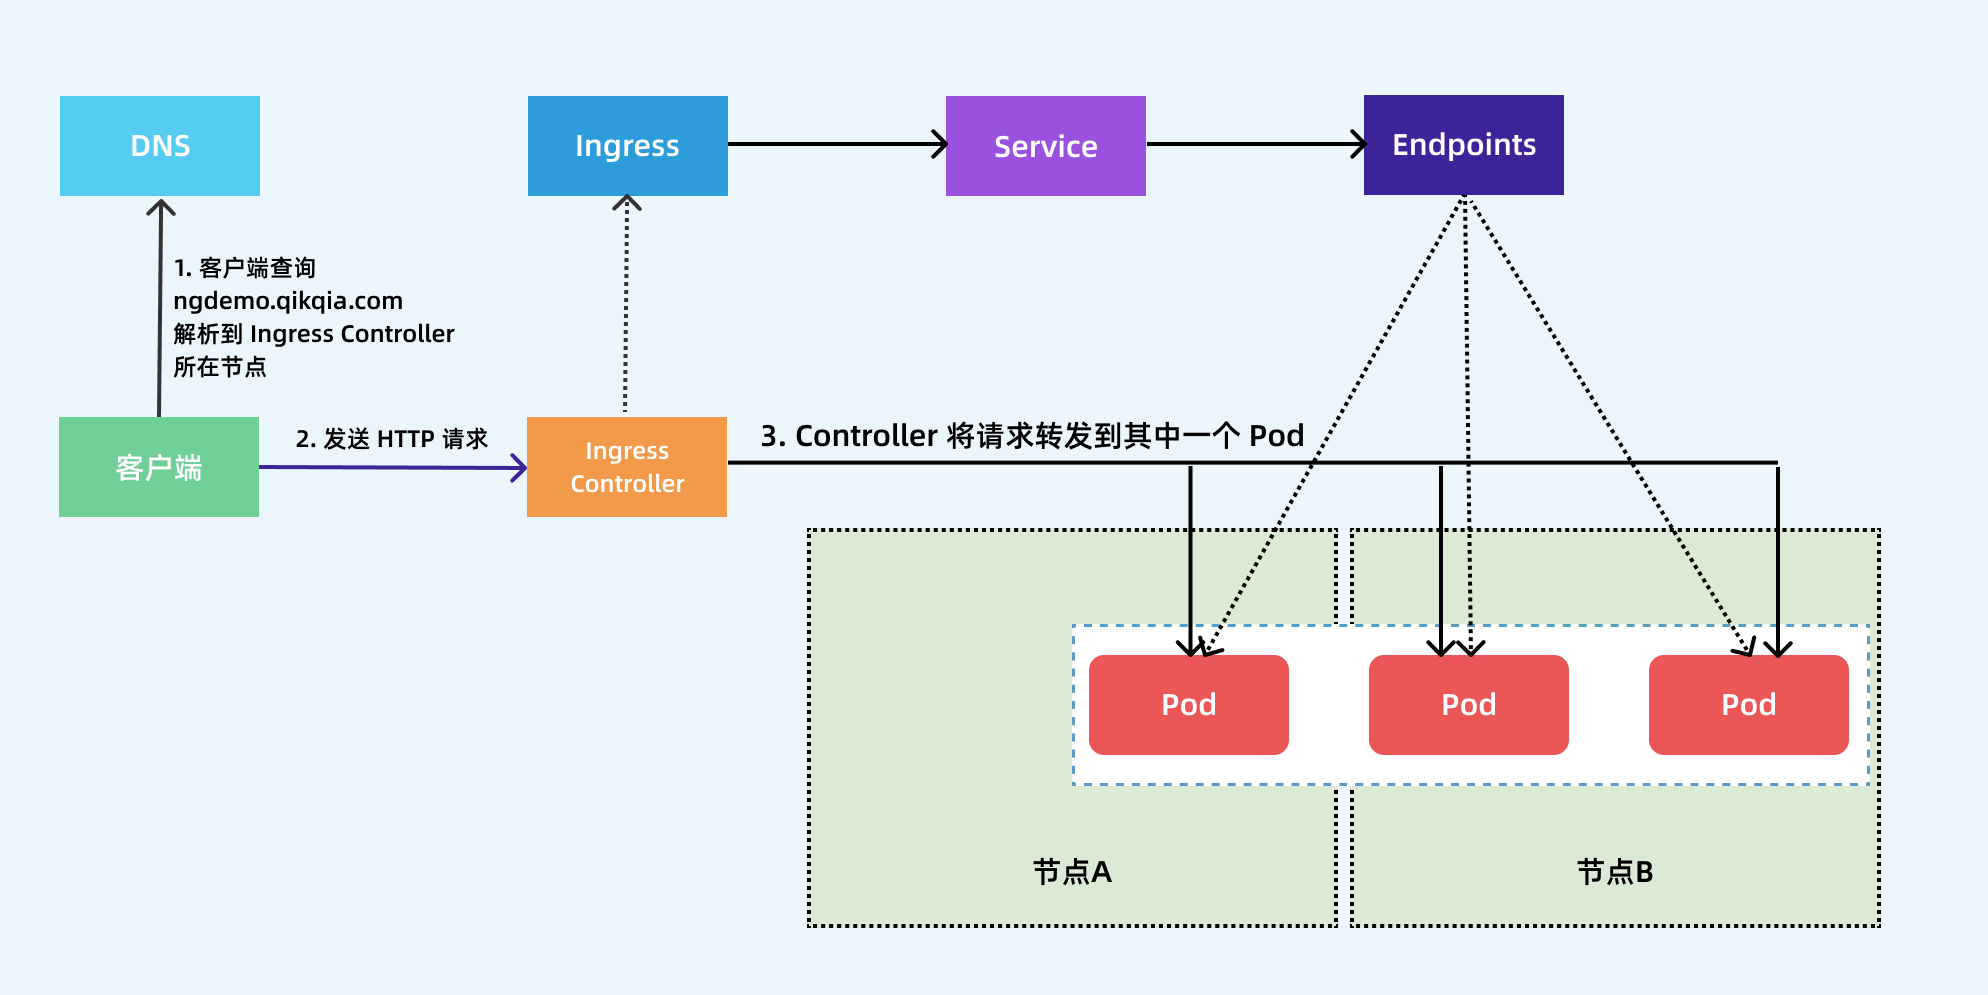
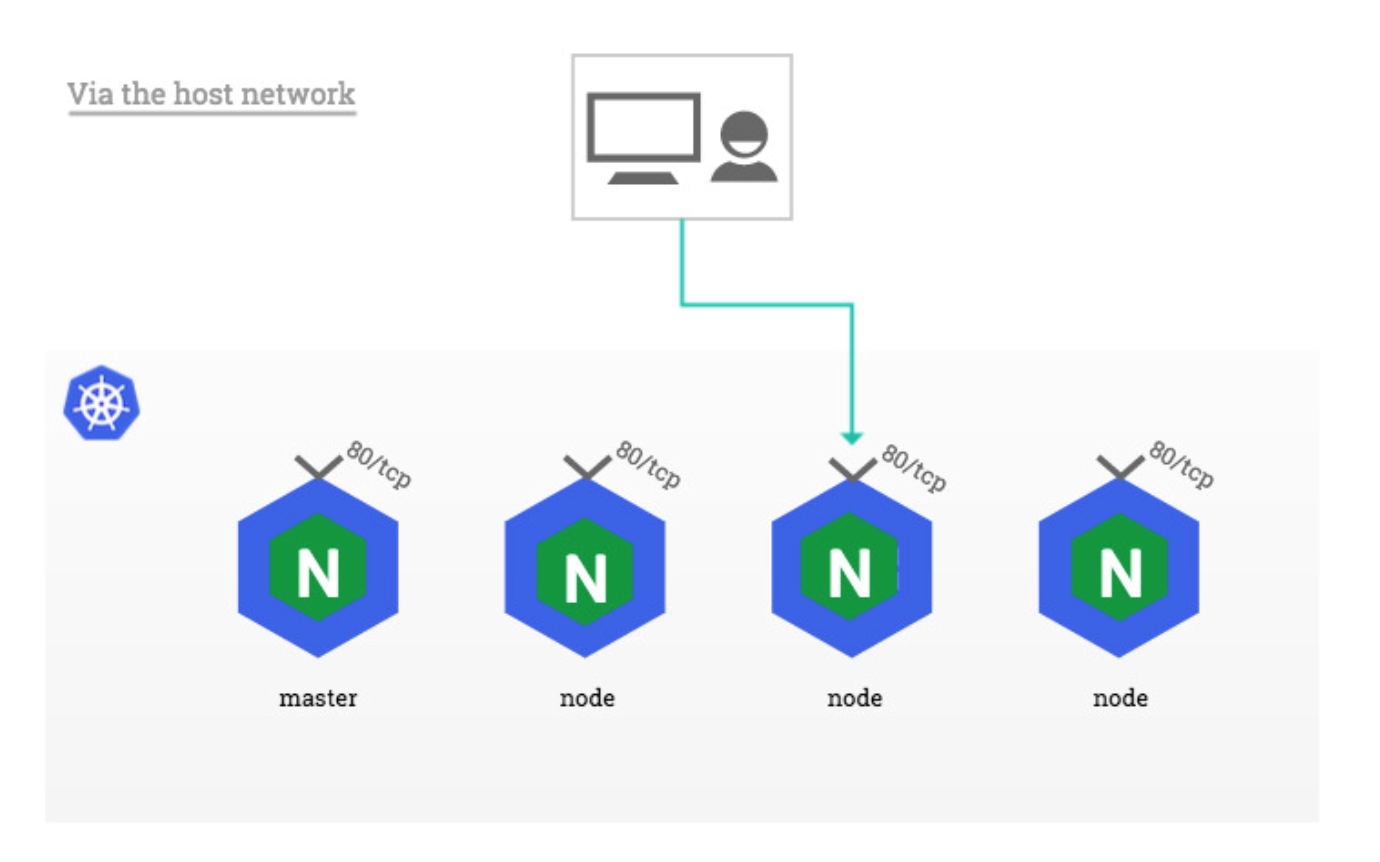
下图显示了客户端是如何通过 Ingress 控制器连接到其中一个 Pod 的流程,客户端首先对 ngdemo.qikqiak.com 执行 DNS 解析,得到 Ingress 控制器所在节点的 IP,然后客户端向 Ingress 控制器发送 HTTP 请求,然后根据 Ingress 对象里面的描述匹配域名,找到对应的 Service 对象,并获取关联的 Endpoints 列表,将客户端的请求转发给其中一个 Pod。
前面我们也提到了 ingress-nginx 控制器的核心原理就是将我们的 Ingress 这些资源对象映射翻译成 Nginx 配置文件 nginx.conf,我们可以通过查看控制器中的配置文件来验证这点:
[root@master1 ingress]#kubectl exec  ingress-nginx-controller-r5964 -ningress-nginx -- cat /etc/nginx/nginx.conf

......
upstream upstream_balancer {
        server 0.0.0.1; # placeholder
        balancer_by_lua_block {
                balancer.balance()
        }
        keepalive 320;
        keepalive_timeout  60s;
        keepalive_requests 10000;
}

......
### start server ngdemo.qikqiak.com
server {
        server_name ngdemo.qikqiak.com ;

        listen 80  ;
        listen [::]:80  ;
        listen 443  ssl http2 ;
        listen [::]:443  ssl http2 ;

        set $proxy_upstream_name "-";

        ssl_certificate_by_lua_block {
                certificate.call()
        }

        location / {

                set $namespace      "default";
                set $ingress_name   "my-nginx";
                set $service_name   "my-nginx";
                set $service_port   "80";
                set $location_path  "/";
                set $global_rate_limit_exceeding n;
                ......
                proxy_next_upstream_timeout             0;
                proxy_next_upstream_tries               3;

                proxy_pass http://upstream_balancer #这里

                proxy_redirect                          off;

        }

}
### end server ngdemo.qikqiak.com
......
我们可以在 nginx.conf 配置文件中看到上面我们新增的 Ingress 资源对象的相关配置信息。不过需要注意的是:现在并不会为每个 backend 后端都创建一个 upstream 配置块,现在是使用 Lua 程序进行动态处理的,所以我们没有直接看到后端的 Endpoints 相关配置数据(以前的版本是可以看到的)。
⚠️ 注意
upstream里面可以配置很多的负载策略,并且可以让nginx去帮我们做一个可定制的负载(如果是走service的话,那负载策略就是service说了算的了)。
ingress-controller如何部署高可用
由于 ingress-nginx 所在的节点需要能够访问外网,这样域名可以解析到这些节点上直接使用。**所以需要让 ingress-nginx绑定节点的 80 和 443 端口,所以可以使用 hostPort 或者 hostNetwork 模式来进行访问。当然对于线上环境来说为了保证高可用,**一般是需要运行多个ingress-nginx 实例的,然后可以用一个 nginx/haproxy 作为入口,通过 keepalived 来访问边缘节点的 vip 地址。
边缘节点:所谓的边缘节点即集群内部用来向集群外暴露服务能力的节点,集群外部的服务通过该节点来调用集群内部的服务,边缘节点是集群内外交流的一个 Endpoint。
自建LB:
MetaLB,OpenELB
⚠️ 注意:
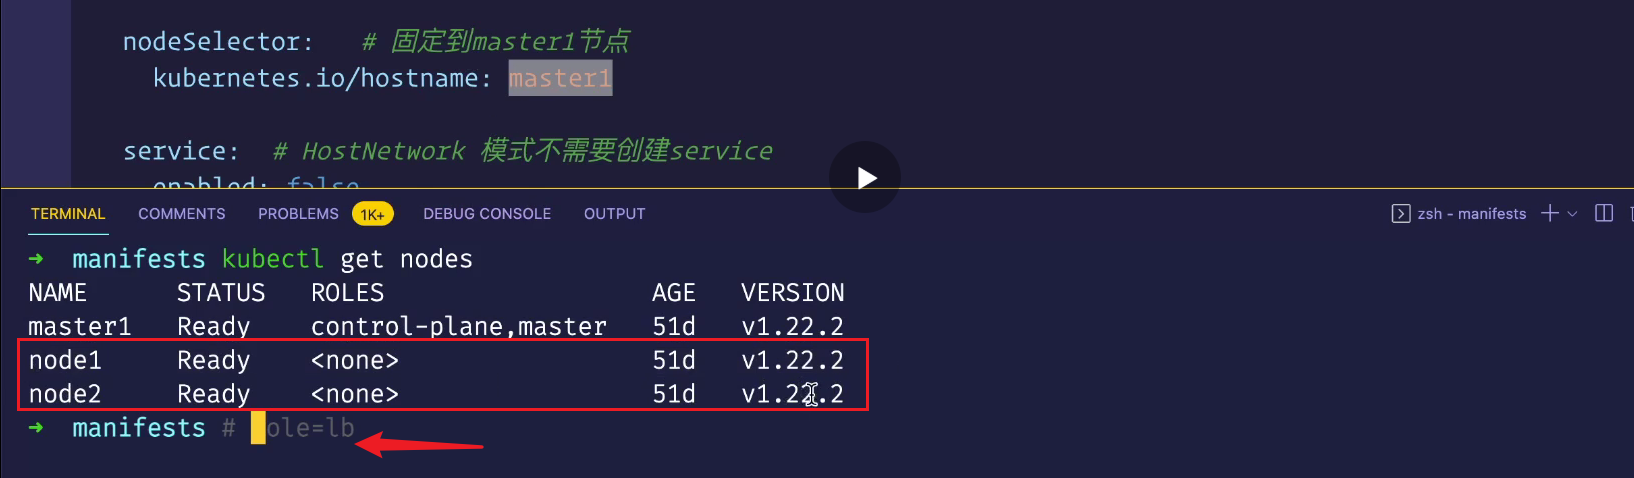
我这里是打算只在master1节点上部署ingress-nginx。如果我想在node1和node2个节点行部署ingress-nginx的话,可以给这2个节点打上个label,例如 role=lb,然后只需要把这个label写到 nodeSelector下面就好。
我们这里测试环境就将 master1 节点看成边缘节点,所以我们就直接将 ingress-nginx 固定到 master1 节点上,采用 hostNetwork 模式(生产环境可以使用 LB + DaemonSet hostNetwork 模式)。
注意:当然你有多个边缘节点的话,可以对这些边缘节点打上一个label,然后把ingress-nginx给固定到上面去,然后采用hostNetwork模式。
推荐开启准入控制器
为了避免创建的错误 Ingress 等资源对象影响控制器重新加载,所以我们也强烈建议大家开启准入控制器,ingess-nginx 中会提供一个用于校验资源对象的 Admission Webhook,我们可以通过 Values 文件进行开启。设置成true之后,当我们去创建Ingress资源对象的时候,它会用这里的admission Webhooks去做一个校验,就是你不是一个正确的Ingress资源对象的话,那它就会拒绝掉。那你拒绝掉之后,我们这个Ingress-controller它就不会去重新加载了,或多或少它可以它可以避免控制器重新加载之类的情况。

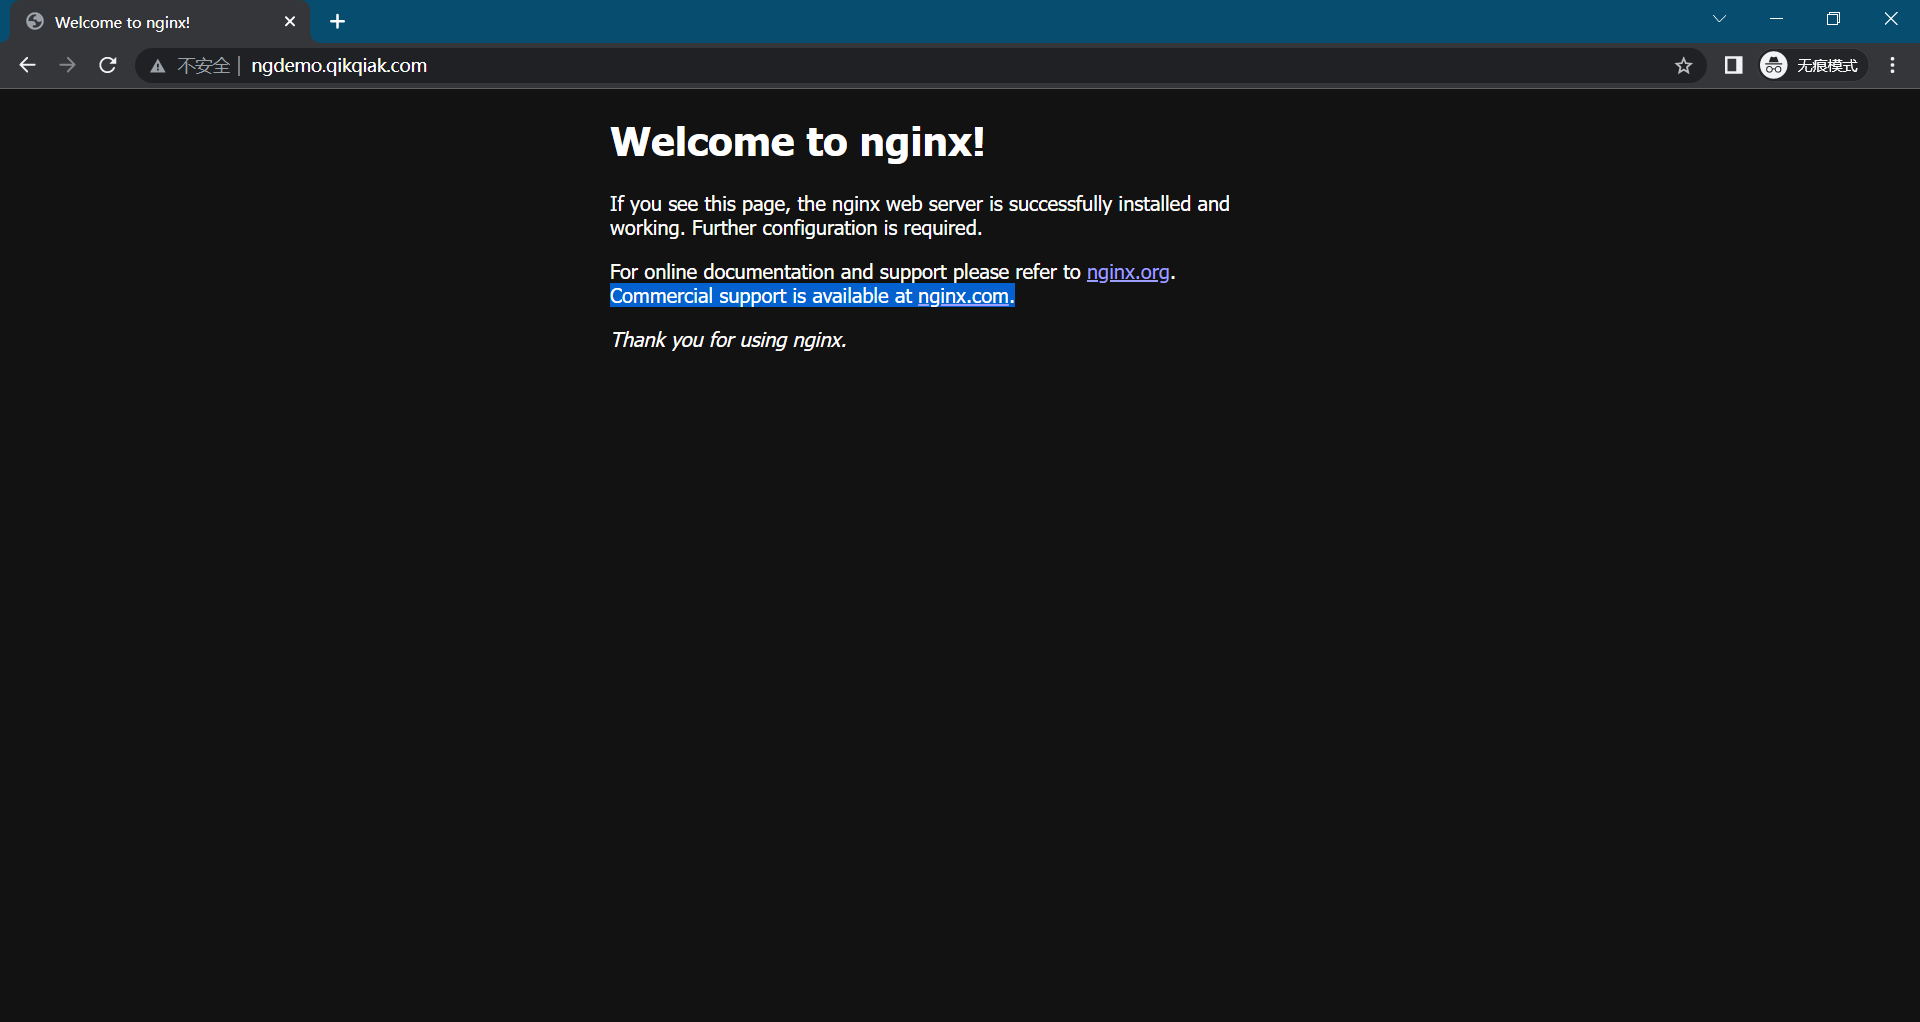
访问ingress
对于ingress-nginx: 如果ingress-nginx-controller svc是clusterIP类型的话,做好/etc/hosts映射后,就直接可以通过域名形式来访问应用了。 如果ingress-nginx-controller svc是LoadBalancer类型的话,做好/etc/hosts映射后,需要通过域名:ingress-nginx-controller svc的nodePort端口 形式来访问应用才行。
demo1:
[root@master1 ingress-nginx]#kubectl get pod -n ingress-nginx -owide
NAME                                            READY   STATUS    RESTARTS   AGE    IP             NODE      NOMINATED NODE   READINESS GATES
ingress-nginx-controller-r5964                  1/1     Running   0          8m2s   172.29.9.51    master1   <none>           <none>
ingress-nginx-defaultbackend-84854cd6cb-8gzcm   1/1     Running   0          8m2s   10.244.1.197   node1     <none>           <none>

[root@master1 ingress-nginx]#kubectl get svc -n ingress-nginx
NAME                                 TYPE        CLUSTER-IP     EXTERNAL-IP   PORT(S)   AGE
ingress-nginx-controller-admission   ClusterIP   10.106.208.0   <none>        443/TCP   8m8s
ingress-nginx-defaultbackend         ClusterIP   10.106.66.15   <none>        80/TCP    8m8s


[root@master1 ingress-nginx]#kubectl get ingress
NAME       CLASS   HOSTS                ADDRESS       PORTS   AGE
my-nginx   nginx   ngdemo.qikqiak.com   172.29.9.51   80      2m19s
demo2:
[root@master1 ~]# kubectl get svc -n ingress-nginx
NAME TYPE CLUSTER-IP EXTERNAL-IP PORT(S) AGE
ingress-nginx-controller LoadBalancer 10.96.228.157 <pending> 80:30933/TCP,443:31697/TCP 95s
ingress-nginx-controller-admission ClusterIP 10.105.93.22 <none> 443/TCP 95s
[root@master1 ~]# kubectl get pods -n ingress-nginx
NAME READY STATUS RESTARTS AGE
ingress-nginx-admission-create--1-xh62p 0/1 Completed 0 28s
ingress-nginx-admission-patch--1-dccjl 0/1 Completed 2 28s
ingress-nginx-controller-c66bc7c5c-pj2h8 1/1 Running 0 29s
[root@master1 ~]#kubectl get ingress
NAME CLASS HOSTS ADDRESS PORTS AGE
my-nginx nginx first-ingress.172.29.9.52.nip.io 80 27m
[root@master1 ~]#curl first-ingress.172.29.9.52.nip.io
curl: (7) Failed connect to first-ingress.172.29.9.52.nip.io:80; Connection refused
[root@master1 ~]#curl first-ingress.172.29.9.52.nip.io:30933 #注��意:这里的ingrexx-nginx默认是一个 LoadBalancer 类型的 Service,我们知道该类型是用于云服务商的,我们这里在本地环境,暂时不能使用,但是可以通过他的 NodePort 来对外暴露。
<!DOCTYPE html>
<html>
<head>
<title>Welcome to nginx!</title>
<style>
html { color-scheme: light dark; }
body { width: 35em; margin: 0 auto;
font-family: Tahoma, Verdana, Arial, sans-serif; }
</style>
</head>
<body>
<h1>Welcome to nginx!</h1>
<p>If you see this page, the nginx web server is successfully installed and
working. Further configuration is required.</p>
<p>For online documentation and support please refer to
<a href="http://nginx.org/">nginx.org</a>.<br/>
Commercial support is available at
<a href="http://nginx.com/">nginx.com</a>.</p>
<p><em>Thank you for using nginx.</em></p>
</body>
</html>
[root@master1 ~]#
关于我
我的博客主旨:
- 排版美观,语言精炼;
- 文档即手册,步骤明细,拒绝埋坑,提供源码;
- 本人实战文档都是亲测成功的,各位小伙伴在实际操作过程中如有什么疑问,可随时联系本人帮您解决问题,让我们一起进步!
🍀 微信二维码 x2675263825 (舍得), qq:2675263825。

🍀 微信公众号 《云原生架构师实战》

🍀 语雀
https://www.yuque.com/xyy-onlyone
🍀 csdn https://blog.csdn.net/weixin_39246554?spm=1010.2135.3001.5421

🍀 知乎 https://www.zhihu.com/people/foryouone
最后
好了,关于本次就到这里了,感谢大家阅读,最后祝大家生活快乐,每天都过的有意义哦,我们下期见!

1