1、k8s命令
k8s命令

目录
[toc]
1、基础命令
| 命令 | 描述 | 例子 |
|---|---|---|
| create | 通过文件名或标准输入创建资源 | kubectl create deployment web --image=nginx --replicas=3 |
| expose | 为Deployment,Pod创建Service | kubectl expose deployment web --port=80 --target-port=80 --type=NodePort |
| run | 在集群中运行一个特定的镜像 | kubectl run bs --image=busybox -- sleep 24h |
| set | 在对象上设置特定的功能 | / |
| explain | 文档参考资料 | |
| get | 显示一个或多个资源 | kubectl get pod,svc,deploy,ns |
| edit(这个是在线配置后立马生效的) | 使用系统编辑器编辑一个资源 | |
| delete | 通过文件名、标准输入、资源名称或标签选择器来删除资源。 | kubectl delete deploy web |
查看资源信息:get命令
语法:kubectl get <资源>
1.简单查看某个对象
kubectl get pod,svc,deploy,ns,rs,ep #查看各种资源
kubectl get pod,svc,deploy,ns,rs -o wide #加-o wide代表查看详细信息

#注意
kubectl get  deploy/deployment/deployment  三者是等价的

kubectl get pod -n kube-system #-n 指定命名空间
kubectl get pod --all-namespaces == kubectl get pod -A #查看命名空间下all的pod
#说明:
	rs--pod副本数量;
	ns--命名空间;
	ep--endpoints端;

	不指定命名空间,默认是default命名空间;
	kubectl get pod/pods都是可以的;
	kubectl get svc/service都是可以的,长命名和短命名的区别
2.get命令导出某个对象的详细信息
kubectl get service -o yaml 命令是可以直接导出来all service的;
kubectl get service -o yaml|grep selector -A  1 #-A代表查看包含范本内容的后一行
4.查看serviceaccount(授权rbac),rolebinding
#示例
[root@kubernetes-master ~]#kubectl get sa,rolebinding -n app-team1 #查看
#查看serviceaccount(授权rbac),rolebinding
NAME                        SECRETS   AGE
serviceaccount/cici-token   1         4m53s
serviceaccount/default      1         23m

NAME                                               ROLE                                 AGE
rolebinding.rbac.authorization.kubernetes.io/cicd-token   ClusterRole/deployment-clusterrole   49s
[root@kubernetes-master ~]#
5.用cicd-token服务账号查看pod
#示例
[root@kubernetes-master ~]#kubectl --as=system:serviceaccount:app-team1:cicd-token get pods -n app-team1 #用cicd-token服务账号查看pod失败
Error from server (Forbidden): pods is forbidden: User "system:serviceaccount:app-team1:cicd-token" cannot list resource "pods" in API group "" in the namespace "app-team1"
6.指定kubeconfig文件测试权限
#指定kubeconfig文件测试权限:
kubectl get pods --kubeconfig=./aliang.kubeconfig
7.我们可以通过如下命令来查看当前用户在kubernetes中拥有哪权限?
#注意:我们可以通过如下命令来查看当前用户在kubernetes中拥有哪权限?
[root@kubernetes-master rbac]#kubectl describe role pod-reader
Name:         pod-reader
Labels:       <none>
Annotations:  <none>
PolicyRule:
  Resources         Non-Resource URLs  Resource Names  Verbs
  ---------         -----------------  --------------  -----
  deployments       []                 []              [get watch list delete]
  pods              []                 []              [get watch list delete]
  services          []                 []              [get watch list delete]
  deployments.apps  []                 []              [get watch list delete]
  pods.apps         []                 []              [get watch list delete]
  services.apps     []                 []              [get watch list delete]
[root@kubernetes-master rbac]#
8.注意:kubectl get pod输出的pod字段含义
[root@k8s-master ~]#kubectl get pod
NAME                                      READY   STATUS             RESTARTS   AGE
app-demo3-5d64754766-9jpp9                1/1     Running            2          24h
app-demo3-5d64754766-x8w5b                1/1     Running            2          24h
app-demo3-5d64754766-xjm8r                1/1     Running            2          24h

deployment名称-rs名称-随机字符串

注意:`kubectl get pod`输出的pod字段含义
例子:如何查看secret对象内容
方法1:jq命令
#这是一个secret对象
[root@master1 ~]#kubectl get secret alertmanager-main-generated  -nmonitoring
NAME                          TYPE     DATA   AGE
alertmanager-main-generated   Opaque   1      22d

#以json形式查看
[root@master1 ~]#kubectl get secret alertmanager-main-generated -n monitoring -o json
{
    "apiVersion": "v1",
    "data": {
        "alertmanager.yaml": "Imdsb2JhbCI6CiAgInJlc29sdmVfdGltZW91dCI6ICI1bSIKImluaGliaXRfcnVsZXMiOgotICJlcXVhbCI6CiAgLSAibmFtZXNwYWNlIgogIC0gImFsZXJ0bmFtZSIKICAic291cmNlX21hdGNoZXJzIjoKICAtICJzZXZlcml0eSA9IGNyaXRpY2FsIgogICJ0YXJnZXRfbWF0Y2hlcnMiOgogIC0gInNldmVyaXR5ID1+IHdhcm5pbmd8aW5mbyIKLSAiZXF1YWwiOgogIC0gIm5hbWVzcGFjZSIKICAtICJhbGVydG5hbWUiCiAgInNvdXJjZV9tYXRjaGVycyI6CiAgLSAic2V2ZXJpdHkgPSB3YXJuaW5nIgogICJ0YXJnZXRfbWF0Y2hlcnMiOgogIC0gInNldmVyaXR5ID0gaW5mbyIKLSAiZXF1YWwiOgogIC0gIm5hbWVzcGFjZSIKICAic291cmNlX21hdGNoZXJzIjoKICAtICJhbGVydG5hbWUgPSBJbmZvSW5oaWJpdG9yIgogICJ0YXJnZXRfbWF0Y2hlcnMiOgogIC0gInNldmVyaXR5ID0gaW5mbyIKInJlY2VpdmVycyI6Ci0gIm5hbWUiOiAiRGVmYXVsdCIKLSAibmFtZSI6ICJXYXRjaGRvZyIKLSAibmFtZSI6ICJDcml0aWNhbCIKLSAibmFtZSI6ICJudWxsIgoicm91dGUiOgogICJncm91cF9ieSI6CiAgLSAibmFtZXNwYWNlIgogICJncm91cF9pbnRlcnZhbCI6ICI1bSIKICAiZ3JvdXBfd2FpdCI6ICIzMHMiCiAgInJlY2VpdmVyIjogIkRlZmF1bHQiCiAgInJlcGVhdF9pbnRlcnZhbCI6ICIxMmgiCiAgInJvdXRlcyI6CiAgLSAibWF0Y2hlcnMiOgogICAgLSAiYWxlcnRuYW1lID0gV2F0Y2hkb2ciCiAgICAicmVjZWl2ZXIiOiAiV2F0Y2hkb2ciCiAgLSAibWF0Y2hlcnMiOgogICAgLSAiYWxlcnRuYW1lID0gSW5mb0luaGliaXRvciIKICAgICJyZWNlaXZlciI6ICJudWxsIgogIC0gIm1hdGNoZXJzIjoKICAgIC0gInNldmVyaXR5ID0gY3JpdGljYWwiCiAgICAicmVjZWl2ZXIiOiAiQ3JpdGljYWwi"
    },
    "kind": "Secret",
    "metadata": {
        "creationTimestamp": "2022-08-20T13:46:51Z",
        "labels": {
            "managed-by": "prometheus-operator"
        },
        "name": "alertmanager-main-generated",
        "namespace": "monitoring",
        "ownerReferences": [
            {
                "apiVersion": "monitoring.coreos.com/v1",
                "blockOwnerDeletion": true,
                "controller": true,
                "kind": "Alertmanager",
                "name": "main",
                "uid": "604067f4-b570-4802-b1dc-df20062ab9bf"
            }
        ],
        "resourceVersion": "1985271",
        "uid": "d4dd90cf-7f79-4038-abae-63e057269fe6"
    },
    "type": "Opaque"
}


#用js工具查看
[root@master1 ~]#kubectl get secret alertmanager-main-generated -n monitoring -o json | jq -r '.data."alertmanager.yaml"' | base64 --decode
"global":
  "resolve_timeout": "5m"
"inhibit_rules":
- "equal":
  - "namespace"
  - "alertname"
  "source_matchers":
  - "severity = critical"
  "target_matchers":
  - "severity =~ warning|info"
- "equal":
  - "namespace"
  - "alertname"
  "source_matchers":
  - "severity = warning"
  "target_matchers":
  - "severity = info"
- "equal":
  - "namespace"
  "source_matchers":
  - "alertname = InfoInhibitor"
  "target_matchers":
  - "severity = info"
"receivers":
- "name": "Default"
- "name": "Watchdog"
- "name": "Critical"
- "name": "null"
"route":
  "group_by":
  - "namespace"
  "group_interval": "5m"
  "group_wait": "30s"
  "receiver": "Default"
  "repeat_interval": "12h"
  "routes":
  - "matchers":
    - "alertname = Watchdog"
    "receiver": "Watchdog"
  - "matchers":
    - "alertname = InfoInhibitor"
    "receiver": "null"
  - "matchers":
    - "severity = critical"
    "receiver": "Critical"[root@master1 ~]#
方法2:base64decode

例子:以不同的输出格式打印资源对象的信息:-o jsonpath
kubectl get命令支持多种不同的输出格式,例如wide、yaml、json、custom-columns、jsonpath和go-template等,每一种格式都以不同的输出格式打印资源对象的信息。例如,下面的命令能够取出kube-system名称空间中带有k8s-app=kube-dns标签的Pod对象的资源名称。
[root@k8s-master ~]#kubectl get po -l k8s-app=kube-dns -nkube-system
NAME                       READY   STATUS    RESTARTS   AGE
coredns-7f89b7bc75-m5shf   1/1     Running   1          189d
coredns-7f89b7bc75-tcpch   1/1     Running   1          189d
[root@k8s-master ~]#kubectl get po -l k8s-app=kube-dns -nkube-system -o jsonpath="{.items[0].metadata.name}"
coredns-7f89b7bc75-m5shf[root@k8s-master ~]#kubectl get po -l k8s-app=kube-dns -nkube-system -o jsonpath="{.items[1].metadata.name}"
coredns-7f89b7bc75-tcpch[root@k8s-master ~]#
案例:
[root@k8s-master ~]#kubectl get po
NAME                       READY   STATUS             RESTARTS   AGE
nginx-6799fc88d8-wqk9h     1/1     Running            0          16m
[root@k8s-master ~]#POD_IP=$(kubectl get po -l app=nginx -o jsonpath="{.items[0].status.podIP}")
[root@k8s-master ~]#curl $POD_IP:80
<!DOCTYPE html>
<html>
<head>
<title>Welcome to nginx!</title>
<style>
html { color-scheme: light dark; }
body { width: 35em; margin: 0 auto;
font-family: Tahoma, Verdana, Arial, sans-serif; }
</style>
</head>
<body>
<h1>Welcome to nginx!</h1>
<p>If you see this page, the nginx web server is successfully installed and
working. Further configuration is required.</p>

<p>For online documentation and support please refer to
<a href="http://nginx.org/">nginx.org</a>.<br/>
Commercial support is available at
<a href="http://nginx.com/">nginx.com</a>.</p>

<p><em>Thank you for using nginx.</em></p>
</body>
</html>
例子:--custom-columns选项自定义要显示的字段
get命令也能够借助**--custom-columns选项**自定义要显示的字段,例如下面的命令只显示了myns名称空间的简要信息中的Name字段。
[root@k8s-master ~]#kubectl get ns kube-system -o custom-columns=NAME:metadata.name
NAME
kube-system
[root@k8s-master ~]#
例子:查看node节点状态
[root@kubernetes-master ~]#kubectl get node
NAME         STATUS   ROLES                  AGE   VERSION
kubernetes-master   Ready    control-plane,master   50d   v1.21.2
kubernetes-node1    Ready    <none>                 50d   v1.21.2
kubernetes-node2    Ready    <none>                 50d   v1.21.2

问题:为什么kubectl get node输出的node也包含master节点?
回答:因为哪个节点部署了kubelet,哪个节点就会在这里显示。  kubelet就相当于每个节点上的agent;
这个命令输出代表了所有部署了kubelet的节点;
每个组件都是必须要有kubelet的;
这个kubernetes-master只是一个名称而已;
kuneadm安装方式中master节点在执行kubectl init时,里面包含了安装kubelet这个步骤了;

kubectl get node -> apiserver <- kubelet(kubeadm join);
例子:查看node节点标签
[root@k8s-master ~]#kubectl get nodes --show-labels
NAME         STATUS     ROLES                  AGE    VERSION   LABELS
k8s-master   Ready      control-plane,master   284d   v1.20.0   beta.kubernetes.io/arch=amd64,beta.kubernetes.io/os=linux,kubernetes.io/arch=amd64,kubernetes.io/hostname=k8s-master,kubernetes.io/os=linux,node-role.kubernetes.io/control-plane=,node-role.kubernetes.io/master=
k8s-node1    NotReady   <none>                 284d   v1.20.0   beta.kubernetes.io/arch=amd64,beta.kubernetes.io/os=linux,disktype2=sata,disktype=ssd,kubernetes.io/arch=amd64,kubernetes.io/hostname=k8s-node1,kubernetes.io/os=linux,love=xyy
k8s-node2    NotReady   <none>                 284d   v1.20.0   beta.kubernetes.io/arch=amd64,beta.kubernetes.io/os=linux,kubernetes.io/arch=amd64,kubernetes.io/hostname=k8s-node2,kubernetes.io/os=linux
例子:查看master组件状态
[root@k8s-master ~]#kubectl get cs
NAME                 STATUS      MESSAGE                                                                                       ERROR
scheduler            Unhealthy   Get "http://127.0.0.1:10251/healthz": dial tcp 127.0.0.1:10251: connect: connection refused
controller-manager   Unhealthy   Get "http://127.0.0.1:10252/healthz": dial tcp 127.0.0.1:10252: connect: connection refused
etcd-0               Healthy     {"health":"true"}
Warning: v1 ComponentStatus is deprecated in v1.19+
例子:查看Apiserver代理的URL
[root@k8s-master ~]#kubectl cluster-info #了解即可
Kubernetes control plane is running at https://172.29.9.31:6443
KubeDNS is running at https://172.29.9.31:6443/api/v1/namespaces/kube-system/services/kube-dns:dns/proxy

To further debug and diagnose cluster problems, use 'kubectl cluster-info dump'.
api-server也是一个代理程序,所以很多程度都注册上来,都会被代理。
例子:查看集群详细信息
[root@k8s-master ~]#kubectl cluster-info dump #了解即可
例子:查看k8s所有资源
[root@k8s-master ~]#kubectl api-resources
NAME                              SHORTNAMES   APIVERSION                             NAMESPACED   KIND
bindings                                       v1                                     true         Binding

例子:查看注册到api-server的服务
[root@k8s-master ~]#kubectl get apiservices
NAME                                   SERVICE                      AVAILABLE   AGE
v1.                                    Local                        True        284d
v1.admissionregistration.k8s.io        Local                        True        284d
v1.apiextensions.k8s.io                Local                        True        284d
v1.apps                                Local                        True        284d
……
例子:查看集群中的 API 组织形式
[root@master1 ~]#kubectl get --raw /
{
  "paths": [
    "/.well-known/openid-configuration",
    "/api",
    "/api/v1",
    "/apis",
    "/apis/",
    "/apis/admissionregistration.k8s.io",
    "/apis/admissionregistration.k8s.io/v1",
    "/apis/apiextensions.k8s.io",
    "/apis/apiextensions.k8s.io/v1",
    "/apis/apiregistration.k8s.io",
    "/apis/apiregistration.k8s.io/v1",
    "/apis/apps",
    "/apis/apps/v1",
    "/apis/authentication.k8s.io",
    "/apis/authentication.k8s.io/v1",
    "/apis/authorization.k8s.io",
    "/apis/authorization.k8s.io/v1",
    "/apis/autoscaling",
    "/apis/autoscaling/v1",
    "/apis/autoscaling/v2beta1",
    "/apis/autoscaling/v2beta2",
    "/apis/batch",
    "/apis/batch/v1",
    "/apis/batch/v1beta1",
    "/apis/certificates.k8s.io",
    "/apis/certificates.k8s.io/v1",
    "/apis/coordination.k8s.io",
    "/apis/coordination.k8s.io/v1",
    "/apis/discovery.k8s.io",
    "/apis/discovery.k8s.io/v1",
    "/apis/discovery.k8s.io/v1beta1",
    "/apis/events.k8s.io",
    "/apis/events.k8s.io/v1",
    "/apis/events.k8s.io/v1beta1",
    "/apis/flowcontrol.apiserver.k8s.io",
    "/apis/flowcontrol.apiserver.k8s.io/v1beta1",
    "/apis/metrics.k8s.io",
    "/apis/metrics.k8s.io/v1beta1",
    "/apis/networking.k8s.io",
    "/apis/networking.k8s.io/v1",
    "/apis/node.k8s.io",
    "/apis/node.k8s.io/v1",
    "/apis/node.k8s.io/v1beta1",
    "/apis/policy",
    "/apis/policy/v1",
    "/apis/policy/v1beta1",
    "/apis/rbac.authorization.k8s.io",
    "/apis/rbac.authorization.k8s.io/v1",
    "/apis/scheduling.k8s.io",
    "/apis/scheduling.k8s.io/v1",
    "/apis/storage.k8s.io",
    "/apis/storage.k8s.io/v1",
    "/apis/storage.k8s.io/v1beta1",
    "/healthz",
    "/healthz/autoregister-completion",
    "/healthz/etcd",
    "/healthz/log",
    "/healthz/ping",
    "/healthz/poststarthook/aggregator-reload-proxy-client-cert",
    "/healthz/poststarthook/apiservice-openapi-controller",
    "/healthz/poststarthook/apiservice-registration-controller",
    "/healthz/poststarthook/apiservice-status-available-controller",
    "/healthz/poststarthook/bootstrap-controller",
    "/healthz/poststarthook/crd-informer-synced",
    "/healthz/poststarthook/generic-apiserver-start-informers",
    "/healthz/poststarthook/kube-apiserver-autoregistration",
    "/healthz/poststarthook/priority-and-fairness-config-consumer",
    "/healthz/poststarthook/priority-and-fairness-config-producer",
    "/healthz/poststarthook/priority-and-fairness-filter",
    "/healthz/poststarthook/rbac/bootstrap-roles",
    "/healthz/poststarthook/scheduling/bootstrap-system-priority-classes",
    "/healthz/poststarthook/start-apiextensions-controllers",
    "/healthz/poststarthook/start-apiextensions-informers",
    "/healthz/poststarthook/start-cluster-authentication-info-controller",
    "/healthz/poststarthook/start-kube-aggregator-informers",
    "/healthz/poststarthook/start-kube-apiserver-admission-initializer",
    "/livez",
    "/livez/autoregister-completion",
    "/livez/etcd",
    "/livez/log",
    "/livez/ping",
    "/livez/poststarthook/aggregator-reload-proxy-client-cert",
    "/livez/poststarthook/apiservice-openapi-controller",
    "/livez/poststarthook/apiservice-registration-controller",
    "/livez/poststarthook/apiservice-status-available-controller",
    "/livez/poststarthook/bootstrap-controller",
    "/livez/poststarthook/crd-informer-synced",
    "/livez/poststarthook/generic-apiserver-start-informers",
    "/livez/poststarthook/kube-apiserver-autoregistration",
    "/livez/poststarthook/priority-and-fairness-config-consumer",
    "/livez/poststarthook/priority-and-fairness-config-producer",
    "/livez/poststarthook/priority-and-fairness-filter",
    "/livez/poststarthook/rbac/bootstrap-roles",
    "/livez/poststarthook/scheduling/bootstrap-system-priority-classes",
    "/livez/poststarthook/start-apiextensions-controllers",
    "/livez/poststarthook/start-apiextensions-informers",
    "/livez/poststarthook/start-cluster-authentication-info-controller",
    "/livez/poststarthook/start-kube-aggregator-informers",
    "/livez/poststarthook/start-kube-apiserver-admission-initializer",
    "/logs",
    "/metrics",
    "/openapi/v2",
    "/openid/v1/jwks",
    "/readyz",
    "/readyz/autoregister-completion",
    "/readyz/etcd",
    "/readyz/informer-sync",
    "/readyz/log",
    "/readyz/ping",
    "/readyz/poststarthook/aggregator-reload-proxy-client-cert",
    "/readyz/poststarthook/apiservice-openapi-controller",
    "/readyz/poststarthook/apiservice-registration-controller",
    "/readyz/poststarthook/apiservice-status-available-controller",
    "/readyz/poststarthook/bootstrap-controller",
    "/readyz/poststarthook/crd-informer-synced",
    "/readyz/poststarthook/generic-apiserver-start-informers",
    "/readyz/poststarthook/kube-apiserver-autoregistration",
    "/readyz/poststarthook/priority-and-fairness-config-consumer",
    "/readyz/poststarthook/priority-and-fairness-config-producer",
    "/readyz/poststarthook/priority-and-fairness-filter",
    "/readyz/poststarthook/rbac/bootstrap-roles",
    "/readyz/poststarthook/scheduling/bootstrap-system-priority-classes",
    "/readyz/poststarthook/start-apiextensions-controllers",
    "/readyz/poststarthook/start-apiextensions-informers",
    "/readyz/poststarthook/start-cluster-authentication-info-controller",
    "/readyz/poststarthook/start-kube-aggregator-informers",
    "/readyz/poststarthook/start-kube-apiserver-admission-initializer",
    "/readyz/shutdown",
    "/version"
  ]
}
[root@master1 ~]#
例子:通过 kubectl 来查询对应api对象下面的数据
[root@master1 ~]#kubectl get --raw /apis/batch/v1 | python -m json.tool
{
    "apiVersion": "v1",
    "groupVersion": "batch/v1",
    "kind": "APIResourceList",
    "resources": [
        {
            "categories": [
                "all"
            ],
            "kind": "CronJob",
            "name": "cronjobs",
            "namespaced": true,
            "shortNames": [
                "cj"
            ],
            "singularName": "",
            "storageVersionHash": "sd5LIXh4Fjs=",
            "verbs": [
                "create",
                "delete",
                "deletecollection",
                "get",
                "list",
                "patch",
                "update",
                "watch"
            ]
        },
        {
            "kind": "CronJob",
            "name": "cronjobs/status",
            "namespaced": true,
            "singularName": "",
            "verbs": [
                "get",
                "patch",
                "update"
            ]
        },
        {
            "categories": [
                "all"
            ],
            "kind": "Job",
            "name": "jobs",
            "namespaced": true,
            "singularName": "",
            "storageVersionHash": "mudhfqk/qZY=",
            "verbs": [
                "create",
                "delete",
                "deletecollection",
                "get",
                "list",
                "patch",
                "update",
                "watch"
            ]
        },
        {
            "kind": "Job",
            "name": "jobs/status",
            "namespaced": true,
            "singularName": "",
            "verbs": [
                "get",
                "patch",
                "update"
            ]
        }
    ]
}
例子:通过 kubectl proxy 命令来开启对 apiserver 的访问
🍀 但是这个操作和我们平时操作 HTTP 服务的方式不太一样,这里我们可以通过 kubectl proxy 命令来开启对 apiserver 的访问:
[root@master1 ~]#kubectl proxy
Starting to serve on 127.0.0.1:8001
然后重新开启一个新的终端,我们可以通过如下方式来访问批处理的 API 服务:
[root@master1 ~]#curl http://127.0.0.1:8001/apis/batch/v1
{
  "kind": "APIResourceList",
  "apiVersion": "v1",
  "groupVersion": "batch/v1",
  "resources": [
    {
      "name": "cronjobs",
      "singularName": "",
      "namespaced": true,
      "kind": "CronJob",
      "verbs": [
        "create",
        "delete",
        "deletecollection",
        "get",
        "list",
        "patch",
        "update",
        "watch"
      ],
      "shortNames": [
        "cj"
      ],
      "categories": [
        "all"
      ],
      "storageVersionHash": "sd5LIXh4Fjs="
    },
    {
      "name": "cronjobs/status",
      "singularName": "",
      "namespaced": true,
      "kind": "CronJob",
      "verbs": [
        "get",
        "patch",
        "update"
      ]
    },
    {
      "name": "jobs",
      "singularName": "",
      "namespaced": true,
      "kind": "Job",
      "verbs": [
        "create",
        "delete",
        "deletecollection",
        "get",
        "list",
        "patch",
        "update",
        "watch"
      ],
      "categories": [
        "all"
      ],
      "storageVersionHash": "mudhfqk/qZY="
    },
    {
      "name": "jobs/status",
      "singularName": "",
      "namespaced": true,
      "kind": "Job",
      "verbs": [
        "get",
        "patch",
        "update"
      ]
    }
  ]
}[root@master1 ~]#
同样也可以去访问另外一个版本的对象数据:
[root@master1 ~]#curl http://127.0.0.1:8001/apis/batch/v1beta1
{
  "kind": "APIResourceList",
  "apiVersion": "v1",
  "groupVersion": "batch/v1beta1",
  "resources": [
    {
      "name": "cronjobs",
      "singularName": "",
      "namespaced": true,
      "kind": "CronJob",
      "verbs": [
        "create",
        "delete",
        "deletecollection",
        "get",
        "list",
        "patch",
        "update",
        "watch"
      ],
      "shortNames": [
        "cj"
      ],
      "categories": [
        "all"
      ],
      "storageVersionHash": "sd5LIXh4Fjs="
    },
    {
      "name": "cronjobs/status",
      "singularName": "",
      "namespaced": true,
      "kind": "CronJob",
      "verbs": [
        "get",
        "patch",
        "update"
      ]
    }
  ]
}[root@master1 ~]#
创建pod:run命令
- 例子:
run命令创建
kubectl run nginx --image=nginx #注意只要你单独创建一个pod,不管是命令行,还是yaml,都是独立运行的,不受deployment控制;

#注意
在k8s中,我们一般是不会直接创建pod的,直接创建pod的话,就和docker中创建容器基本没什么两样了,我们也就不会感受到k8s带给我们的一些高级功能了。
- 例子:
--rm参数
kubectl run -it --image busybox:1.28.3 test --restart=Never --rm /bin/sh
具体测试过程:
1.查看当前环境
[root@master1 ~]#kubectl get po
No resources found in default namespace.

2.使用kubectl创建一个容器
[root@master1 ~]#kubectl run -it --image busybox:1.28.3 test  --restart=Never --rm /bin/sh
If you don't see a command prompt, try pressing enter.
/ # ls
bin   dev   etc   home  proc  root  sys   tmp   usr   var
/ # hostname
test
/ #

3.打开另一个终端,观察这个容器,其实kubectl给我们创建的是一个pod
[root@master1 ~]#kubectl get po -owide
NAME   READY   STATUS    RESTARTS   AGE    IP             NODE    NOMINATED NODE   READINESS GATES
test   1/1     Running   0          108s   10.244.2.104   node2   <none>           <none>
[root@master1 ~]#

3.退出容器后,再次查看下pod状态
[root@master1 ~]#kubectl get po
NAME   READY   STATUS      RESTARTS   AGE
test   0/1     Completed   0          3m38s #注意这i

[root@master1 ~]#kubectl describe pod test
……
  State:          Terminated
      Reason:       Completed
      Exit Code:    0
      Started:      Tue, 23 Nov 2021 20:27:52 +0800
      Finished:     Tue, 23 Nov 2021 20:28:04 +0800
    Ready:          False
……
Events:
  Type     Reason       Age                    From               Message
  ----     ------       ----                   ----               -------
  Normal   Scheduled    4m11s                  default-scheduler  Successfully assigned default/test to node2
  Normal   Pulled       4m10s                  kubelet            Container image "busybox:1.28.3" already present on machine
  Normal   Created      4m9s                   kubelet            Created container test
  Normal   Started      4m7s                   kubelet            Started container test
  Warning  FailedMount  3m51s (x4 over 3m55s)  kubelet            MountVolume.SetUp failed for volume "kube-api-access-zljjd" : object "default"/"kube-root-ca.crt" not registered

4.删除测试Pod
[root@master1 ~]#kubectl delete po test
pod "test" deleted
[root@master1 ~]#kubectl get po
No resources found in default namespace.
[root@master1 ~]#
注意: 如果对
kubectl run命令的使用参数不清楚,我们可以使用kubectl run --help命令查看可使用的参数。我们这里使用kubectl run命令启动了一个以 busybox 为镜像的 Pod,--rm参数意味着我们退出 Pod 后就会被删除,和之前的docker run命令用法基本一致。 --rm=false: If true, delete resources created in this command for attached containers.busybox 镜像
busybox最新版本的镜像有 BUG,会出现nslookup提示无法解析的问题,我们这里使用老一点的镜像版本1.28.3即可。
- 例子:
sleep 24h参数
示例:
`kubectl run bs --image=busybox -- sleep 24h` #注意这里的-- sleep 24h命令

示例:创建pod时指定标签的命令
[root@kubernetes-master np]#kubectl run  client1 -l run=client1 --image=busybox -n test -- sleep 12h
pod/client1 created
[root@kubernetes-master np]#kubectl run  client2 -l run=client2 --image=busybox -n test -- sleep 12h
pod/client2 created
#查看pod标签
[root@kubernetes-master np]#kubectl get pod -n test --show-labels
NAME      READY   STATUS    RESTARTS   AGE   LABELS
busybox   1/1     Running   1          22h   run=busybox
client1   1/1     Running   0          33s   run=client1
client2   1/1     Running   0          20s   run=client2
web       1/1     Running   1          8h    run=web
创建资源对象:create命令
- 例子:牛刀小试,快速部署一个nginx网站
#使用Deployment控制器部署镜像:
[root@kubernetes-master ~]#kubectl create deployment web --image=nginx
deployment.apps/web created

#此时用kubectl get pods命令查看pod是否是运行的:
[root@master1 ~]#kubectl get po
NAME                       READY   STATUS             RESTARTS          AGE
web-8667899c97-2s4mv       1/1     Running            0                 20s
[root@master1 ~]#kubectl get deploy
NAME   READY   UP-TO-DATE   AVAILABLE   AGE
web    1/1     1            1           23s

#使用Service将Pod暴露出去:
[root@master1 ~]#kubectl expose deployment web --port=80 --target-port=80 --type=NodePort
service/web exposed
#备注
#第一个--port是kubernetes集群内部访问端口,通过集群内部访问的ip, cluster ip;
#第二个--target--port是镜像里服务跑的端口号;

#用kubectl get service命令查看刚才创建的service:
[root@master1 ~]#kubectl get svc
NAME         TYPE        CLUSTER-IP      EXTERNAL-IP   PORT(S)        AGE
kubernetes   ClusterIP   10.96.0.1       <none>        443/TCP        10d
web          NodePort    10.105.119.46   <none>        80:30382/TCP   34s

#访问应用
http://NodeIP:Port # 端口随机生成,通过get svc获取
#注意:此时你通过任意的nodeip:端口都可访问nginx应用;(masterip:端口是不行的)
[root@master1 ~]#curl 172.29.9.63:30382
<!DOCTYPE html>
<html>
<head>
<title>Welcome to nginx!</title>
<style>
html { color-scheme: light dark; }
body { width: 35em; margin: 0 auto;
font-family: Tahoma, Verdana, Arial, sans-serif; }
</style>
</head>
<body>
<h1>Welcome to nginx!</h1>
<p>If you see this page, the nginx web server is successfully installed and
working. Further configuration is required.</p>

<p>For online documentation and support please refer to
<a href="http://nginx.org/">nginx.org</a>.<br/>
Commercial support is available at
<a href="http://nginx.com/">nginx.com</a>.</p>

<p><em>Thank you for using nginx.</em></p>
</body>
</html>
- 例子:
-f后面接yaml用法
示例:
$kubectl create -f deployment-demoapp.yaml -f service-demoapp.yaml #-f后面可以接多个yaml文件的哦

示例:
$kubectl create -f ./pod.json #kubectrl create后面可以跟上文件,但是它只限于创建一个资源,而不能更新资源。
- 例子:使用Deployment控制器部署镜像
$kubectl create deployment web --image=nginx

$kubectl create deployment web --image=nginx --replicas=3 #创建deployment时指定副本数(--replicas)
- 例子:创建命名空间
示例:
$kubectl create ns dev
- 例子:创建svc
$ kubectl create svc clusterip demoapp --tcp=80 -n dev

$ kubectl create service nodeport demoapp --tcp=80 #(nodeport|clusterip|externalname|loadbalancer)

在上面的命令中,nodeport是指Service对象的类型,它会在集群中各节点上随机选择一个节点端口(hostPort)为该Service对象接入集群外部的访问流量,集群内部流量则由Service资源通过ClusterIP直接接入。

命令选项--tcp=<port>[:<targetPort>]用于指定Servcie端口及容器上要暴露的端口,省略容器端口时表示与Service端口相同。
- 例子:创建service account并绑定默认cluster-admin管理员集群角色
案例1:
# 创建用户
$ kubectl create serviceaccount dashboard-admin -n kube-system

# 用户授权
$ kubectl create clusterrolebinding dashboard-admin --clusterrole=cluster-admin --serviceaccount=kube-system:dashboard-admin

# 获取用户Token
$ kubectl describe secrets -n kube-system $(kubectl -n kube-system get secret | awk '/dashboard-admin/{print $1}')
案例2:
 解答:
解答:

1、切换环境
kubectl config use-context kubernetes

2、配置
kubectl create clusterrole deployment-clusterrole --verb=create --resource=deployments,daemonsets,statefulsets
kubectl create serviceaccount cicd-token -n app-team1
# 题目中写了“限于 namespace app-team1 中”,则创建 rolebinding。没有写的话,则创建 clusterrolebinding。
kubectl create rolebinding cicd-token-rolebinding --serviceaccount=app-team1:cicd-token --clusterrole=deployment-clusterrole -n app-team1
# rolebinding 后面的名字 cicd-token-rolebinding 随便起的,因为题目中没有要求,如果题目中有要求,就不能随便起了。

3、验证
#稍微验证下
kubectl describe rolebinding cicd-token-rolebinding -napp-team1
暴露服务:expose命令
🍀 例子:通过service对象把服务暴露出去
1.
kubectl expose deployment nginx --port=80 --target-port=80 --type=NodePort #注意:这个创建出来的名称和deployment的名称是一样的;

2.
kubectl expose deployment nginx --port=80 --target-port=80 --type=NodePort --name=service #这里也可以指定服务名的;
create和apply的区别?20210817
孟凡杰大佬说:
- 有人说,不用create,用apply,apply也是一个很好的方式。kubectl提供很多命令,kubecrate就相当于明确地告诉kubernetes说,我要创建一个这样的对象,那么这个对象就叫做nginx。
- ``如果用apply的话,其实是告诉kubernetes说,如果没有的话,就帮我创建,如果有的话,就帮我更新`。;apply是幂等的;
其实敲命令行,你想看他们的区别很简单。 我给大家举个例子。 你只需要加上-v 9,-v 9其实就是把这条命令的……什么…… log打出来了……………… kubectl是一个binary,但事实上它真正的apiserver调用还是一个restful 靠…………,所以你敲kubectl,它只是把这个rest靠……这个隐藏起来了。它最终还是转成了rest靠……
kubectl create -f nginx.yaml -v 9

是因为我那个对象已经存在了,所以才报这么多log。没关系,我们去看他们的区别。

1、你可以看到如果我是create的话,kubectl会把这条命令转换成curl -XPOST,所以它是一个POST操作;

那么如果我是apply呢?
2、kubectl apply -f nginx.yaml -v 9
你可以看到这次的操作是PATCH。


所以create和apply的操作是什么呢?
1.create就相当于它会把你整个文件读出来,然你后通过post方法发到apiserver;
2.那么replace呢?replace就相当于kubectl本身提供了一个client 的PATCH功能,那么这个本身后面的版本可能要发生一些变化,但你你可以看到,它的真正一个操作是一个PATCH操作。然后PATCH操作里面有个叫strategic-merge-patch+json,那么事实上,做了一个什么操作?它会去对比当前apiserver那边存的这个对象的版本和本地通过-f传给它的中间有哪些差异。那么kubectl本身这个命令行,会把这2个json做一个diff,就相当于找出差异,然后create一个mege PATCH,然后再把这个merge PATCH,就相当于一个增量的部分,不像刚才的 POST,会把整个spec扔过去,那么对于PATCH来说,它只是发不同的部分,发到apiserver,所以你看,这个就是PATCH的request body。它会把metadata的部分传过来,但是spc里面只有replica=1,多以对于PATCH来说,它就是提取一个增量,就相当于……是通过client这一端做了一个merge PATCH,生成了一个代尔塔……传给appiseerver,然后让apiserver直接把这个代尔塔apply上去。


那么对于apiserver的操作也有很多种。有updae,如果我们真正写代码的时候,任何的对象,它的apiserver调用都有update,都有PATCH,那么一般我们是不去使用update,而去使用PATCH的,因为PATCH本身是计算增量,然后它传输的那个文件的大小就非常小。
k8s资源对象的文档参考资料:explain命令
我们想知道如何去写某种资源的yaml,就可以去使用explains命令去查看;
例如: 常见的资源字段类型: string object,说明我们可以继续查看这个字段后面有什么配置选项的,例如用命令
kubectl explain replicaset.spec注意,这个带有-required-表示必须写有这个字段这里还需要特备注意下:kubectl explains展示的命令并不一定和版本是完全对应的,有可能命令解释那里信息没更新出来。
[root@master1 ~]#kubectl explain replicaset
KIND:     ReplicaSet
VERSION:  apps/v1

DESCRIPTION:
     ReplicaSet ensures that a specified number of pod replicas are running at
     any given time.

FIELDS:
   apiVersion   <string> #string
     APIVersion defines the versioned schema of this representation of an
     object. Servers should convert recognized schemas to the latest internal
     value, and may reject unrecognized values. More info:
     https://git.k8s.io/community/contributors/devel/sig-architecture/api-conventions.md#resources

   kind <string>
     Kind is a string value representing the REST resource this object
     represents. Servers may infer this from the endpoint the client submits
     requests to. Cannot be updated. In CamelCase. More info:
     https://git.k8s.io/community/contributors/devel/sig-architecture/api-conventions.md#types-kinds

   metadata     <Object> #这里是object,说明我们可以继续查看这个字段后面有什么配置选项的,例如用命令`kubectl explain replicaset.spec`
     If the Labels of a ReplicaSet are empty, they are defaulted to be the same
     as the Pod(s) that the ReplicaSet manages. Standard object's metadata. More
     info:
     https://git.k8s.io/community/contributors/devel/sig-architecture/api-conventions.md#metadata

   spec <Object>
     Spec defines the specification of the desired behavior of the ReplicaSet.
     More info:
     https://git.k8s.io/community/contributors/devel/sig-architecture/api-conventions.md#spec-and-status

   status       <Object>
     Status is the most recently observed status of the ReplicaSet. This data
     may be out of date by some window of time. Populated by the system.
     Read-only. More info:
     https://git.k8s.io/community/contributors/devel/sig-architecture/api-conventions.md#spec-and-status

[root@master1 ~]#
[root@master1 ~]#kubectl explain replicaset.spec
KIND:     ReplicaSet
VERSION:  apps/v1

RESOURCE: spec <Object>

DESCRIPTION:
     Spec defines the specification of the desired behavior of the ReplicaSet.
     More info:
     https://git.k8s.io/community/contributors/devel/sig-architecture/api-conventions.md#spec-and-status

     ReplicaSetSpec is the specification of a ReplicaSet.

FIELDS:
   minReadySeconds      <integer>
     Minimum number of seconds for which a newly created pod should be ready
     without any of its container crashing, for it to be considered available.
     Defaults to 0 (pod will be considered available as soon as it is ready)

   replicas     <integer>
     Replicas is the number of desired replicas. This is a pointer to
     distinguish between explicit zero and unspecified. Defaults to 1. More
     info:
     https://kubernetes.io/docs/concepts/workloads/controllers/replicationcontroller/#what-is-a-replicationcontroller

   selector     <Object> -required- #注意,这个带有-required-表示必须写有这个字段
     Selector is a label query over pods that should match the replica count.
     Label keys and values that must match in order to be controlled by this
     replica set. It must match the pod template's labels. More info:
     https://kubernetes.io/docs/concepts/overview/working-with-objects/labels/#label-selectors

   template     <Object>
     Template is the object that describes the pod that will be created if
     insufficient replicas are detected. More info:
     https://kubernetes.io/docs/concepts/workloads/controllers/replicationcontroller#pod-template

[root@master1 ~]#
在线编辑命令:edit命令
`kubectl edit configmap kube-proxy -n kube-system` #kubeadm方式修改ipvs模式
删除资源对象:delete命令
- 例子:删除资源清单文件
#删除指定的资源清单文件
kubectl delete -f nginx-deployment.yaml

#删除当前目录下的所有以yaml启动的pod
kubectl delete -f .
- 例子:删除pod
语法:kubectl delete pod <Pod名称>

#1、删除某个pod
kubectl delete pod pod1 -n kube-system

#2、一次性删除多个pod
kubectl delete pod pod1 pod2 -n kube-system
- 例子:强制删除pod:
--force --grace-period=0
kubectl delete pod nginx-deploy-75b69bd684-5jh8p --force --grace-period=0
说明:默认所有的优雅退出时间都在30秒内,kubectl delete 命令支持 --grace-period=<seconds> 选项,这个选项允许用户用他们自己指定的值覆盖默认值,值0代表强制删除 pod。 在 kubectl 1.5 及以上的版本里,执行强制删除时必须同时指定 --force --grace-period=0。
注意:这个 --force --grace-period=0命令能不用就不用,这个可能不会删除一些依赖信息,最好还是让系统删除,进行一些垃圾回收工作;
强制删除一个 pod 是从集群中还有 etcd 里立刻删除这个 pod,只是当 Pod 被强制删除时, APIServer 不会等待来自 Pod 所在节点上的 kubelet 的确认信息:pod 已经被终止。 在 API 里 pod 会被立刻删除,在节点上, pods 被设置成立刻终止后,在强行杀掉前还会有一个很小的宽限期。
另外,有些资源类型支持优雅删除的机制,它们有着默认的删除宽限期,例如Pod资源的默认宽限期为30秒,但用户可在命令中使用--grace-period选项或--now选项来覆盖默认的宽限期。上面的命令就用于强制删除指定的Pod对象,但这种删除操作可能会导致相关容器无法终止并退出。
需要特别说明的是:对于受控于控制器的对象来说,仅删除受控对象自身,其控制器可能会重建出类似的对象,例如Deployment控制器下的Pod对象被删除时即会被重建。
- 例子:结合名称空间使用的删除命令

一次性删除某个命名空间下的某种类型的all资源

kubectl delete pods --all -n kube-public #若要删除指定名称空间中的所有某类对象,可以使用类似kubectl delete TYPE --all -n NS格式的命令。
注意:在删除之前列出其内部所有资源并再三确认各资源是否仍被需要应该被视作一个常规步骤。

- 例子:删除pv,pvc命令
kubectl delete pvc名称 -n namespace

kubectl delete pv名称
2、部署命令
| 命令 | 描述 |
|---|---|
| rollout | 管理Deployment,Daemonset资源的发布(例如状态、发布记录、回滚等) |
| rolling-update | 滚动升级,仅限ReplicationController |
| scale | 对Deployment、ReplicaSet、RC或Job资源扩容或缩容Pod数量 |
| autoscale | 为Deploy, RS, RC配置自动伸缩规则(依赖metrics-server和hpa) |
扩展副本:scale命令
例子:扩容副本数为3
$kubectl scale deployment web --replicas=3
例子:后面也可以接yaml文件
$kubectl scale --replicas=3 -f foo.yaml
滚动升级:rollout命令
管理Deployment,Daemonset资源的发布。
1.查看
例子:查看滚动升级状态
$kubectl rollout status deployment nginx-deploy

例子:
查看滚动升级记录 #或者 查看某个deployment的rs版本
$kubectl rollout history deployment nginx-deploy
或者:
$kubectl rollout history deployment nginx-deploy --revision=2
2.升级
例子:升级
$kubectl apply -f xxx.yaml --record
#备注:
      --record=false: Record current kubectl command in the resource annotation. If set to false, do not record the
command. If set to true, record the command. If not set, default to updating the existing annotation value only if one
already exists.
3.暂停/恢复某个滚动升级部署
例子:暂停某个滚动升级部署
$kubectl rollout pause deployment nginx-deploy

例子:恢复某个滚动升级部署
$kubectl rollout resume deployment nginx-deploy
4.回滚
例子:回滚到上一个版本
$kubectl rollout undo deployment nginx-deploy

例子:回滚到历史指定版本
¥kubectl rollout undo deployment nginx-deploy --to-revision=2
3、集群管理命令
| 命令 | 描述 | 例子 |
|---|---|---|
| certificate | 修改证书资源 | |
| cluster-info | 显示集群信息 | |
| top | 查看资源利用率(依赖metrics-server) | |
| cordon | 标记节点不可调度 | |
| uncordon | 标记节点可调度 | |
| drain | 驱逐节点上的应用,准备下线维护 | |
| taint | 修改节点taint标记 |
- cluster-info命令
`kubectl cluster-info`
[root@kubernetes-master ~]#kubectl cluster-info
kubernetes control plane is running at https://172.29.9.31:6443
CoreDNS is running at https://172.29.9.31:6443/api/v1/namespaces/kube-system/services/kube-dns:dns/proxy

To further debug and diagnose cluster problems, use 'kubectl cluster-info dump'.
[root@kubernetes-master ~]#
注意:这个命令你了解一下即可;
#这个只是列出了些api-server代理的url;
#因为api-server它也是一个代理程序,内置了代理;
#所以有的程序注册上来了,就会被他给代理;

或者
`kubectl cluster-info dump`
- 查看集群信息
kubectl cluster-info
kubectl cluster-info dump
systemctl status kube-apiserver
systemctl status kubelet
systemctl status kube-proxy
systemctl status kube-scheduler
systemctl status kube-controller-manager
systemctl status docker

# 查看节点资源使用情况:
`kubectl top nodes`
# 查看状态:
`kubectl get componentstatuses`
- Node的隔离与恢复
## 隔离kubectl cordon kubernetes-node1## 恢复kubectl uncordon kubernetes-node1
污点命令:taint命令
例子:给某个node打上污点
➜ kubectl taint nodes node2 test=node2:NoSchedule
node "node2" tainted
例子:给某个node取消污点
➜ kubectl taint nodes node2 test-
node "node2" untainted
查看资源消耗:top命令
注意:这个命令是依赖于metric-server这个服务的。
例子:查看Node资源消耗
[root@k8s-master ~]#kubectl top node
NAME         CPU(cores)   CPU%   MEMORY(bytes)   MEMORY%
k8s-master   273m         13%    1129Mi          65%
k8s-node1    102m         5%     591Mi           34%
k8s-node2    168m         8%     782Mi           45%
例子:查看pod资源消耗
🍀 示例
[root@k8s-master ~]#kubectl top pods -A
NAMESPACE NAME CPU(cores) MEMORY(bytes)
ingress-nginx nginx-ingress-controller-kdbmw 13m 101Mi
kube-system calico-kube-controllers-6949477b58-4kr9x 2m 21Mi
kube-system calico-node-c5sl6 42m 119Mi
kube-system calico-node-l7q5q 40m 84Mi
��……
🍀 --sort-by选项
#      --sort-by='': If non-empty, sort pods list using specified field. The field can be either 'cpu' or 'memory'
--sort-by=  可以针对CPU或者内存排序,例如:--sort-by=memory/cpu
kubectl top pods -A --sort-by=cpu/memory

[root@k8s-master ~]#kubectl top pod -A --sort-by=cpu
NAMESPACE              NAME                                         CPU(cores)   MEMORY(bytes)
kube-system            kube-apiserver-k8s-master                    82m          372Mi
kube-system            calico-node-c5sl6                            39m          119Mi
kube-system            calico-node-sck2q                            34m          110Mi
kube-system            calico-node-l7q5q                            33m          85Mi
kube-system            etcd-k8s-master                              24m          66Mi
kube-system            kube-controller-manager-k8s-master           19m          79Mi
ingress-nginx          nginx-ingress-controller-kdbmw               10m          109Mi
kube-system            kube-proxy-5gn48
4、故障诊断和调试命令
| 命令 | 描述 | 例子 |
|---|---|---|
| describe | 显示资源详细信息 | kubectl describe pod web |
| logs | 查看Pod内容器日志,如果Pod有多个容器,-c参数指定��容器名称 | kubectl logs web-96d5df5c8-5lwhm |
| attach | 附加到Pod内的一个容器 | |
| exec | 在容器内执行命令 | |
| port-forward | 为Pod创建本地端口映射 | |
| proxy | 为kubernetes API server创建代理 | |
| cp | 拷贝文件或目录到容器中,或者从容器内向外拷贝 | |
| journalctl -f | 查看日志 |
查看kubelet日志
- 查看kubelt状态
[root@k8s-master1 manifests]#systemctl status kubelet

- 查看kubelt日志
[root@k8s-master1 manifests]#journalctl -xefu kubelet

查看资源信息:describle命令
语法:kubectl describe <资源> <名称>

例子:
kubectl describe pod web-6695fcb7f9-fbmzq #显示资源详细信息,kubernetes提供了一种命令叫describe,让你知道这个对象发生过什么
查看容器日志:logs命令
通常一个应用容器中仅会运行一个进程(及其子进程),该进程作为1号进程接收并处理信号,同时负责将日志直接输出至容器终端中,因此容器日志信息的获取一般要通过容器控制台进行。
- 语法
kubectl logs命令可打印Pod对象内指定容器的日志信息:
命令格式为:
kubectl logs [-f] [-p] (POD | TYPE/NAME) [-c CONTAINER][options]。#若Pod对象内仅有一个容器,则-c选项及容器名可选。
例子:logs命令查看容器日志
$kubectl logs web777-56b96cfd4-vn8lh -n test #nginx访问是有日志的。
例子:-c参数指定容器名称
kubectl logs web-96d5df5c8-5lwhm -c container_name #如果多个容器,-c参数指定容器名称
例子:-f选项查看容器日志
$kubectl logs -f kube-dns-699984412-vz1q6 -n kube-system
例子:配合tail命令查看容器日志
$kubectl logs --tail=10 nginx
例子:shell命令查看容器日志
#下面的命令先取出kube-system名称空间中带有指定标签的一个Pod对象,而第二条命令则能够查看该Pod对象的日志。
[root@k8s-master ~]#DNS_POD=$(kubectl get po -l k8s-app=kube-dns -A -o jsonpath="{.items[0].metadata.name}")
[root@k8s-master ~]#kubectl logs $DNS_POD -nkube-system

#为上面的命令添加-f选项,还能用于持续监控指定容器中的日志输出,其行为类似于使用了-f选项的tail命令。
[root@k8s-master ~]#kubectl logs -f $DNS_POD -nkube-system
在容器内执行命令:exec命令
- 语法
$kubectl exec -it pod_name [-c container_name] -n namesapce -- sh或者bash(bin/sh或者/bin/bash)

#备注:
exec后面接-it的话,表示会分配一个交互终端,可进入容器。如果没接-it的话,则可以在容器内执行一些命令并输出到当前终端。
例子:进入容器并执行命令
#1、例子
[root@k8s-master ~]#kubectl exec -it  web-96d5df5c8-2fs44 --  sh
# date
Sun Feb 27 00:14:50 UTC 2022
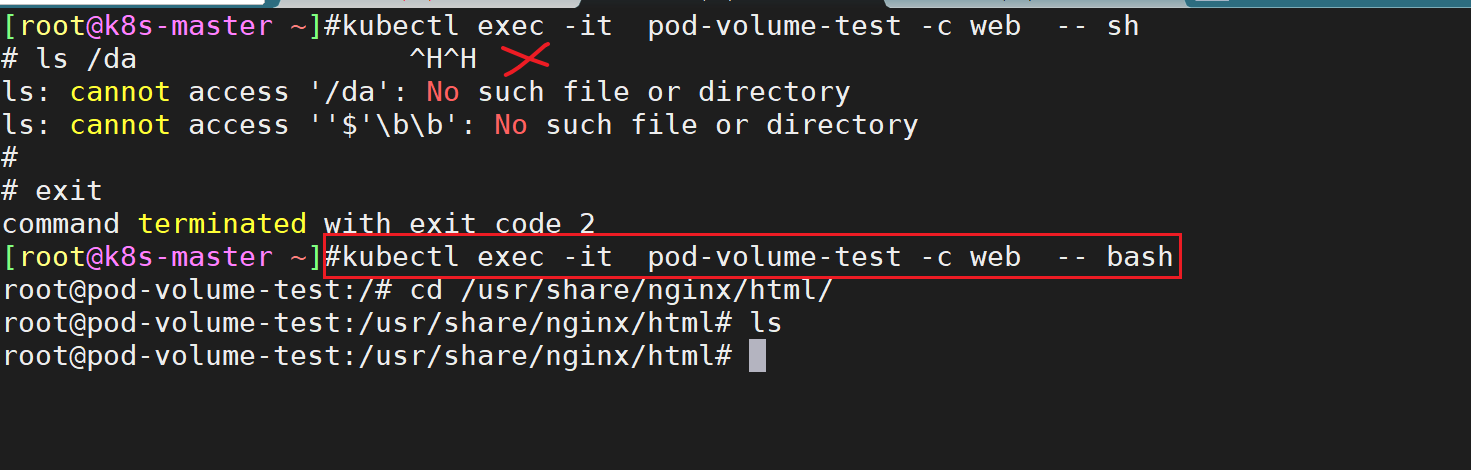
注意:进到容器时能用bash尽量用bash,sh不支持补全
[root@k8s-master ~]#kubectl exec -it pod-volume-test -c web -- bash
例子:不进入容器但可以在容器里执行命令
#1、例子:
#说明:后续推荐使用--用法
[root@k8s-master ~]#kubectl exec web-96d5df5c8-2fs44 date
kubectl exec [POD] [COMMAND] is DEPRECATED and will be removed in a future version. Use kubectl exec [POD] -- [COMMAND] instead.
Sun Feb 27 00:27:04 UTC 2022
[root@k8s-master ~]#kubectl exec web-96d5df5c8-2fs44 -- date
Sun Feb 27 00:28:10 UTC 2022

#2、例子:-c后面接容器名称
$kubectl exec client1 -c love -n test -- date
例子:批量在容器内写入文件shell命令
示例:
for i in 0 1; do kubectl exec web-$i -- sh -c 'echo hello $(hostname) > /usr/share/nginx/html/index.html'; done
# 这里的sh后面的 -c表示command含义

验证:
[root@master1 ~]#kubectl get po #查看当前pod
NAME    READY   STATUS    RESTARTS   AGE
web-0   1/1     Running   0          6m42s
web-1   1/1     Running   0          6m41s
[root@master1 ~]#for i in 0 1; do kubectl exec web-$i -- sh -c 'echo hello $(hostname) > /usr/share/nginx/html/index.html'; done
[root@master1 ~]#for i in 0 1; do kubectl exec web-$i -- cat /usr/share/nginx/html/index.html; done
hello web-0
hello web-1
[root@master1 ~]#
5、高级命令
| 命令 | 描述 | 例子 |
|---|---|---|
| apply | 从文件名或标准输入对资源创建/更新 | kubectl apply -f service.yaml |
| patch | 使用补丁方式修改、更新资源的某些字段 | |
| replace | 从文件名或标准输入替换一个资源 | |
| convert | 在不同API版本之间转换对象定义 |
��部署:apply命令
注意: 这个命令也是推荐我们使用的,我们不必关心当前的操作是创建,还是更新,执行的命令始终是
**kubectl apply**,Kubernetes 则会根据 YAML 文件的内容变化,自动进行具体的处理,所以无论是创建还是更新都可以直接使用这个命令:
kubectl create -f xxx.yaml --命令式的 kubectl apply -f xx.yaml
[root@master1 ~]#kubectl apply -f nginx-deployment.yaml
deployment.apps/nginx-deploy configured
[root@master1 ~]#
🍀 也可以这样操作的:666(后面直接跟目录)

例子:替换并部署命令
$ sed 's/k8s.gcr.io\/dns/cnych/g
s/__PILLAR__DNS__SERVER__/10.96.0.10/g
s/__PILLAR__LOCAL__DNS__/169.254.20.10/g
s/__PILLAR__DNS__DOMAIN__/cluster.local/g' nodelocaldns.yaml |
kubectl apply -f -

#注意:这个使用的是老师的镜像中转地址cnych。
从文件名或标准输入替换一个资源:replace命令
kubectl replace命令提供了一种替换式对象更新机制,它删除了配置清单中目标资源的名称对应的现存对象,并基于配置清单重新创建了一个同名的该类型对象,因此这是一种破坏性更新(disruptive update)机制。同时为命令使用**--force[=true]选项可实现立即执行删除操作而无视宽限期(grace-period)的定义**。该命令仅支持更新操作,若目标对象不存在时,则会报错并终止。
以下2个命令总感觉奇奇怪怪的:😢
- 案例1
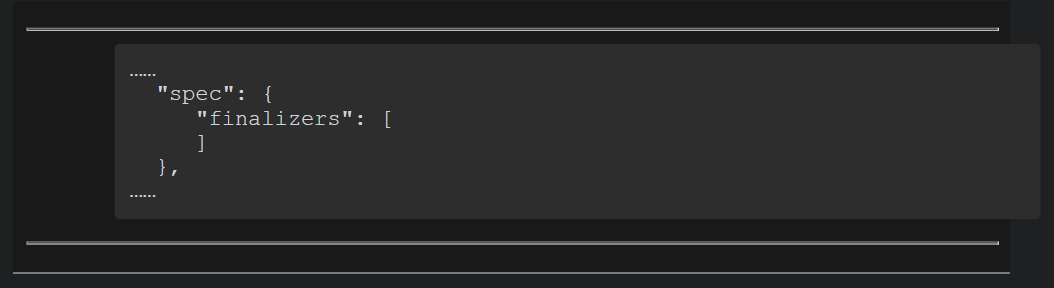
例如,以前面创建的Namespace对象demo为例,删除其指定的终结器,首先需要将其spec.finalizers字段的值修改为空值,如下所示。

将上面的配置清单保存于指定的配置清单,例如ns-demo-v2.yaml,而后使用下面的命令即可完成替换操作,即删除demo之后进行重新创建。我们已经知道,删除名称空间时会删除其内部的所有资源,因此这种修改操作的破坏性毋庸置疑,务必要谨慎使用。实践中,Namespace对象几乎不存在修改的需求,该操作仅是用于描述replace命令的用法。

- 案例2
命令式对象配置的删除操作同样使用delete命令,它同样基于配置清单获取目标对象的资源类型及名称标识,而后针对相应�的对象执行删除操作。例如,如下命令可删除前面创建的demo名称空间。再次提醒,删除名称空间将级联删除其内部的所有资源。

有时候,名称空间的正常删除操作可能会莫名卡在Terminating状态。常用的解决方案是获取并保存目标Namespace对象的JSON格式的配置清单,将spec.finalizers字段的值置空,而后手动终止相应的名称空间对象即可。以demo为例,首先获取其当前配置:

编辑ns-demo-term.json文件,将其中的spec.finalizers的配置部分修改为如下所示:
而后运行如下命令手动终止demo名称空间:

设置storageclass为默认:patch命令
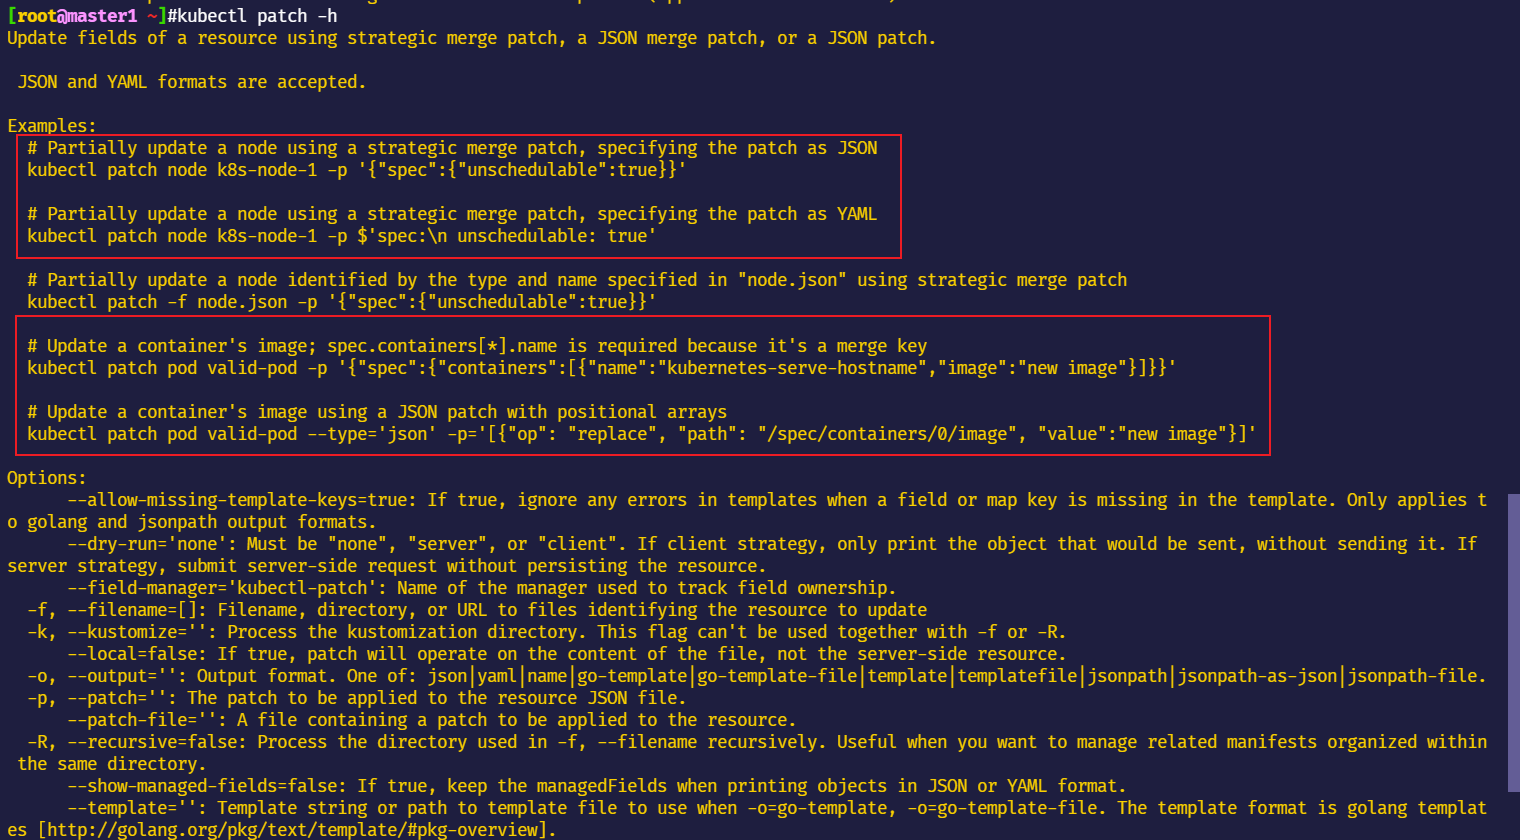
[root@master1 ~]#kubectl patch -h
- 例子:
patch命令设置storageclass为默认
语法:
$kubectl patch storageclass <your-class-name> -p '{"metadata": {"annotations":{"storageclass.kubernetes.io/is-default-class":"true"}}}'

示例:
#查看当前sc
[root@master1 ~]#kubectl get sc nfs-client
NAME                 PROVISIONER                                     RECLAIMPOLICY   VOLUMEBINDINGMODE   ALLOWVOLUMEEXPANSION   AGE
nfs-client           cluster.local/nfs-subdir-external-provisioner   Delete          Immediate           true                   5d2h

# 设置storageclass为默认
[root@master1 ~]#kubectl patch storageclass nfs-client -p '{"metadata": {"annotations":{"storageclass.kubernetes.io/is-default-class":"true"}}}'
storageclass.storage.k8s.io/nfs-client patched

#验证
[root@master1 ~]#kubectl get sc nfs-client #可以发现,已经将其修改为默认sc了
NAME                   PROVISIONER                                     RECLAIMPOLICY   VOLUMEBINDINGMODE   ALLOWVOLUMEEXPANSION   AGE
nfs-client (default)   cluster.local/nfs-subdir-external-provisioner   Delete          Immediate           true                   5d2h
- 例子:更新镜像
# Update a container's image using a JSON patch with positional arrays
  kubectl patch pod valid-pod --type='json' -p='[{"op": "replace", "path": "/spec/containers/0/image", "value":"new image"}]'

例子:
➜ kubectl patch sidecarset test-sidecarset --type='json' -p='[{"op": "replace", "path": "/spec/containers/0/image", "value": "busybox:1.35.0"}]'
sidecarset.apps.kruise.io/test-sidecarset patched
- 例子:更新pod里容器镜像
kubectl patch statefulset web --type='json' -p='[{"op": "replace", "path":"/spec/template/spec/containers/0/image", "value":"nginx:latest"}]'
6、设置命令
| 命令 | 描述 | 例子 |
|---|---|---|
| label | 给资源设置、更新标签 | |
| annotate | 给资源设置、更新注解 | |
| completion | kubectl工具自动补全,source <(kubectl completion bash) (依赖软件包 bash-completion) | |
| set |
标签:label命令
查看标签
- 语法
kubectl get po/node --show-labels
- 例子
1.例子:查看pod标签:`--show-labels选项`
[root@k8s-master ~]#kubectl get po --show-labels
NAME                  READY   STATUS    RESTARTS   AGE   LABELS
web-96d5df5c8-2fs44   1/1     Running   1          6d    app=web,pod-template-hash=96d5df5c8
web-96d5df5c8-bdjvt   1/1     Running   1          6d    app=web,pod-template-hash=96d5df5c8
web-96d5df5c8-q9ph8   1/1     Running   1          6d    app=web,pod-template-hash=96d5df5c8
用标签过滤资源
1.用标签过滤资源:`-l key:value`
[root@k8s-master ~]#kubectl get po -l app=web #注意:service不管你是否是由deployment创建的pod,只要你的标签是它seletctor里面匹配的内容,它都会将pod映射到一个项目里去的;
NAME                  READY   STATUS    RESTARTS   AGE
web-96d5df5c8-2fs44   1/1     Running   1          6d
web-96d5df5c8-bdjvt   1/1     Running   1          6d1h
web-96d5df5c8-q9ph8   1/1     Running   1          6d

2.指定有特定键的标签信息:`-L key1,key2`
#标签较多时,在kubectl get命令上使用-L key1,key2,…选项可指定有特定键的标签信息。例如,仅显示eshop名称空间上的env和app标签:
[root@k8s-master ~]#kubectl get po -L app,pod-template-hash
NAME                  READY   STATUS    RESTARTS   AGE   APP   POD-TEMPLATE-HASH
web-96d5df5c8-2fs44   1/1     Running   1          6d    web   96d5df5c8
web-96d5df5c8-bdjvt   1/1     Running   1          6d    web   96d5df5c8
web-96d5df5c8-q9ph8   1/1     Running   1          6d    web   96d5df5c8
添加标签
- 语法
格式:kubectl label nodes <node-name> <label-key>=<label-value>
#这个kubectl label可以给任意资源打标签,例如之前提到的pod,deployment;
- 例子
1.例子:添加标签:`label命令`
[root@k8s-master ~]#kubectl label node k8s-node1 disktype2=ssd2
node/k8s-node1 labeled
[root@k8s-master ~]#kubectl get node -l disktype2=ssd2
NAME        STATUS   ROLES    AGE    VERSION
k8s-node1   Ready    <none>   197d   v1.20.0

2.例子:对于已经附带了指定键名的标签,使用kubectl label为其设定新的键值时必须要同时使用--overwrite命令,以强制覆盖原有键值,否则会报错的。
[root@k8s-master ~]#kubectl label node k8s-node1 disktype2=sata --overwrite
node/k8s-node1 labeled
[root@k8s-master ~]#kubectl get node k8s-node1 -L disktype2 #查看
NAME        STATUS   ROLES    AGE    VERSION   DISKTYPE2
k8s-node1   Ready    <none>   197d   v1.20.0   sata
删除标签
- 语法
kubectl label nodes <node-name> <label-key>-
- 例子
1.例子:删除标签:在key后面加个横杠-就好
[root@k8s-master ~]#kubectl get node -l disktype2=ssd2 #查看当前节点标签
NAME        STATUS   ROLES    AGE    VERSION
k8s-node1   Ready    <none>   197d   v1.20.0
[root@k8s-master ~]#kubectl label nodes k8s-node1 disktype2- #删除标签
node/k8s-node1 labeled
[root@k8s-master ~]#kubectl get node -l disktype2=ssd2 #再次查看当前节点标签
No resources found
annotations与label区别

如何查看某个svc包含了哪些pod
- 方法1:可用如下方法来确认某个标签包含了哪些pod?
[root@k8s-master ~]#kubectl get pod -l app=web
#注意,service不管你是否是由deployment创建的pod,只要你的标签是它seletctor里面匹配的内容,它都会将pod映射到一个�项目里去的;

- 方法2:这种方法也是可以查看的
[root@k8s-master ~]#kubectl get endpoints #简写ep

set命令
例子:设置内存、cpu限制
示例:
kubectl set resources deployment xxx -c=xxx --limits=cpu=200m,memory=512Mi --requests=cpu=1m,memory=1Mi
#选项说明
-c, --containers='*': The names of containers in the selected pod templates to change, all containers are selected by default - may use wildcards
例子:设置镜像命令(应用升级)
kubectl set image deployment/web nginx=nginx:1.20
或者
kubectl set image deployment web nginx=nginx:1.20都是可以的;
7、其他命令
| 命令 | 描述 | 例子 |
|---|---|---|
| api-resources | 查看所有资源 | kubectl api-resources |
| api-versions | 打印受支持的API版本 | kubectl api-versions |
| config | 修改kubeconfig文件(用于访问API,比如配置认证信息) | |
| help | 所有命令帮助 | kubectl create --help |
| version | 查看kubectl和kubernetes版本 | kubectl version |
| --- | yaml中用---来区分不同的资源 | |
| --dry-run=client | ||
| join | ||
| --context | 切换k8s集群 |
范例:打印sercret里base64后的password数据
[root@devops8 ~]#kubectl -n argocd get secret argocd-initial-admin-secret -oyaml
apiVersion: v1
data:
  password: b3FBa1JOTXhyOFpDdHZZeQ==
kind: Secret
metadata:
  creationTimestamp: "2024-05-30T11:42:33Z"
  name: argocd-initial-admin-secret
  namespace: argocd
  resourceVersion: "1073"
  uid: 9af48c0b-b37e-42bc-9987-d710a7ffac47
type: Opaque
[root@devops8 ~]#kubectl -n argocd get secret argocd-initial-admin-secret -ojson
{
    "apiVersion": "v1",
    "data": {
        "password": "b3FBa1JOTXhyOFpDdHZZeQ=="
    },
    "kind": "Secret",
    "metadata": {
        "creationTimestamp": "2024-05-30T11:42:33Z",
        "name": "argocd-initial-admin-secret",
        "namespace": "argocd",
        "resourceVersion": "1073",
        "uid": "9af48c0b-b37e-42bc-9987-d710a7ffac47"
    },
    "type": "Opaque"
}
[root@devops8 ~]#kubectl -n argocd get secret argocd-initial-admin-secret -o jsonpath='{.data.password}' | base64 -d ; echo
oqAkRNMxr8ZCtvYy
可以运行此命令来列出 pod 使用的镜像
请确保您的集群不依赖于旧镜像仓库。例如,可以运行此命令来列出 pod 使用的镜像:
$ kubectl get pods --all-namespaces -o jsonpath="{.items[*].spec.containers[*].image}" |\
tr -s '[[:space:]]' '\n' |\
sort |\
uniq -c

busybox容器命令
例子:命令行创建busybox pod
kubectl run -it --image busybox:1.28.3 test-dns --restart=Never --rm /bin/sh
例子:busybox镜像中多个命令执行方式

- 注意:busybox容器命令参数:60m写法如何表示
apiVersion: v1
kind: Pod
metadata:
  name: security-context-pod-demo
spec:
  volumes:
  - name: sec-ctx-vol
    emptyDir: {}
  securityContext:
    runAsUser: 1000
    runAsGroup: 3000
    fsGroup: 2000
  containers:
  - name: sec-ctx-demo
    image: busybox
    command: ["sh", "-c", "sleep 60m"] #默认是s,加上m的话,表示x分钟;
    volumeMounts:
    - name: sec-ctx-vol
      mountPath: /pod/demo
    securityContext:
      allowPrivilegeEscalation: false
例子:args和command是等价的


CGroups与Namespaces命令
案例:查看当前系统支持的CGroups子系统
我们可以通过查看 /proc/cgroups 文件来查找当前系统支持的 CGroups 子系统:
[root@devops ~]#cat /proc/cgroups
#subsys_name	hierarchy	num_cgroups	enabled
cpuset	10	6	1
cpu	7	69	1
cpuacct	7	69	1
memory	11	69	1
devices	8	69	1
freezer	9	6	1
net_cls	6	6	1
blkio	3	69	1
perf_event	4	6	1
hugetlb	2	6	1
pids	5	69	1
net_prio	6	6	1
案例:在使用 CGroups 时需要先挂载
在使用 CGroups 时需要先挂载,我们可以使用 df -h | grep cgroup 命令进行查看:
[root@devops ~]#df -h | grep cgroup
tmpfs                    7.8G     0  7.8G   0% /sys/fs/cgroup
案例:查看当前系统挂载了哪些 cgroup
我们可以使用 mount --type cgroup命令查看当前系统挂载了哪些 cgroup:
[root@devops ~]#mount --type cgroup
cgroup on /sys/fs/cgroup/systemd type cgroup (rw,nosuid,nodev,noexec,relatime,xattr,release_agent=/usr/lib/systemd/systemd-cgroups-agent,name=systemd)
cgroup on /sys/fs/cgroup/hugetlb type cgroup (rw,nosuid,nodev,noexec,relatime,hugetlb)
cgroup on /sys/fs/cgroup/blkio type cgroup (rw,nosuid,nodev,noexec,relatime,blkio)
cgroup on /sys/fs/cgroup/perf_event type cgroup (rw,nosuid,nodev,noexec,relatime,perf_event)
cgroup on /sys/fs/cgroup/pids type cgroup (rw,nosuid,nodev,noexec,relatime,pids)
cgroup on /sys/fs/cgroup/net_cls,net_prio type cgroup (rw,nosuid,nodev,noexec,relatime,net_prio,net_cls)
cgroup on /sys/fs/cgroup/cpu,cpuacct type cgroup (rw,nosuid,nodev,noexec,relatime,cpuacct,cpu)
cgroup on /sys/fs/cgroup/devices type cgroup (rw,nosuid,nodev,noexec,relatime,devices)
cgroup on /sys/fs/cgroup/freezer type cgroup (rw,nosuid,nodev,noexec,relatime,freezer)
cgroup on /sys/fs/cgroup/cpuset type cgroup (rw,nosuid,nodev,noexec,relatime,cpuset)
cgroup on /sys/fs/cgroup/memory type cgroup (rw,nosuid,nodev,noexec,relatime,memory)
kubectl kustomize命令
kustomize集成到了kubectl里面;
kustomize有点类似于helm,也是一个包管理工具;
kustomize和helmchart是2种不同做模板的方式;(个人目前比较喜欢使用helm这种方式的)

安装测试:
要在 Traefik 中使用 Gateway API,首先我们需要先手动安装 Gateway API 的 CRDs,使用如下命令即可安装,这将安装包括 GatewayClass、Gateway、HTTPRoute、TCPRoute 等 CRDs:
➜ kubectl kustomize "github.com/kubernetes-sigs/gateway-api/config/crd?ref=v0.3.0" \
| kubectl apply -f -
这个是什么用法?可以直接执行吗?
这里有使用到github网站资源,不知道是否可以直接下载下来呢??;
在虚机上执行了2次都包这个错:

自己最后是这样创建的:(直接在github下载源码,然后把目录文件使用即可)
https://github.com/kubernetes-sigs/gateway-api/releases/tag/v0.3.0

#gateway-api-0.3.0/config文件环境如下
[root@master1 ~]#ls
--  01-whoami.yaml  gateway-api-0.3.0  gateway-api-0.3.0.zip  old-yamls  traefik
[root@master1 ~]#cd gateway-api-0.3.0/
[root@master1 gateway-api-0.3.0]#ls
apis             cmd                 CONTRIBUTING.md  docs      go.sum   Makefile      OWNERS          README.md         SECURITY_CONTACTS
CHANGELOG.md     code-of-conduct.md  deploy           examples  hack     mkdocs.yml    OWNERS_ALIASES  RELEASE.md        site-src
cloudbuild.yaml  config              Dockerfile       go.mod    LICENSE  netlify.toml  pkg             requirements.txt  tools

#在该目录下执行命令即可
[root@master1 config]#ls
crd
[root@master1 config]#pwd
/root/gateway-api-0.3.0/config
[root@master1 config]#ls
crd
[root@master1 config]#ls crd/
bases  kustomization.yaml
[root@master1 config]#ls crd/bases/
networking.x-k8s.io_backendpolicies.yaml  networking.x-k8s.io_httproutes.yaml  networking.x-k8s.io_udproutes.yaml
networking.x-k8s.io_gatewayclasses.yaml   networking.x-k8s.io_tcproutes.yaml
networking.x-k8s.io_gateways.yaml         networking.x-k8s.io_tlsroutes.yaml

#开始执行
[root@master1 config]#kubectl kustomize crd \
> | kubectl apply -f -
customresourcedefinition.apiextensions.k8s.io/backendpolicies.networking.x-k8s.io created
customresourcedefinition.apiextensions.k8s.io/gatewayclasses.networking.x-k8s.io created
customresourcedefinition.apiextensions.k8s.io/gateways.networking.x-k8s.io created
customresourcedefinition.apiextensions.k8s.io/httproutes.networking.x-k8s.io created
customresourcedefinition.apiextensions.k8s.io/tcproutes.networking.x-k8s.io created
customresourcedefinition.apiextensions.k8s.io/tlsroutes.networking.x-k8s.io created
customresourcedefinition.apiextensions.k8s.io/udproutes.networking.x-k8s.io created
[root@master1 config]#
监控某个资源变化:watch命令
由于我们这里使用的是一个 Deployment 的控制器,所以会滚动更新我们的应用,我们可以通过在命令后面加上 --watch 参数来查看 Pod 的更新过程:
[root@master1 ~]#kubectl get po -l app=nginx --watch
NAME                            READY   STATUS    RESTARTS   AGE
nginx-deploy-5d59d67564-b6wgv   1/1     Running   0          16m
nginx-deploy-5d59d67564-cwk4p   1/1     Running   0          16m
nginx-deploy-75b69bd684-5jh8p   0/1     Pending   0          0s
nginx-deploy-75b69bd684-5jh8p   0/1     Pending   0          0s
nginx-deploy-75b69bd684-5jh8p   0/1     ContainerCreating   0          0s
nginx-deploy-75b69bd684-5jh8p   1/1     Running             0          17s
nginx-deploy-5d59d67564-cwk4p   1/1     Terminating         0          17m
nginx-deploy-75b69bd684-7k47q   0/1     Pending             0          0s
nginx-deploy-75b69bd684-7k47q   0/1     Pending             0          0s
nginx-deploy-75b69bd684-7k47q   0/1     ContainerCreating   0          0s
nginx-deploy-5d59d67564-cwk4p   0/1     Terminating         0          17m
nginx-deploy-5d59d67564-cwk4p   0/1     Terminating         0          17m
nginx-deploy-5d59d67564-cwk4p   0/1     Terminating         0          17m
nginx-deploy-75b69bd684-7k47q   1/1     Running             0          33s
nginx-deploy-5d59d67564-b6wgv   1/1     Terminating         0          17m
nginx-deploy-5d59d67564-b6wgv   0/1     Terminating         0          17m
nginx-deploy-5d59d67564-b6wgv   0/1     Terminating         0          17m
nginx-deploy-5d59d67564-b6wgv   0/1     Terminating         0          17m
查看k8s中资源的短名称:api-resource命令
kubectl api-resources

[root@master1 ~]#kubectl explain sts #StatefuSset可以简些为sts
KIND:     StatefulSet
VERSION:  apps/v1

DESCRIPTION:
     StatefulSet represents a set of pods with consistent identities. Identities
     are defined as:
     - Network: A single stable DNS and hostname.
     - Storage: As many VolumeClaims as requested. The StatefulSet guarantees
     that a given network identity will always map to the same storage identity.

FIELDS:
   apiVersion   <string>
     APIVersion defines the versioned schema of this representation of an
     object. Servers should convert recognized schemas to the latest internal
     value, and may reject unrecognized values. More info:
     https://git.k8s.io/community/contributors/devel/sig-architecture/api-conventions.md#resources

   kind <string>
     Kind is a string value representing the REST resource this object
     represents. Servers may infer this from the endpoint the client submits
     requests to. Cannot be updated. In CamelCase. More info:
     https://git.k8s.io/community/contributors/devel/sig-architecture/api-conventions.md#types-kinds

   metadata     <Object>
     Standard object's metadata. More info:
     https://git.k8s.io/community/contributors/devel/sig-architecture/api-conventions.md#metadata

   spec <Object>
     Spec defines the desired identities of pods in this set.

   status       <Object>
     Status is the current status of Pods in this StatefulSet. This data may be
     out of date by some window of time.

[root@master1 ~]#
join命令
如果忘记了上面的 join 命令可以使用命令 kubeadm token create --print-join-command 重新获取。
QA:kubeadm init后面还可以加一些参数的-20210811

--dry-run=client选项
用于测试运行,并不真正执行资源对象的创建过程。
kubectl create deployment #**该命令的--dry-run={none|client|server}选项可用于测试运行,并不真正执行资源对象的创建过程,**因而可用于在真正运行之前测试其是否能成功创建出指定的Deployment资源。
例如,下面的命令会创建一个名为demoapp的Deployment控制器对象,它使用镜像ikubernetes/demoapp:v1.0创建Pod对象,但仅用于测试,运行后即退出。
#参数说明:
--dry-run='none': Must be "none", "server", or "client". If client strategy, only print the object that would be
sent, without sending it. If server strategy, submit server-side request without persisting the resource.

1、用于测试运行,并不真正执行资源对象的创建过程
[root@k8s-master ~]#kubectl create deployment demoapp --image="ikubernetes:demoapp:v1" --dry-run=client
deployment.apps/demoapp created (dry run)

2、模拟创建资源导出yaml文件
[root@k8s-master ~]#kubectl create deployment web --image=nginx --dry-run=client --replicas=3 -o yaml > deployment.yaml
other
- 您可以通过
kubectl get svc -w -v 9-v 9来查看它的debug log:#-w代表监听

- 查看api版本和资源类型
#我们在写yaml文件的api版本和资源类型参数时,可以用如下命令作为参考;#kubernetes总共资源有70多个,实际常用的有10多个;#说明:这个`apps/v1`是kubernetes api对象,后期有可能会变的,在写yaml文件时,要注意核对清楚;`kubectl api-resources``kubectl api-resources |wc -l`#注意,也可以用这个命令搜索某些资源的短名称和长名称的对应关系的有的资源有长格式和短格式之分的,都可以使用;命名空间起的是隔离作用,有的支持命名空间,有的资源不支持命名空间;

我们可以通过如下命令来查看某个资源归属的组信息?
[root@kubernetes-master ~]#kubectl api-resources

- 查看kubectrl create的帮助文档
kubectl create --help
#注意这个kubectl --help命令

- 切换kubernetes集群环境
kubectl config use-context kubernetes

- 注意:
kubeadm token list命令

- 注意老师的这种简写
老师的写法
1.kubectl的别名是k; 2.pod可以简写为po; 3.-o yaml也可以简写为:-oyaml
 自己实现过程:
[root@k8s-master ~]#vim .bashrc
alias k='kubectl' #做k为kubectl的别名

[root@k8s-master ~]#. .bashrc

[root@k8s-master ~]#k get po #验证
NAME   READY   STATUS    RESTARTS   AGE
web    1/1     Running   0          40s
测试效果
QA:就是现在的版本有点讨厌,就是:它有一个manageFileds,它会非常长:
QA:666,yaml竟然可以不用带后缀


拷贝文件到容器里:cp命令
[root@master1 go]#kubectl cp testdns nginx-5d59d67564-k9m2k:/root/
[root@master1 go]#kubectl exec -it nginx-5d59d67564-k9m2k -- bash
root@nginx-5d59d67564-k9m2k:/# ls -l  /root/testdns
-rwxr-xr-x 1 root root 2903854 Dec 28 07:18 /root/testdns
root@nginx-5d59d67564-k9m2k:/#
技巧:可以用daemonset方式在node节点上批量安装软件包😘
🍀 要安装 open-iscsi,可以直接使用下面的命令即可:
# apt-get install open-iscsi  # Debian 和 Ubuntu 系统命令
➜ yum install -y iscsi-initiator-utils
😂或者可以使用yaml文件部署:
Longhorn 官方还为我们还提供了一个 iscsi 安装程序,可以更轻松地自动安装 open-iscsi:
➜ kubectl apply -f https://raw.githubusercontent.com/longhorn/longhorn/v1.2.3/deploy/prerequisite/longhorn-iscsi-installation.yaml
部署完成后,运行以下命令来检查安装程序的 pod 状态:
➜ kubectl get pod | grep longhorn-iscsi-installation
longhorn-iscsi-installation-49hd7   1/1     Running   0          21m
longhorn-iscsi-installation-pzb7r   1/1     Running   0          39m
也可以通过以下命令查看日志,查看安装结果:
➜ kubectl logs longhorn-iscsi-installation-pzb7r -c iscsi-installation
...
Installed:
  iscsi-initiator-utils.x86_64 0:6.2.0.874-7.amzn2

Dependency Installed:
  iscsi-initiator-utils-iscsiuio.x86_64 0:6.2.0.874-7.amzn2

Complete!
Created symlink from /etc/systemd/system/multi-user.target.wants/iscsid.service to /usr/lib/systemd/system/iscsid.service.
iscsi install successfully
🍀 同样要安装 NFSv4 客户端,可以直接使用下面的命令一键安装:
# apt-get install nfs-common  #  Debian 和 Ubuntu 系统命令
➜ yum install nfs-utils
😂或者可以使用yaml文件部署:
同样 Longhorn 官方也提供了一个 nfs 客户端安装程序,可以更轻松地自动安装 nfs-client:
➜ kubectl apply -f https://raw.githubusercontent.com/longhorn/longhorn/v1.2.3/deploy/prerequisite/longhorn-nfs-installation.yaml
部署完成后,运行以下命令来检查安装程序的 pod 状态:
➜ kubectl get pod | grep longhorn-nfs-installation
NAME                                  READY   STATUS    RESTARTS   AGE
longhorn-nfs-installation-t2v9v   1/1     Running   0          143m
longhorn-nfs-installation-7nphm   1/1     Running   0          143m
也可以通过以下命令查看日志,查看安装结果:
➜ kubectl logs longhorn-nfs-installation-t2v9v -c nfs-installation
...
nfs install successfully
相关依赖环境准备好过后就可以开始安装 Longhorn 了。
🍀 注意事项
如果使用yaml文件在k8s节点上安装上面iscsi-initiator-utils和nfs-utils软件时,使用这个yaml文件部署还是非常方便的,因为节点数越多使用��这个效果就越明显。
记得要改下这2个yaml里镜像仓库地址
image: registry.aliyun.comcs/k8sxio/pause:3.5

现在有个有趣的问题
安装一个软件可以采用pod形式了,哈哈。
可以借鉴这种安装方式的。
注意一下这个yaml文件的使用方式;
那我把这个DaemonSet资源移除后,原来安装的软件应该是换在原来机器上面的吧;-->应该在的。-->已测试:是存在的!
这个相当于把脚本集成到了这个command里面:666
OS=$(grep "ID_LIKE" /etc/os-release | cut -d '=' -f 2);

if [[ "${OS}" == *"debian"* ]]; then sudo apt-get update -q -y && sudo apt-get install -q -y open-iscsi && sudo systemctl -q enable iscsid && sudo systemctl start iscsid;

elif [[ "${OS}" == *"suse"* ]]; then sudo zypper --gpg-auto-import-keys -q refresh && sudo zypper --gpg-auto-import-keys -q install -y open-iscsi && sudo systemctl -q enable iscsid && sudo systemctl start iscsid;

else sudo yum makecache -q -y && sudo yum --setopt=tsflags=noscripts install -q -y iscsi-initiator-utils && echo "InitiatorName=$(/sbin/iscsi-iname)" > /etc/iscsi/initiatorname.iscsi && sudo systemctl -q enable iscsid && sudo systemctl start iscsid; fi && if [ $? -eq 0 ]; then echo "iscsi install successfully"; else echo "iscsi install failed error code $?";

fi
apiVersion: apps/v1
kind: DaemonSet
metadata:
  name: longhorn-iscsi-installation
  labels:
    app: longhorn-iscsi-installation
  annotations:
    command: &cmd OS=$(grep "ID_LIKE" /etc/os-release | cut -d '=' -f 2); if [[ "${OS}" == *"debian"* ]]; then sudo apt-get update -q -y && sudo apt-get install -q -y open-iscsi && sudo systemctl -q enable iscsid && sudo systemctl start iscsid; elif [[ "${OS}" == *"suse"* ]]; then sudo zypper --gpg-auto-import-keys -q refresh && sudo zypper --gpg-auto-import-keys -q install -y open-iscsi && sudo systemctl -q enable iscsid && sudo systemctl start iscsid; else sudo yum makecache -q -y && sudo yum --setopt=tsflags=noscripts install -q -y iscsi-initiator-utils && echo "InitiatorName=$(/sbin/iscsi-iname)" > /etc/iscsi/initiatorname.iscsi && sudo systemctl -q enable iscsid && sudo systemctl start iscsid; fi && if [ $? -eq 0 ]; then echo "iscsi install successfully"; else echo "iscsi install failed error code $?"; fi
spec:
  selector:
    matchLabels:
      app: longhorn-iscsi-installation
  template:
    metadata:
      labels:
        app: longhorn-iscsi-installation
    spec:
      hostNetwork: true
      hostPID: true
      initContainers:
      - name: iscsi-installation
        command:
          - nsenter
          - --mount=/proc/1/ns/mnt
          - --
          - bash
          - -c
          - *cmd
        image: alpine:3.12
        securityContext:
          privileged: true
      containers:
      - name: sleep
        # image: k8s.gcr.io/pause:3.1
        image: registry.aliyun.com/k8sxio/pause:3.5
  updateStrategy:
    type: RollingUpdate
自己使用yaml安装如下
$ kubectl apply -f longhorn-iscsi-installation.yaml
daemonset.apps/longhorn-iscsi-installation created

#从安装结果看,好像master节点不需要安装。。
[root@master1 ~]#kubectl get po -owide
NAME                                READY   STATUS    RESTARTS   AGE     IP            NODE    NOMINATED NODE   READINESS GATES
longhorn-iscsi-installation-7zq4k   1/1     Running   0          4m22s   172.29.9.53   node2   <none>           <none>
longhorn-iscsi-installation-b4ztm   1/1     Running   0          27s     172.29.9.52   node1   <none>           <none>

#测试是否安装成功:
[root@master1 ~]#kubectl logs longhorn-iscsi-installation-7zq4k -c iscsi-installation
Package iscsi-initiator-utils-6.2.0.874-22.el7_9.x86_64 already installed and latest version
iscsi install successfully
[root@node1 ~]#rpm -qa|grep iscsi-initiator-utils
iscsi-initiator-utils-6.2.0.874-22.el7_9.x86_64
iscsi-initiator-utils-iscsiuio-6.2.0.874-22.el7_9.x86_64
注意:之前在做nfs测试实验是,这个包3个节点都已经暗转改好了的。
[root@node1 ~]#rpm -qa |grep nfs-utils
nfs-utils-1.3.0-0.68.el7.2.x86_64
我们可以继续尝试用yaml文件再次安装下这个包:
$ kubectl apply -f longhorn-nfs-installation.yaml
daemonset.apps/longhorn-nfs-installation created

[root@master1 ~]#kubectl get po -owide
NAME                                READY   STATUS    RESTARTS   AGE     IP            NODE    NOMINATED NODE   READINESS GATES
longhorn-iscsi-installation-7zq4k   1/1     Running   0          10m     172.29.9.53   node2   <none>           <none>
longhorn-iscsi-installation-b4ztm   1/1     Running   0          6m47s   172.29.9.52   node1   <none>           <none>
longhorn-nfs-installation-dggst     1/1     Running   0          19s     172.29.9.52   node1   <none>           <none>
longhorn-nfs-installation-k7dtt     1/1     Running   0          19s     172.29.9.53   node2   <none>           <none>
[root@master1 ~]#

[root@master1 ~]#kubectl logs longhorn-nfs-installation-dggst -c nfs-installation
Package 1:nfs-utils-1.3.0-0.68.el7.2.x86_64 already installed and latest version
nfs install successfully
config命令
- 案例:config修改kubeconfig文件(用于访问API,比如配置认证信息)。切换k8s环境:
$kubectl config use-context k8s
kubeadm命令
- 案例:然后我们可以通过下面的命令在 master 节点上输出集群初始化默认使用的配置
[root@master1 ~]#kubeadm config print init-defaults --component-configs KubeletConfiguration > kubeadm.yaml
- 案例:
在开始初始化集群之前可以使用 kubeadm config images pull --config kubeadm.yaml 预先在各个服务器节点上拉取所k8s需要的容器镜像。
我们可以先list一下:
[root@master1 ~]#kubeadm config images list
registry.k8s.io/kube-apiserver:v1.25.4
registry.k8s.io/kube-controller-manager:v1.25.4
registry.k8s.io/kube-scheduler:v1.25.4
registry.k8s.io/kube-proxy:v1.25.4
registry.k8s.io/pause:3.8
registry.k8s.io/etcd:3.5.5-0
registry.k8s.io/coredns/coredns:v1.9.3

[root@master1 ~]#kubeadm config images list --config kubeadm.yaml
registry.aliyuncs.com/k8sxio/kube-apiserver:v1.25.4
registry.aliyuncs.com/k8sxio/kube-controller-manager:v1.25.4
registry.aliyuncs.com/k8sxio/kube-scheduler:v1.25.4
registry.aliyuncs.com/k8sxio/kube-proxy:v1.25.4
registry.aliyuncs.com/k8sxio/pause:3.8
registry.aliyuncs.com/k8sxio/etcd:3.5.5-0
registry.aliyuncs.com/k8sxio/coredns:v1.9.3
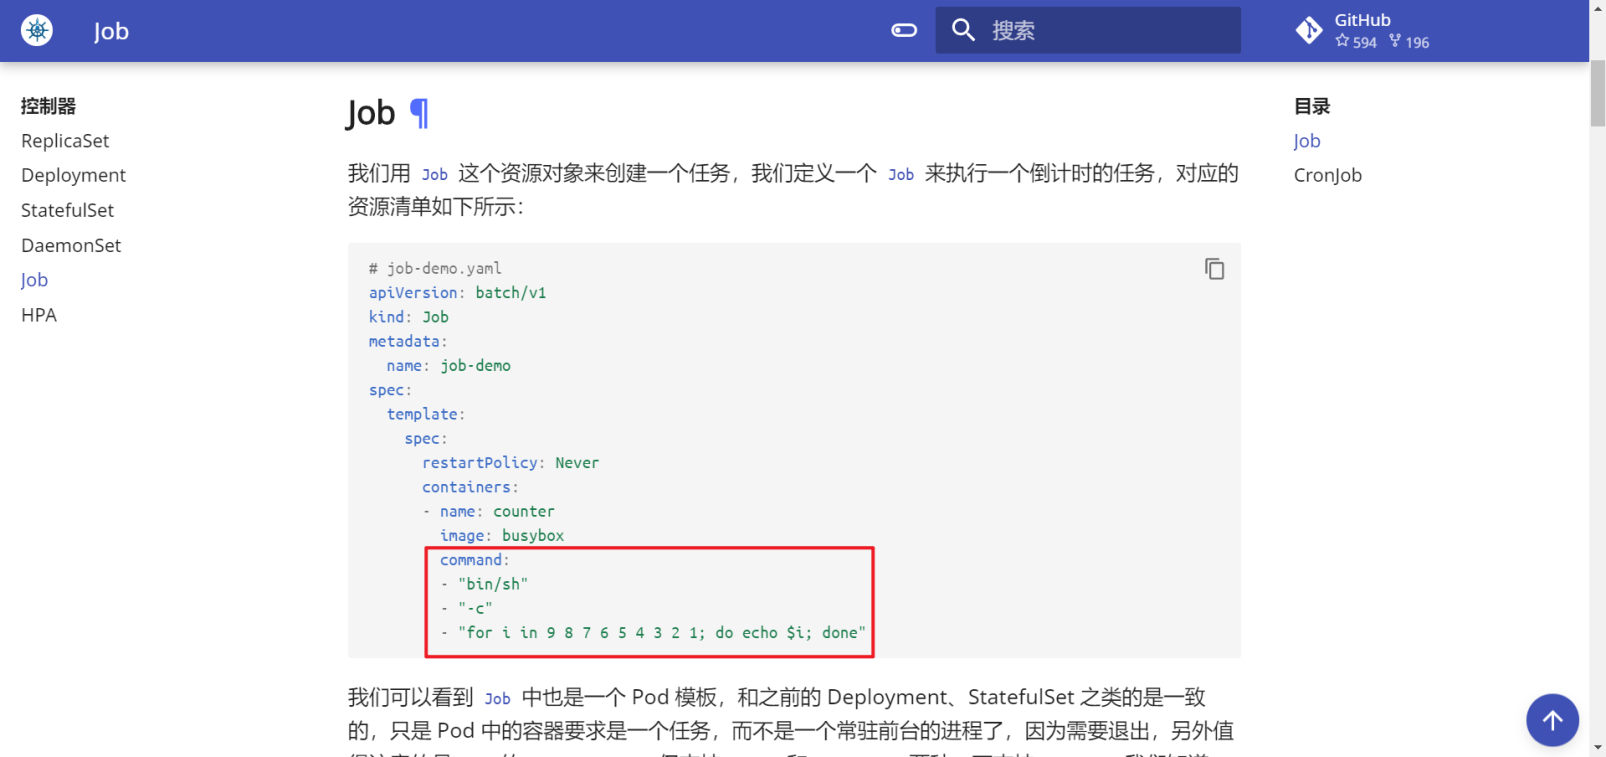
- 案例:添加节点
kubeadm join 172.29.9.61:6443 --token abcdef.0123456789abcdef \
	--discovery-token-ca-cert-hash sha256:d4bdf1090a033f285e12087147da051a43cf786e03645fdcd48e2d51e1cacaf7
- 案例:join命令
如果忘记了上面的 join 命令可以使用命令 kubeadm token create --print-join-command 重新获取。
--context命令
切换k8s集群:

关于我
我的博客主旨:
- 排版美观,语言精炼;
- 文档即手册,步骤明细,拒绝埋坑,提供源码;
- 本人实战文档都是亲测成功的,各位小伙伴在实际操作过程中如有什么疑问,可随时联系本人帮您解决问题,让我们一起进步!
🍀 微信二维码 x2675263825 (舍得), qq:2675263825。

🍀 微信公众号 《云原生架构师实战》

🍀 博客 www.onlyyou520.com


🍀 csdn https://blog.csdn.net/weixin_39246554?spm=1010.2135.3001.5421
🍀 知乎 https://www.zhihu.com/people/foryouone

最后
好了,关于本次就到这里了,感谢大家阅读,最后祝大家生活快乐,每天都过的有意义哦,我们下期见!

1