centos8
centos8
配置ip
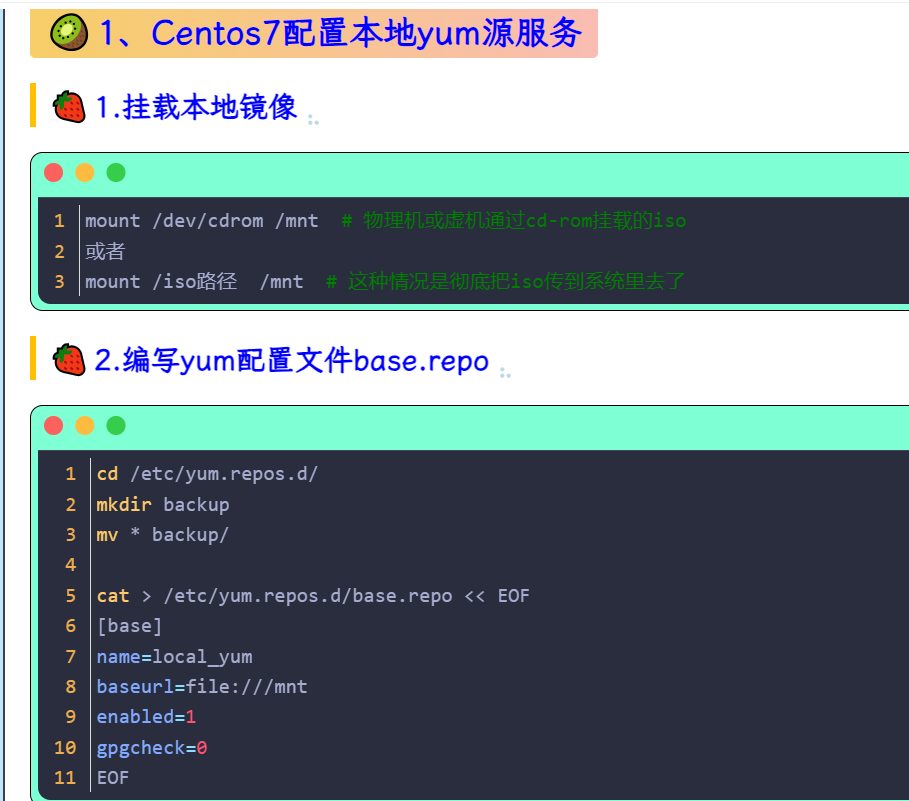
和centos7一样。
centos8重启网络命令
centos8重启网络命令?
在 CentOS 8 中,网络服务的管理方式与之前的版本有所不同。CentOS 8 使用 NetworkManager 来管理网络连接,而不是传统的 network 服务。因此,重启网络的命令也有所变化。
以下是在 CentOS 8 中重启网络服务的命令:
使用 NetworkManager 重启网络
-
重启 NetworkManager 服务:
sudo systemctl restart NetworkManager -
检查 NetworkManager 状态:
sudo systemctl status NetworkManager -
重载所有网络接口(这会断开所有网络连接然后重新连接):
sudo nmcli networking off
sudo nmcli networking on -
重启特定的网络连接:
sudo nmcli connection down <connection-name>
sudo nmcli connection up <connection-name>
其中
<connection-name>是你想要重启的网络连接的名称,例如enp0s3或eth0。
使用传统的 network 服务(不推荐)
虽然 CentOS 8 推荐使用 NetworkManager,但如果你仍然想使用传统的 network 服务,你可以尝试以下命令:
sudo systemctl restart network
但是,这个命令可能不会像在 CentOS 7 或更早版本中那样有效,因为 network 服务在 CentOS 8 中已经被弃用。
注意事项
- 在执行这些命令时,你可能需要使用
sudo来获取足够的权限。 - 重启网络服务可能会导致你当前的网络连接中断,请确保在适当的时候执行这些操作。
- 如果你使用的是虚拟机或容器,确保你的宿主机或网络配置允许重新连接。
在实际操作中,建议使用 NetworkManager 来管理网络,因为它提供了更多的灵活性和功能,特别是在处理动态网络环境时。
如何给centos8配置国内镜像源?
给centos8配置本地yum仓库(eos)
要给 CentOS 8 配置国内镜像源,你需要替换默认的软件包仓库文件。在中国,有多个镜像站提供了 CentOS 的镜像,例如阿里云、网易、清华大学等。以下是配置国内镜像源的一般步骤:
-
备份现有的 Yum 仓库配置(非必须,但建议进行):
sudo cp -r /etc/yum.repos.d /etc/yum.repos.d.backup -
移除或重命名现有的仓库文件:
sudo rm -f /etc/yum.repos.d/*.repo -
选择一个镜像站并获取其 CentOS 8 的镜像源配置信息。以下是使用阿里云镜像站为例的配��置方法:
- 访问阿里云的官方镜像站点,找到 CentOS 8 的镜像源说明页面。
- 复制 CentOS 8 的 repo 文件内容。
-
创建新的 repo 文件: 打开一个文本编辑器,创建一个新的
.repo文件。例如,使用nano编辑器创建阿里云镜像源的配置:sudo vim /etc/yum.repos.d/CentOS-Base.repo然后粘贴复制的镜像源配置内容,并保存文件。
阿里云 CentOS 8 镜像源配置内容通常如下所示(请从官方镜像站点复制最新的配置):
[base]
name=CentOS-$releasever - Base - mirrors.aliyun.com
failovermethod=priority
baseurl=https://mirrors.aliyun.com/centos/$releasever/BaseOS/$basearch/os/
enabled=1
gpgcheck=1
gpgkey=https://mirrors.aliyun.com/centos/RPM-GPG-KEY-CentOS-Official

[updates]
name=CentOS-$releasever - Updates - mirrors.aliyun.com
failovermethod=priority
baseurl=https://mirrors.aliyun.com/centos/$releasever/updates/$basearch/
enabled=1
gpgcheck=1
gpgkey=https://mirrors.aliyun.com/centos/RPM-GPG-KEY-CentOS-Official

[extras]
name=CentOS-$releasever - Extras - mirrors.aliyun.com
failovermethod=priority
baseurl=https://mirrors.aliyun.com/centos/$releasever/extras/$basearch/
enabled=1
gpgcheck=1
gpgkey=https://mirrors.aliyun.com/centos/RPM-GPG-KEY-CentOS-Official

[centosplus]
name=CentOS-$releasever - Plus - mirrors.aliyun.com
failovermethod=priority
baseurl=https://mirrors.aliyun.com/centos/$releasever/centosplus/$basearch/
enabled=0
gpgcheck=1
gpgkey=https://mirrors.aliyun.com/centos/RPM-GPG-KEY-CentOS-Official -
清理 Yum 缓存并生成新的缓存:
sudo dnf clean all
sudo dnf makecache fas -
测试新的镜像源: 使用以下命令安装或更新一个小的软件包来测试新的镜像源是否工作正常。
sudo dnf install -y lrzsz -
如果一切正常,现在你可以使用新的镜像源安装和更新软件包了。
请注意,以上步骤可能会随着具体镜像站点的变化和 CentOS 版本的更新。
给centos8配置本地yum仓库
按centos7方式,这里会报错的。。。

环境:
CentOS Linux release 8.1.1911 (Core)
- 正确的配置如下:
mount -o loop /path/to/centos8.iso /mnt
mount -o loop /dev/cdrom /mnt

cat > /etc/yum.repos.d/local.repo << EOF
[local-baseos]
name=Local BaseOS
baseurl=file:///mnt/BaseOS
enabled=1
gpgcheck=0

[local-appstream]
name=Local AppStream
baseurl=file:///mnt/AppStream
enabled=1
gpgcheck=0
EOF


dnf clean all
dnf makecache
