实战-centos7上containerd的安装-v1.6.10-2022.12.5-测试成功-荐
实战:centos7上containerd的安装(v1.6.10)-2022.12.5(测试成功)【荐】

环境
实验环境
| 软件 | 版本 |
|---|---|
| 操作系统 | centos7.6_x64 1810 mini(其他centos7.x版本也行) |
| containerd | v1.6.10 |
实验软件
链接:https://pan.baidu.com/s/1RHVmgH6rgBtM4HMqDRtguA?pwd=9fbv
提取码:9fbv
--来自百度网盘超级会员V7的分享
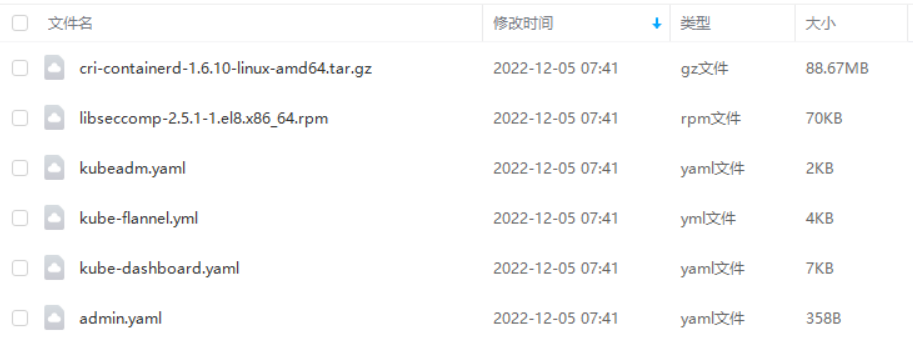
2022.12.5-k8s-install-containerd-softwares
1.安装containerd
接下来需要安装 Containerd 容器运行时。
如果在安装集群的过程出现了容器运行时的问题,启动不起来,可以尝试使用 yum install containerd.io 来安装 Containerd。
首先需要在节点上安装 seccomp 依赖,这一步很重要:
[root@master1 ~]#rpm -qa |grep libseccomp #自己系统当时是有这个包的,且其版本为libseccomp-2.3.1-4.el7.x86_64
libseccomp-2.3.1-4.el7.x86_64

# 如果没有安装 libseccomp 包则可以执行下面的命令安装依赖
[root@master1 ~]#wget http://mirror.centos.org/centos/7/os/x86_64/Packages/libseccomp-2.3.1-4.el7.x86_64.rpm
[root@master1 ~]#yum install libseccomp-2.3.1-4.el7.x86_64.rpm -y
由于 Containerd 需要依赖底层的 runc 工具,所以我们也需要先安装 runc,不过 Containerd 提供了一个包含相关依赖的压缩包 cri-containerd-cni-${VERSION}.${OS}-${ARCH}.tar.gz,可以直接使用这个包来进行安装,强烈建议使用该安装包,不然可能因为 runc 版本问题导致不兼容。(这个安装包包含了一些包,例如runc,ctr命令等)
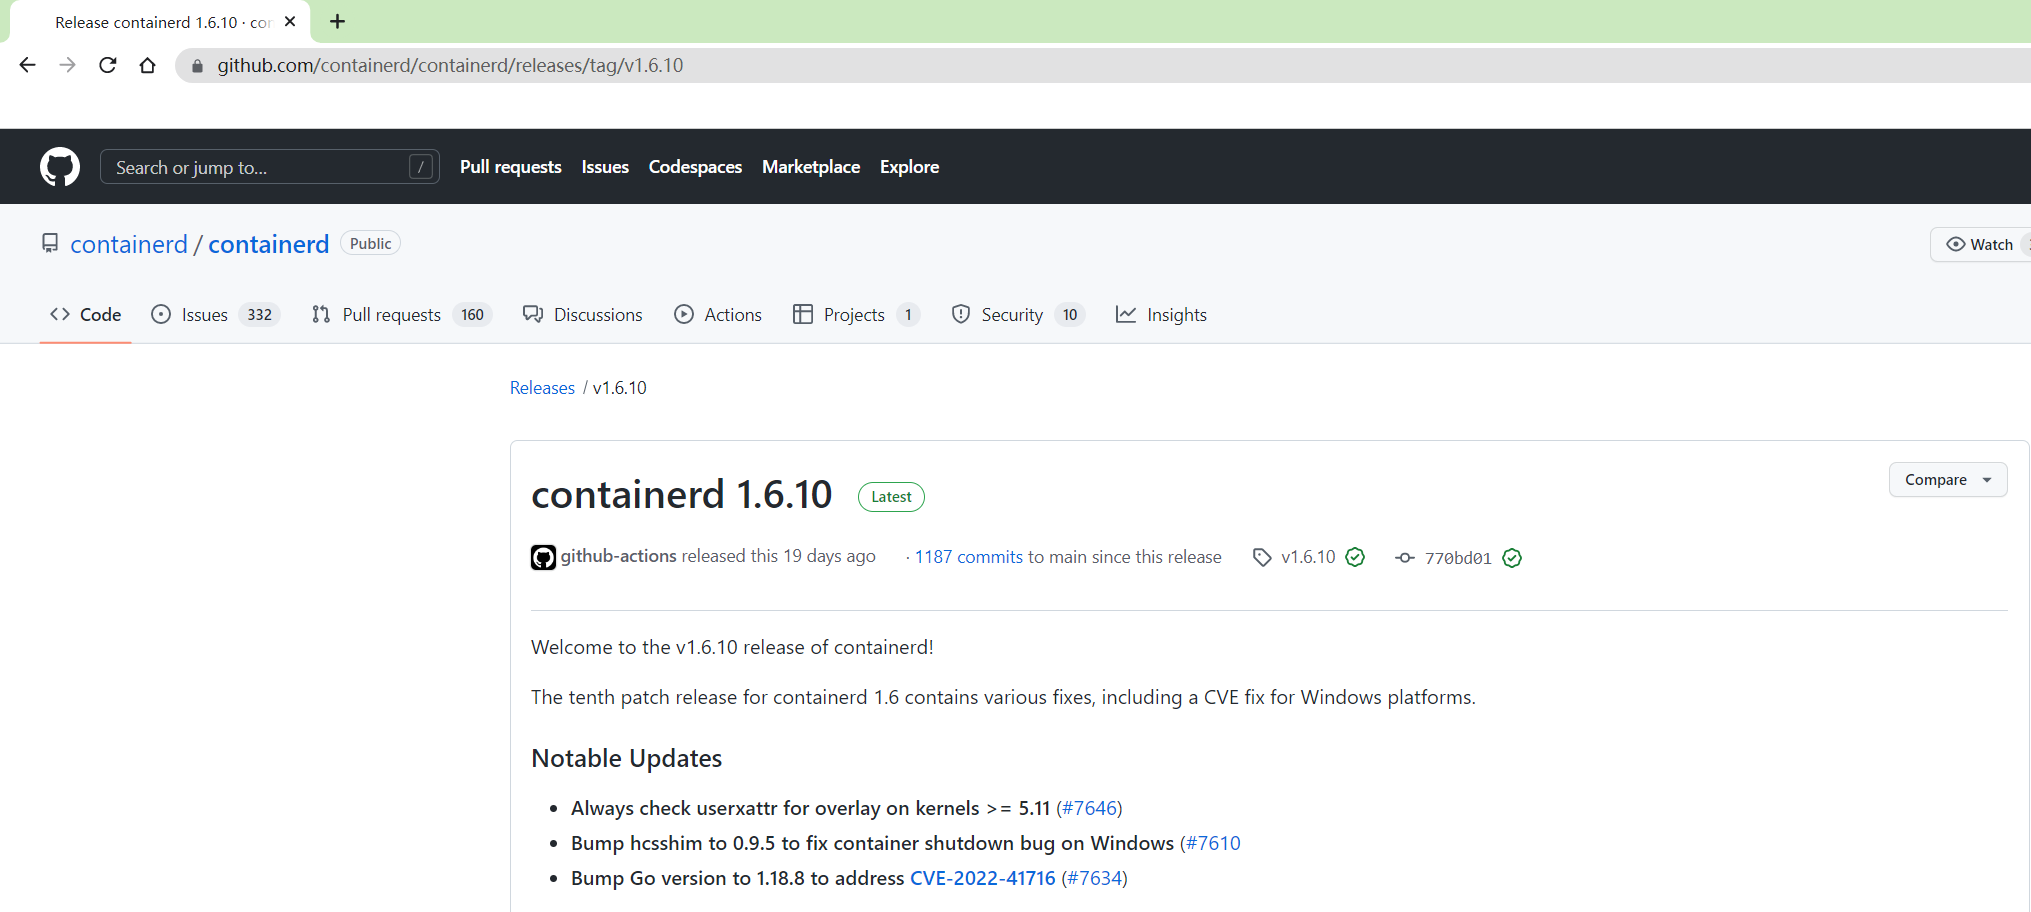
首先从 release 页面下载最新的 1.6.10 版本的压缩包:
[root@master1 ~]#wget https://github.com/containerd/containerd/releases/download/v1.6.10/cri-containerd-1.6.10-linux-amd64.tar.gz

# 如果有限制,也可以替换成下面的 URL 加速下载(本次就用的这个加速地址)
wget https://ghdl.feizhuqwq.cf/https://github.com/containerd/containerd/releases/download/v1.6.10/cri-containerd-1.6.10-linux-amd64.tar.gz
https://github.com/containerd/containerd/releases/tag/v1.6.10

直接将压缩包解压到系统的各个目录中:
#可以先看下这个压缩包的文件内容:
[root@master1 ~]#tar tf cri-containerd-1.6.10-linux-amd64.tar.gz
etc/crictl.yaml
etc/systemd/
etc/systemd/system/
etc/systemd/system/containerd.service
usr/
usr/local/
usr/local/bin/
usr/local/bin/ctr
usr/local/bin/critest
usr/local/bin/crictl
usr/local/bin/containerd
usr/local/bin/containerd-shim
usr/local/bin/ctd-decoder
usr/local/bin/containerd-stress
usr/local/bin/containerd-shim-runc-v2
usr/local/bin/containerd-shim-runc-v1
usr/local/sbin/
usr/local/sbin/runc
opt/containerd/
opt/containerd/cluster/
opt/containerd/cluster/version
opt/containerd/cluster/gce/
opt/containerd/cluster/gce/configure.sh
opt/containerd/cluster/gce/cni.template
opt/containerd/cluster/gce/cloud-init/
opt/containerd/cluster/gce/cloud-init/master.yaml
opt/containerd/cluster/gce/cloud-init/node.yaml
opt/containerd/cluster/gce/env

[root@master1 ~]#tar -C / -xzf cri-containerd-1.6.10-linux-amd64.tar.gz
记得将 /usr/local/bin 和 /usr/local/sbin 追加到 PATH 环境变量中:(默认就在环境变量里的)
[root@master1 ~]#echo $PATH
/usr/local/sbin:/usr/local/bin:/usr/sbin:/usr/bin:/root/bin

[root@master1 ~]#containerd -v
containerd github.com/containerd/containerd v1.6.10 770bd0108c32f3fb5c73ae1264f7e503fe7b2661

[root@master1 ~]#runc -h
runc: symbol lookup error: runc: undefined symbol: seccomp_notify_respond
可以正常执行 containerd -v 命令证明 Containerd 安装成功了,但是执行 runc -h 命令的时候却出现了类似runc: undefined symbol: seccomp_notify_respond 的错误,这是因为我们当前系统默认安装的 libseccomp是 2.3.1 版本,该版本已经不能满足我们这里的 v1.6.10 版本的 Containerd 了(从 1.5.7 版本开始就不兼容了),需要 2.4 以上的版本,所以我们需要重新安装一个高版本的 libseccomp 。
注意:
老师说先要卸载老版本的
libseccomp-2.3.1-4包,但是之前的chrony软件包会依赖这个libseccomp包,卸载libseccomp包的同时chrony也会被卸载掉。后面安装好高版本libseccomp-2.5.1-1要记得再次安装下chrony软件。 另外,新版本libseccomp-2.5.1-1.el8.x86_64.rpm是el8的,但是直接安装到el7上也是没问题的哦;
这里开始操作:
1、卸载老版本libseccom包
[root@master1 ~]#rpm -qa | grep libseccomp
libseccomp-2.3.1-4.el7.x86_64

2、查询哪些包对这个libseccomp软件包有依赖关系
[root@master1 ~]#rpm -e --test libseccomp
error: Failed dependencies:
	libseccomp.so.2()(64bit) is needed by (installed) chrony-3.4-1.el7.x86_64
#可以发现libseccomp软件包只背chrony软件依赖

3、卸载老版本libseccomp包
[root@master1 ~]#yum remove -y libseccomp #yum remove/erase 删除一个软件的时候也会删除对该软件具有依赖关系的包。
……
Removed:
  libseccomp.x86_64 0:2.3.1-4.el7

Dependency Removed:
  chrony.x86_64 0:3.4-1.el7

Complete!
[root@master1 ~]#rpm -qa | grep libseccomp #查看老版本libseccomp已被卸载
[root@master1 ~]#

4、# 下载高于 2.4 以上的包并安装
[root@master1 ~]#wget http://rpmfind.net/linux/centos/8-stream/BaseOS/x86_64/os/Packages/libseccomp-2.5.1-1.el8.x86_64.rpm
[root@master1 ~]#yum install libseccomp-2.5.1-1.el8.x86_64.rpm -y
……
Installed:
  libseccomp.x86_64 0:2.5.1-1.el8

Complete!
[root@master1 ~]#rpm -qa | grep libseccomp #再次查看,发现此时libseccomp已经是最新版本的了。
libseccomp-2.5.1-1.el8.x86_64

5、重新安装chrony软件
yum install chrony -y
systemctl enable chronyd --now
chronyc sources
现在 runc 命令就可以正常使用了:
[root@master1 ~]#runc -v
runc version 1.1.4
commit: v1.1.4-0-g5fd4c4d1
spec: 1.0.2-dev
go: go1.18.8
libseccomp: 2.5.1

[root@master1 ~]#runc -h
NAME:
   runc - Open Container Initiative runtime

runc is a command line client for running applications packaged according to
the Open Container Initiative (OCI) format and is a compliant implementation of the
Open Container Initiative specification.

runc integrates well with existing process supervisors to provide a production
container runtime environment for applications. It can be used with your
existing process monitoring tools and the container will be spawned as a
direct child of the process supervisor.

Containers are configured using bundles. A bundle for a container is a directory
that includes a specification file named "config.json" and a root filesystem.
The root filesystem contains the contents of the container.

To start a new instance of a container:

    # runc run [ -b bundle ] <container-id>

Where "<container-id>" is your name for the instance of the container that you
are starting. The name you provide for the container instance must be unique on
your host. Providing the bundle directory using "-b" is optional. The default
value for "bundle" is the current directory.

USAGE:
   runc [global options] command [command options] [arguments...]

VERSION:
   1.1.4
commit: v1.1.4-0-g5fd4c4d1
spec: 1.0.2-dev
go: go1.18.8
libseccomp: 2.5.1
2.配置containerd
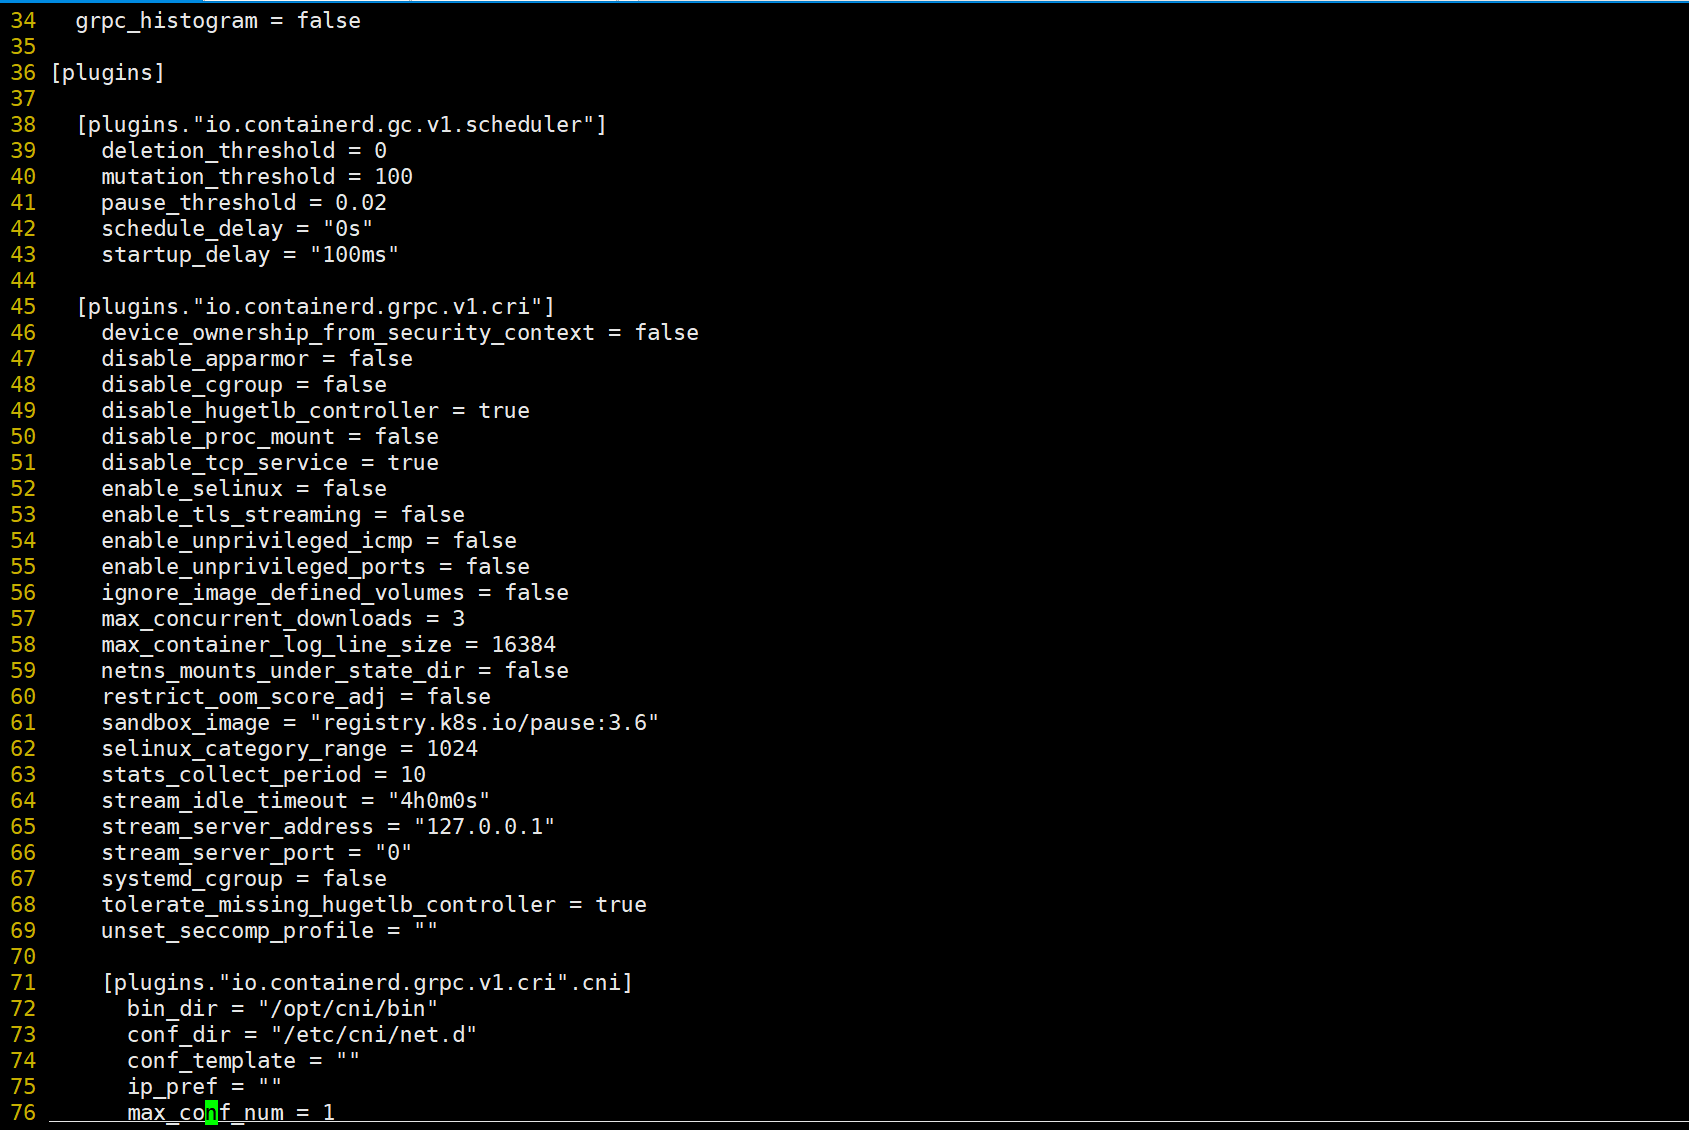
Containerd 的默认配置文件为 /etc/containerd/config.toml,我们可以通过如下所示的命令生成一个默认的配置:
[root@master1 ~]#mkdir -p /etc/containerd
[root@master1 ~]#containerd config default > /etc/containerd/config.toml
containerd都是插件化的。
1.修改containerd 的 cgroup driver类型为systemd
将 containerd 的 cgroup driver 配置为 systemd。
对于使用 systemd 作为 init system 的 Linux 的发行版,使用 systemd 作为容器的 cgroup driver 可以确保节点在资源紧张的情况更加稳定,所以推荐将 containerd 的 cgroup driver 配置为 systemd。
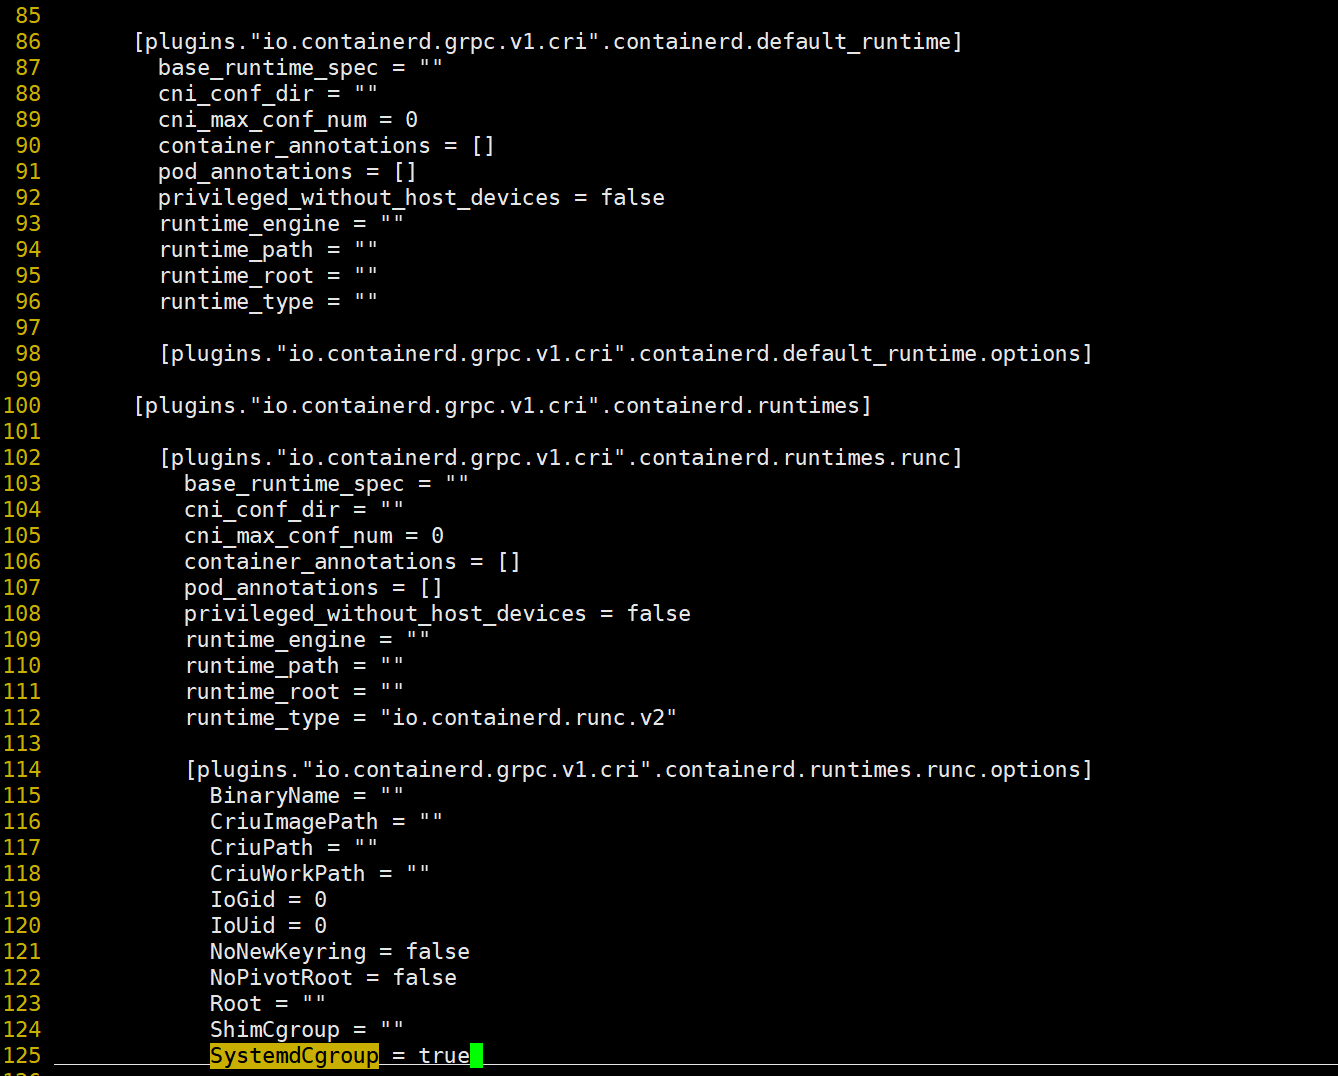
修改前面生成的配置文件 /etc/containerd/config.toml,在 plugins."io.containerd.grpc.v1.cri".containerd.runtimes.runc.options 配置块下面将 SystemdCgroup 设置为 true:
[root@master1 ~]#vim /etc/containerd/config.toml
#通过搜索SystemdCgroup进行定位
[plugins."io.containerd.grpc.v1.cri".containerd.runtimes.runc]
……
	[plugins."io.containerd.grpc.v1.cri".containerd.runtimes.runc.options]
		SystemdCgroup = true
		....
2.配置镜像加速器地址
然后再为镜像仓库配置一个加速器,需要在 cri 配置块下面的 registry 配置块下面进行配置 registry.mirrors:(注意缩进)
[root@master1 ~]#vim /etc/containerd/config.toml
#通过搜索registry.mirrors进行定位
144     [plugins."io.containerd.grpc.v1.cri".registry]
					……
152
153       [plugins."io.containerd.grpc.v1.cri".registry.mirrors]
154         [plugins."io.containerd.grpc.v1.cri".registry.mirrors."docker.io"]
155           endpoint = ["https://bqr1dr1n.mirror.aliyuncs.com"]
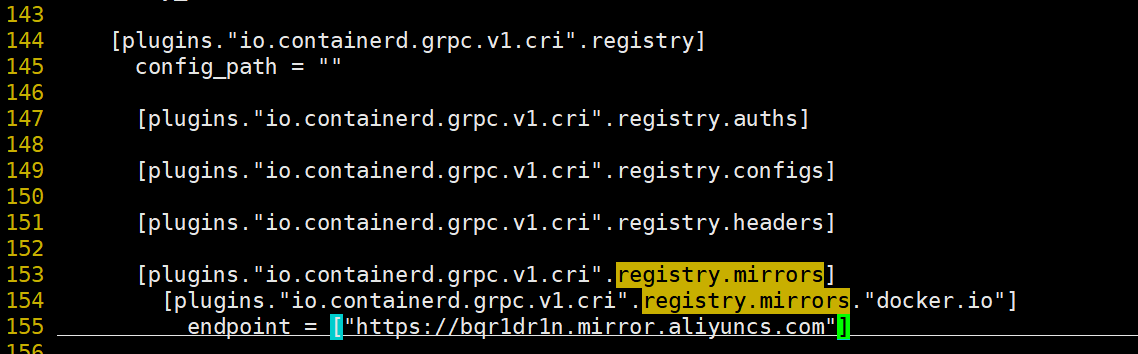
注意:这里的k8s.gcr.io仓库地址就不写了,因为现在社区已经将 K8s 默认的镜像仓库从 k8s.gcr.io 迁移到了 registry.k8s.io。(这里的标注是以前的版本)(老师当时这部分k8s.gcr.io的仓库地址是去掉的,只加了一个dock.io地址。)

[plugins."io.containerd.grpc.v1.cri".registry.mirrors."docker.io"]
  endpoint = ["https://bqr1dr1n.mirror.aliyuncs.com"] #注意:这个地址是老师的私人仓库地址

[plugins."io.containerd.grpc.v1.cri".registry.mirrors."k8s.gcr.io"]
  endpoint = ["https://registry.aliyuncs.com/k8sxio"] #注意:这个地址是老师的私人仓库地址
3.配置pause镜像地址
注意:
现在社区已经将 K8s 默认的镜像仓库从 k8s.gcr.io 迁移到了 registry.k8s.io ,不过国内正常情况下还是不能使用。所以如果我们的节点不能正常获取 registry.k8s.io 的镜像,那么我们需要在上面重新配置sandbox_image 镜像,Containerd 模式下直接通过 kubelet (之前版本可以这么配置的)覆盖该镜像不会生效: Warning: For remotecontainer runtime, "'pod-infra-container-image is ignored in kubelet, which should beset in that remote runtime instead。因此需要在Containerd 里进行配置。
注意:在宿主机上是可以ping通这个registry.k8s.io域名的,但是可能还是无法正常拉取镜像。
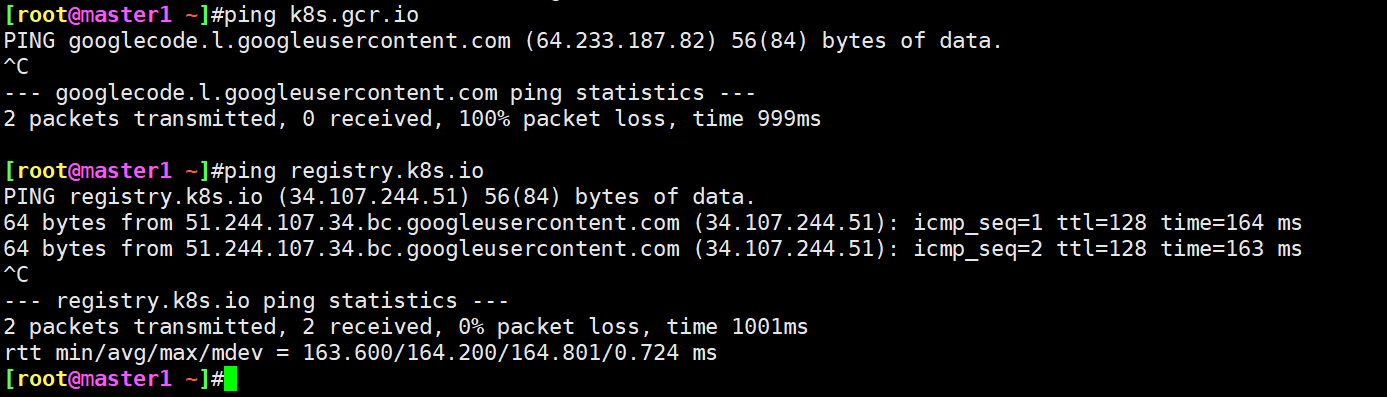
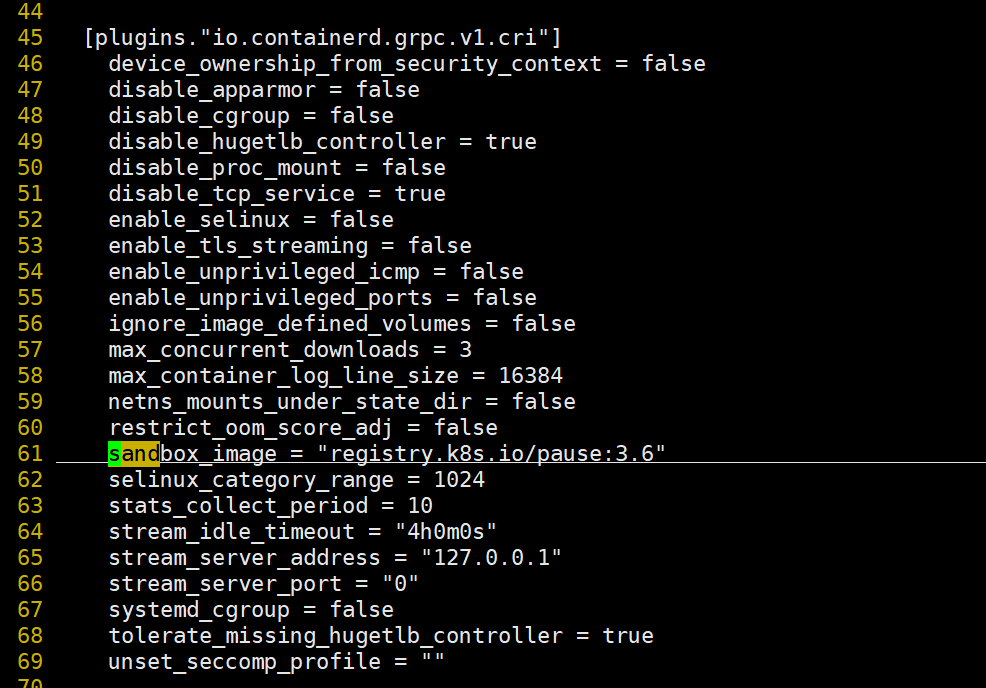
当前v1.6.10版本的containerd里的sandbox_image的pause镜像地址为pause:3.6,但我们要安装的k8s v1.25.4对其pause需求要是pause:3.8才行,这里我们来修改下pause镜像地址。
配置方法:
[root@master1 ~]#vim /etc/containerd/config.toml
��……
sandbox_image = "registry.aliyuncs.com/k8sxio/pause:3.8"
……
修改前:
 修改后:
修改后:

3.启动containerd服务
由于上面我们下载的 containerd 压缩包中包含一个 etc/systemd/system/containerd.service 的文件,这�样我们就可以通过 systemd 来配置 containerd 作为守护进程运行了,现在我们就可以启动 containerd 了,直接执行下面的命令即可:
[root@master1 ~]#systemctl daemon-reload
[root@master1 ~]#systemctl enable containerd --now
Created symlink from /etc/systemd/system/multi-user.target.wants/containerd.service to /etc/systemd/system/containerd.service.
4.验证
启动完成后就可以使用 containerd 的本地 CLI 工具 ctr 和 crictl 了,比如查看版本:
[root@master1 ~]#containerd -v
containerd github.com/containerd/containerd v1.6.10 770bd0108c32f3fb5c73ae1264f7e503fe7b2661

[root@master1 ~]#ctr version #ctr--containerd类似于docker--dockerd。
Client:
  Version:  v1.6.10
  Revision: 770bd0108c32f3fb5c73ae1264f7e503fe7b2661
  Go version: go1.18.8

Server:
  Version:  v1.6.10
  Revision: 770bd0108c32f3fb5c73ae1264f7e503fe7b2661
  UUID: 4b5d9dc9-7e39-47ce-be54-c9f4c0fa4865

[root@master1 ~]#crictl version #crictl是操作k8s里的cri的。
Version:  0.1.0
RuntimeName:  containerd
RuntimeVersion:  v1.6.10
RuntimeApiVersion:  v1
至此,containerd安装完成。
关于我
我的博客主旨:
- 排版美观,语言精炼;
- 文档即手册,步骤明细,拒绝埋坑,提供源码;
- 本人实战文档都是亲测成功的,各位小伙伴在实际操作过程中如有什么疑问,可随时联系本人帮您解决问题,让我们一起进步!
🍀 微信二维码 x2675263825 (舍得), qq:2675263825。

🍀 微信公众号 《云原生架构师实战》

🍀 个人博客站点
http://47.97.48.237/ (即将上线域名:onedayxyy.cn)
🍀 语雀
https://www.yuque.com/xyy-onlyone

🍀 csdn https://blog.csdn.net/weixin_39246554?spm=1010.2135.3001.5421

🍀 知乎 https://www.zhihu.com/people/foryouone

最后
好了,关于本次就到这里了,感谢大家阅读,最后祝大家生活快乐,每天都过的有意义哦,我们下期见!