1、yum
更新于:2024年1月5日
yum命令

目录
[toc]
1、查询
案例:列出所有可用软件包 yum list
这会列出系统中所有可用的软件包,包括已安装和未安装的。
yum list

说明:
#说明:通过yum list输出可以看出,某个软件包是否已安装在机器上:
	前面有@代表已安装,无此符号的话就代表没安装;
案例:列出所有可用的软件包及其版本信息 yum list available
这会列出系统中所有可用的软件包及其版本信息,包括已安装和未安装的。
yum list available

- 案例:查看可用的rpm包
# 查看可用的rpm包
yum --disablerepo="*" --enablerepo="elrepo-kernel" list available
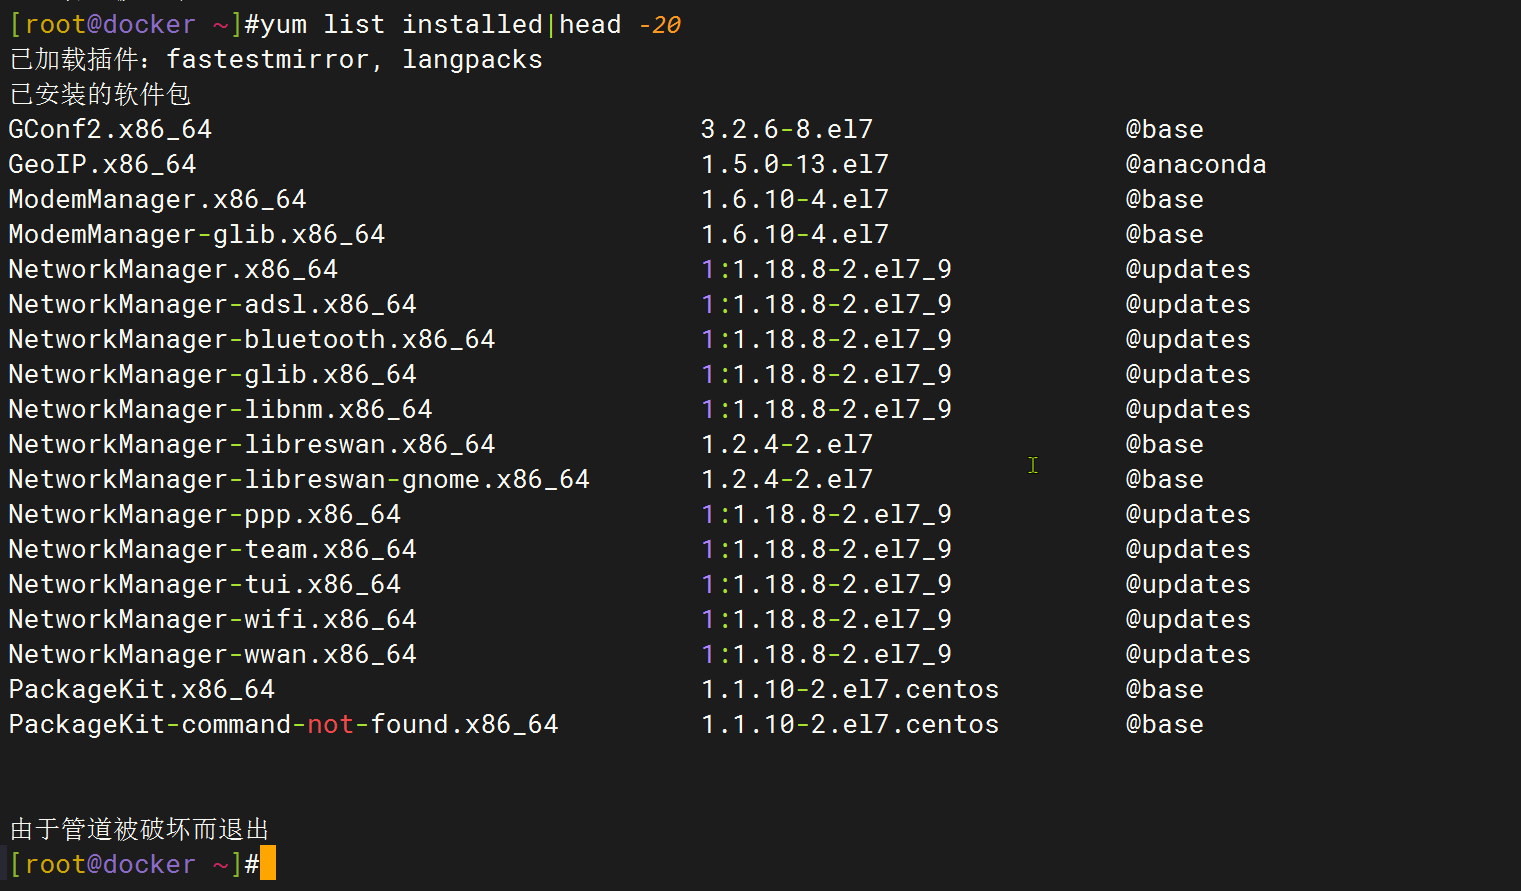
案例:查询本地机器已安装的软件包 yum list installed
yum list installed
案例:找出某个特定软件包的详细信息 yum list <package_name>
yum list <package_name>
[root@docker ~]#yum list lrzsz
已加载插件:fastestmirror, langpacks
Loading mirror speeds from cached hostfile
 * base: mirrors.aliyun.com
 * elrepo: hkg.mirror.rackspace.com
 * epel: mirror.nju.edu.cn
 * extras: mirrors.aliyun.com
 * updates: mirrors.aliyun.com
已安装的软件包
lrzsz.x86_64                                                               0.12.20-36.el7                                                               @base
案例:查看某个包的描述信息 yum info <包名>
[root@docker ~]#yum info lrzsz
已加载插件:fastestmirror, langpacks
Loading mirror speeds from cached hostfile
 * base: mirrors.aliyun.com
 * elrepo: hkg.mirror.rackspace.com
 * epel: mirror.nju.edu.cn
 * extras: mirrors.aliyun.com
 * updates: mirrors.aliyun.com
已安装的软件包
名称    :lrzsz
架构    :x86_64
版本    :0.12.20
发布    :36.el7
大小    :181 k
源    :installed
来自源:base
简介    : The lrz and lsz modem communications programs
网址    :http://www.ohse.de/uwe/software/lrzsz.html
协议    : GPLv2+
描述    : Lrzsz (consisting of lrz and lsz) is a cosmetically modified
         : zmodem/ymodem/xmodem package built from the public-domain version of
         : the rzsz package. Lrzsz was created to provide a working GNU
         : copylefted Zmodem solution for Linux systems.

[root@docker ~]#
案例:列出所有可用软件包中包含特定关键字的软件包 yum list *<keyword>*
yum list *<keyword>*
这会列出包含特定关键字的所有可用软件包。替换 <keyword> 为你要搜索的关键字。
案例:查询包依赖和被依赖(已解决)
1、依赖哪些软件包
rpm   -qR  postfix      # 查postfix 依赖哪些包,R参数的意思就是requires就是依赖哪些软件包
或者
yum deplist postfix   # 查postfix 依赖哪些包
2、被哪些包依赖
rpm -e --test rpcbind # 通过--test进行测试删除,查看是否有依赖关系,如果有会阻止删除
案例测试:查询包依赖和被依赖
1、我想知道libseccomp软件包被哪些包依赖?
[root@master1 ~]#rpm -qa | grep libseccomp
libseccomp-2.3.1-4.el7.x86_64
[root@master1 ~]#rpm -e --test libseccomp
error: Failed dependencies:
	libseccomp.so.2()(64bit) is needed by (installed) chrony-3.4-1.el7.x86_64
可以看到,libseccomp只有被chrony对其有依赖。
2、我想知道chrony依赖的包有哪些?
[root@master1 ~]#rpm -qa|grep chrony
chrony-3.4-1.el7.x86_64

# 方法1:
[root@master1 ~]#rpm   -qR chrony
/bin/bash
/bin/sh
/bin/sh
/bin/sh
/bin/sh
/bin/sh
config(chrony) = 3.4-1.el7
libc.so.6()(64bit)
libc.so.6(GLIBC_2.12)(64bit)
libc.so.6(GLIBC_2.14)(64bit)
libc.so.6(GLIBC_2.15)(64bit)
libc.so.6(GLIBC_2.17)(64bit)
libc.so.6(GLIBC_2.2.5)(64bit)
libc.so.6(GLIBC_2.3)(64bit)
libc.so.6(GLIBC_2.3.4)(64bit)
libc.so.6(GLIBC_2.4)(64bit)
libcap.so.2()(64bit)
libedit.so.0()(64bit)
libfreebl3.so()(64bit)
libfreebl3.so(NSSRAWHASH_3.12.3)(64bit)
libm.so.6()(64bit)
libm.so.6(GLIBC_2.2.5)(64bit)
libpthread.so.0()(64bit)
libpthread.so.0(GLIBC_2.2.5)(64bit)
libseccomp.so.2()(64bit)
rpmlib(CompressedFileNames) <= 3.0.4-1
rpmlib(FileDigests) <= 4.6.0-1
rpmlib(PayloadFilesHavePrefix) <= 4.0-1
rtld(GNU_HASH)
shadow-utils
systemd
systemd
systemd
rpmlib(PayloadIsXz) <= 5.2-1

方法2:
[root@master1 ~]#yum deplist chrony
Loaded plugins: fastestmirror
Loading mirror speeds from cached hostfile
 * base: mirrors.aliyun.com
 * extras: mirrors.aliyun.com
 * updates: mirrors.aliyun.com
package: chrony.x86_64 3.4-1.el7
  dependency: /bin/bash
   provider: bash.x86_64 4.2.46-35.el7_9
  dependency: /bin/sh
   provider: bash.x86_64 4.2.46-35.el7_9
  dependency: libc.so.6(GLIBC_2.17)(64bit)
   provider: glibc.x86_64 2.17-326.el7_9
  dependency: libcap.so.2()(64bit)
   provider: libcap.x86_64 2.22-11.el7
  dependency: libedit.so.0()(64bit)
   provider: libedit.x86_64 3.0-12.20121213cvs.el7
  dependency: libfreebl3.so()(64bit)
   provider: nss-softokn-freebl.x86_64 3.79.0-4.el7_9
  dependency: libfreebl3.so(NSSRAWHASH_3.12.3)(64bit)
   provider: nss-softokn-freebl.x86_64 3.79.0-4.el7_9
  dependency: libm.so.6()(64bit)
   provider: glibc.x86_64 2.17-326.el7_9
  dependency: libm.so.6(GLIBC_2.2.5)(64bit)
   provider: glibc.x86_64 2.17-326.el7_9
  dependency: libpthread.so.0()(64bit)
   provider: glibc.x86_64 2.17-326.el7_9
  dependency: libpthread.so.0(GLIBC_2.2.5)(64bit)
   provider: glibc.x86_64 2.17-326.el7_9
  dependency: libseccomp.so.2()(64bit)
   provider: libseccomp.x86_64 2.3.1-4.el7
  dependency: rtld(GNU_HASH)
   provider: glibc.x86_64 2.17-326.el7_9
   provider: glibc.i686 2.17-326.el7_9
  dependency: shadow-utils
   provider: shadow-utils.x86_64 2:4.6-5.el7
  dependency: systemd
   provider: systemd.x86_64 219-78.el7_9.7
案例:处理损坏的包依赖关系
有时在安装多个软件包时,某个包的软件依赖关系可能会被另一个包的安装覆盖掉。这叫作损坏的包依赖关系(broken dependency)。
1.yum clean all
如果系统出现了这个问题,先试试下面的命令:
yum clean all

然后试着用yum命令的update选项。有时,只要清理了放错位置的文件就可以了。
2.yum deplist package_name 查看某个软件包依赖了哪些包
如果这还解决不了问题,试试下面的命令:
yum deplist package_name
这个命令显示了某个软件包的all库依赖关系以及什么软件可以提供这些库依赖关系。一旦知道某个包需要的库,你就能安装它们了。下面是确定xterm包依赖关系的例子。

# yum deplist xterm
Loaded plugins: fastestmirror, refresh-packagekit, security
Loading mirror speeds from cached hostfile
 * base: mirrors.bluehost.com
 * extras: mirror.5ninesolutions.com
 * updates: mirror.san.fastserv.com
Finding dependencies:
package: xterm.i686 253-1.el6
 dependency: libncurses.so.5
 provider: ncurses-libs.i686 5.7-3.20090208.el6
 dependency: libfontconfig.so.1
 provider: fontconfig.i686 2.8.0-3.el6
 dependency: libXft.so.2
 provider: libXft.i686 2.3.1-2.el6
 dependency: libXt.so.6
 provider: libXt.i686 1.1.3-1.el6
 dependency: libX11.so.6
 provider: libX11.i686 1.5.0-4.el6
 dependency: rtld(GNU_HASH)
 provider: glibc.i686 2.12-1.132.el6
 provider: glibc.i686 2.12-1.132.el6_5.1
 provider: glibc.i686 2.12-1.132.el6_5.2
 dependency: libICE.so.6
 provider: libICE.i686 1.0.6-1.el6
 dependency: libXaw.so.7
  provider: libXaw.i686 1.0.11-2.el6
 dependency: libtinfo.so.5
 provider: ncurses-libs.i686 5.7-3.20090208.el6
 dependency: libutempter.so.0
 provider: libutempter.i686 1.1.5-4.1.el6
 dependency: /bin/sh
 provider: bash.i686 4.1.2-15.el6_4
 dependency: libc.so.6(GLIBC_2.4)
 provider: glibc.i686 2.12-1.132.el6
 provider: glibc.i686 2.12-1.132.el6_5.1
 provider: glibc.i686 2.12-1.132.el6_5.2
 dependency: libXmu.so.6
 provider: libXmu.i686 1.1.1-2.el6
3.yum update --skip-broken
如果这样仍未解决问题,还有最后一招:
yum update --skip-broken
#--skip-broken选项允许你忽略依赖关系损坏的那个包,继续去更新其他软件包。这可能救不了损坏的包,但至少可以更新系统上的其他包。
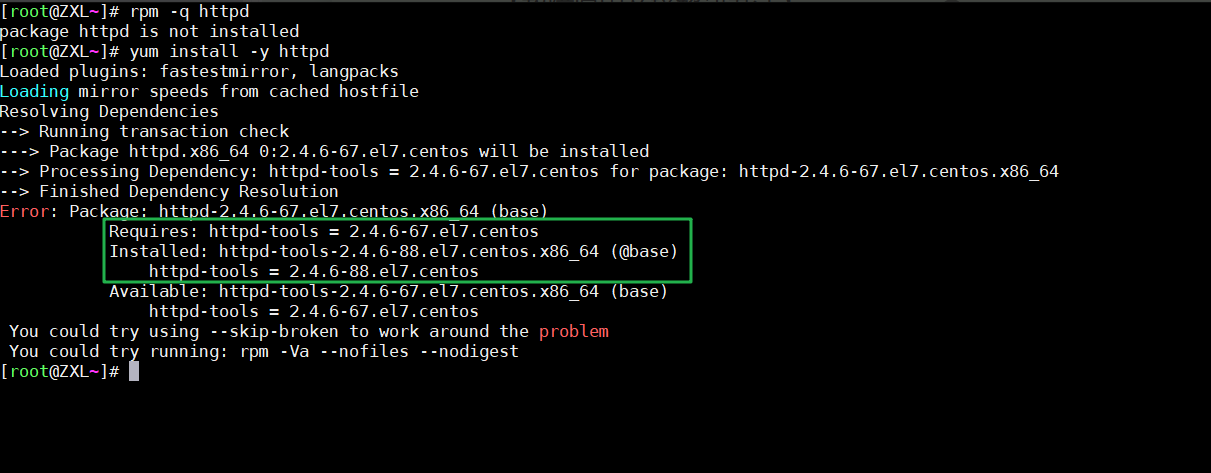
TS:yum安装软件包失败的案例,因需安装的服务的依赖包版本不一致导致安装服务失败问题
本地yum源没问题:

故障原因: 因为本身centos7.4带的httpd-tools版本是67的,而之前应该是源码安装了88版本的,导致httpd安装一直失败。。。。。

解决办法:
先卸载httpd,再安装httpd
[root@ZXL~]# yum remove -y http

完美解决。
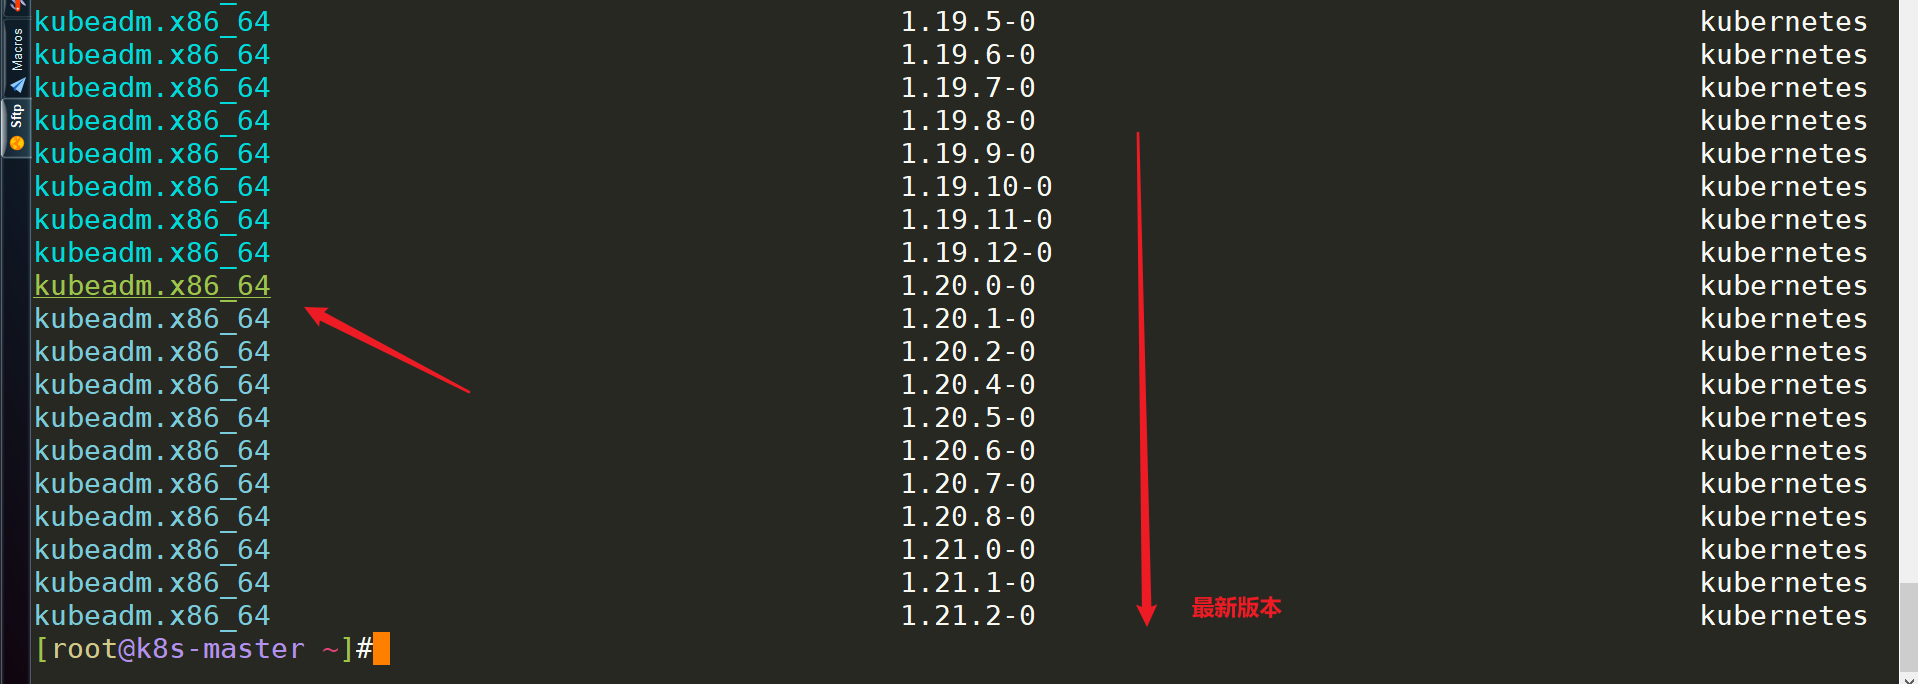
案例:查找仓库里某个软件包所有的版本 --showduplicates
- 查找yum源中最新版本号:
yum list --showduplicates kubeadm --disableexcludes=kubernetes
1、查找最新版本号
yum list --showduplicates kubeadm --disableexcludes=kubernetes #--disableexcludes=kubernetes,只使用kubernetes仓库;

#
  --showduplicates      在 list/search 命令下,显示源里重复的条目
案例:需要找出系统上的某个命令属于哪个软件包 yum provides 命令
最后,如果需要找出系统上的某个特定文件属于哪个软件包,万能的yum可以做到!只要输入命令:

[root@docker ~]#yum provides sz
已加载插件:fastestmirror, langpacks
Loading mirror speeds from cached hostfile
 * base: mirrors.aliyun.com
 * elrepo: hkg.mirror.rackspace.com
 * epel: mirror.nju.edu.cn
 * extras: mirrors.aliyun.com
 * updates: mirrors.aliyun.com
lrzsz-0.12.20-36.el7.x86_64 : The lrz and lsz modem communications programs
源    :base
匹配来源:
文件名    :/usr/bin/sz


lrzsz-0.12.20-36.el7.x86_64 : The lrz and lsz modem communications programs
源    :@base
匹配来源:
文件名    :/usr/bin/sz


[root@docker ~]#
🔰 扩展
ifconfig和netstat命令的软件包均是net-tools软件包;
2、安装
yum的优点之一就是它的命令富有逻辑性,而且对用户也友好。
案例:yum安装软件包 yum install -y <软件包>
下面这个简单的命令会从仓库中安装软件包、所有它需要的库以及依赖的其他包:
yum install package_name -y
🔰 说明:
备注:-y选项在前在后(前后都可以);软件包是否标注.x86_64(不用标注);可并列写需要安装的软件包名。
# -y在前在后都行:
[zxl@foryou ~]$ yum -y install httpd
[zxl@foryou ~]$ yum install httpd -y


# 可以不带.x86_64
yum install -y gcc  pam.x86_64
或者
yum install -y gcc  pam dhcp ntp telnet


# yum安装时可以并行写着的:
yum install -y gcc pam.x86_64 pam-devel.x86_64 krb5-devel.x86_64
yum -y install gcc gcc-c++ kernel-devel //安装gcc、c++编译器以及内核文件 --可以放在同一行
案例:手动下载rpm安装文件�并用yum安装 yum localinstall *.rpm -y
rpm安装包下载完成后,以下命令在下载的软件包目录下执行,这里不使用rpm -ivh安装时因为使用yum localinstall安装可以解决一些依赖关系,开始安装:

[root@localhost ansible]# yum localinstall *.rpm -y


案例:yum仅下载不安装软件包命令
通常是使用yum来安装解决依赖包关系,如果有一台服务器没法连接外网或yum源没有设置,希望通过另一台服务器将这些RPM包下载下来,然后再去安装。那么怎么使用yum工具来下载RPM包呢?--使用如下命令即可。
yum install -y ansible --downloadonly --downloaddir=ansible
例子:yum groupinstalll “xxx”命令
新安装完机器后,你可能需要安装一些必须的包,比如你要做开发,可能要安装gcc,cmake, glibc之类的;比如说你要做web server,需要安装apache或者httpd,mysql,php之类的。

有时候你可能忘了安装一些依赖的包,导致安装失败,不得不先去安装依赖包。

yum提供了一个很强大的功能,groupinstall
通过这个功能可以让你非常方便的一次过安装你所需要的包,

比如你安装必要的开发工具包:
yum groupinstalll “Development Tools”
记得不要丢了双引号。

如果是安装web server必要的包:
yum groupinstall “Web Server”

如果还想知道还有哪些group可以使用grouplist
yum grouplist
例子:--disableexcludes选项
[root@master1 ~]yum makecache fast
[root@master1 ~]yum install -y kubelet-1.25.4 kubeadm-1.25.4 kubectl-1.25.4 --disableexcludes=kubernetes
[root@master1 ~]#kubeadm version
kubeadm version: &version.Info{Major:"1", Minor:"25", GitVersion:"v1.25.4", GitCommit:"872a965c6c6526caa949f0c6ac028ef7aff3fb78", GitTreeState:"clean", BuildDate:"2022-11-09T13:35:06Z", GoVersion:"go1.19.3", Compiler:"gc", Platform:"linux/amd64"}


#可以看到我们这里安装的是 v1.25.4 版本,然后将 master 节点的 kubelet 设置成开机启动:
[root@master1 ~]#systemctl enable --now kubelet
说明:--disableexcludes 禁掉除了kubernetes之外的别的仓库。
🔰 注意:
yum install -y kubeadm-1.25.4 --disableexcludes=kubernetes

等价于

yum install -y --disablerepo=\* --enablerepo=kubernetes kubeadm-1.25.4
3、更新
案例:列出所有已安装包的可用更新 yum list updates == yum check-update
yum list updates == yum check-update

案例:更新某个软件包 yum updates package_name
yum updates package_name
(1)先查看某个软件包是否有新版本?
[root@GitLab ~]# yum list unzip
或者
[root@GitLab ~]# yum list updates|grep unzip

#备注:带有@表示已安装软件包;

(2)再利用yum update package_name进行升级安装包
[root@GitLab ~]# yum update unzip -y
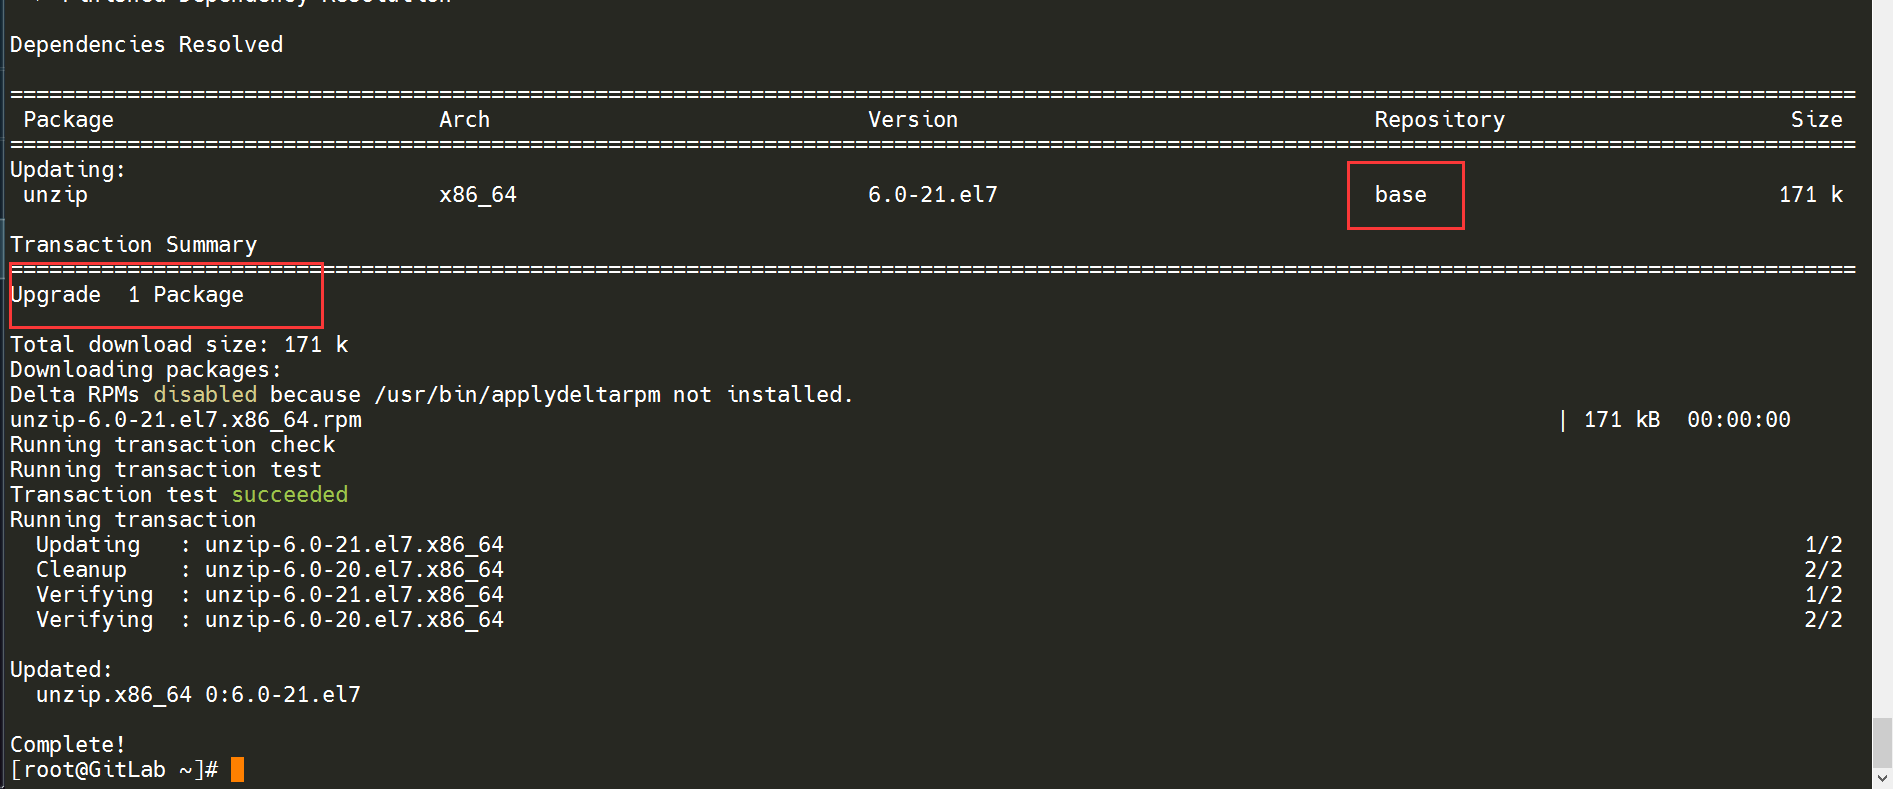
(3)验证

案例:更新操作系统、内核、软件包
yum update -y
yum upgrade -y
yum update和yum upgrade命令有什么区别?
在使用yum这个包管理器时,yum update和yum upgrade命令在大多数情况下是等效的,它们都会更新所有已安装的软件包到最新的可用版本。但是,有一个细微的差别:
yum update:这个命令会更新所有已安装的包,并且会处理依赖关系,以确保系统稳定。理论上,它不会删除任何包。yum upgrade:这个命令除了执行yum update的所有操作外,还会删除过时的包。过时的包指的是那些在仓库中已经被替换掉的包。这意味着某些包可能会被他们的新版本所替代,而旧版本则会被删除。
实际上,在早期的yum版本中,yum upgrade命令是用来表示更彻底的系统升级,它会考虑删除那些已经不再仓库中维护的包。但在后来的版本中,这两个命令的差异已经被最小化了。
为了确保系统稳定,一般推荐使用yum update。如果你想进行一个彻底升级并且移除不再需要的包,可以使用yum upgrade。在具体使用之前,查阅特定系统版本的yum文档是一个好习惯,以确认两者之间是否有特殊的差异处理。
个人使用推荐:
一般保持centos mini版本就行,不需要执行
yum update命令!
案例:生成yum缓存 yum makecache
yum makecache
案例:载入elrepo-kernel元数据
yum --disablerepo=\* --enablerepo=elrepo-kernel repolist
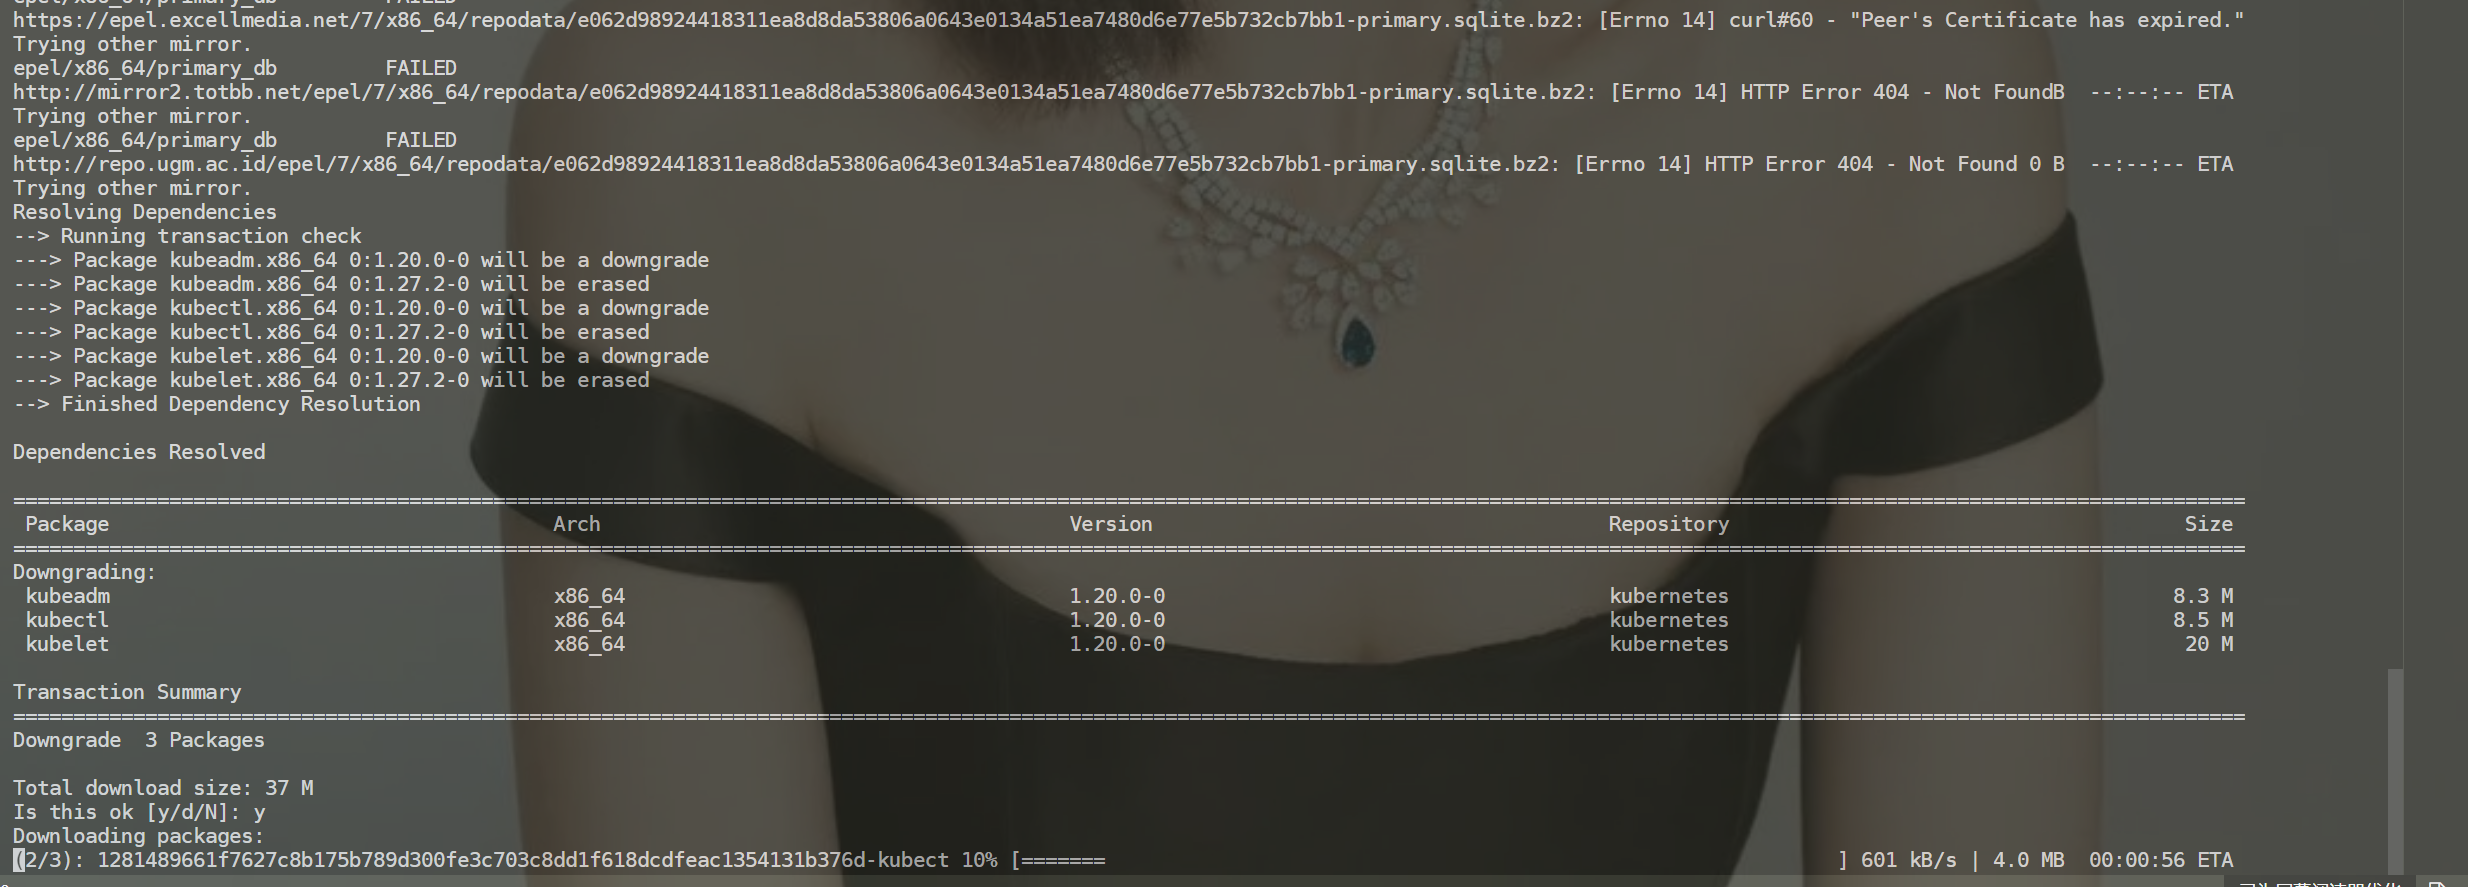
案例:降级某个安装包 downgrade选项
yum downgrade kubectl-1.20.0-0.x86_64 \
kubeadm-1.20.0-0.x86_64 \
kubelet-1.20.0-0.x86_64


4、卸载
注意:yum卸载命令是不需要yum源的;
注意:yum remove/erase 删除一个软件的时候也会删除对该软件具有依赖关系的包。
方法1:
yum remove package_name -y #只删除软件包而保留配置文件和数据文件,就用如下命令:

方法2:
yum erase package_name #要删除软件和它所有的文件,就用erase选项:
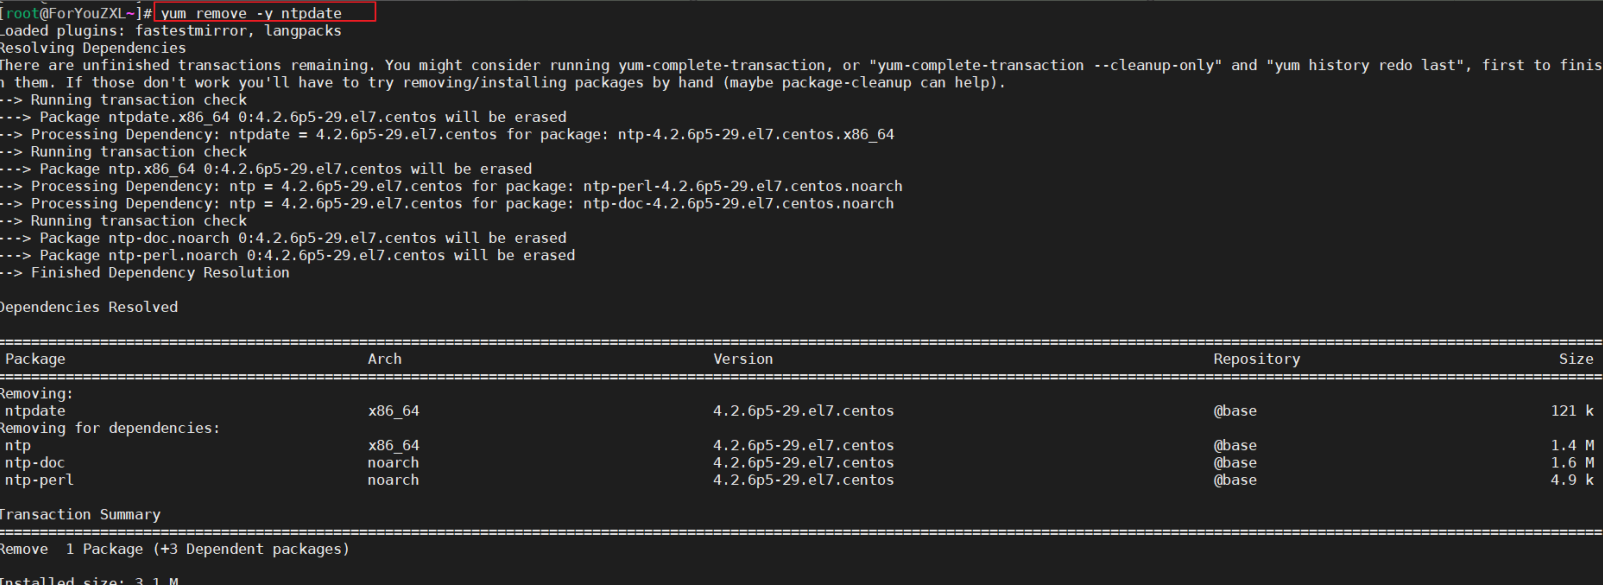
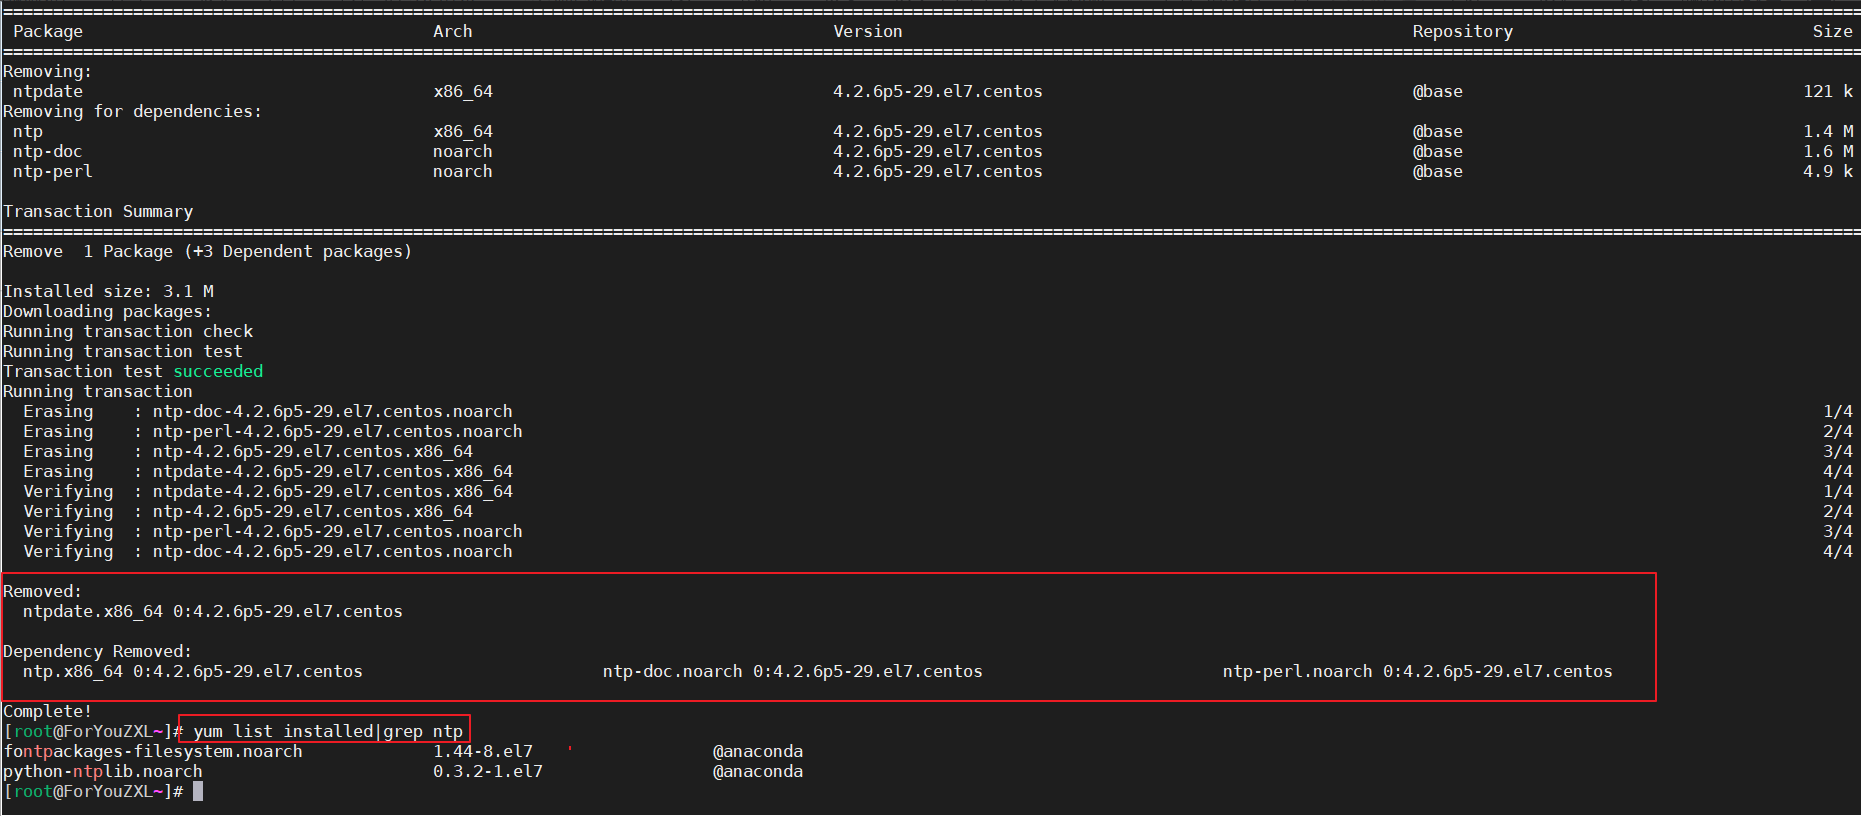
🍀 案例测试:yum remove/erase 删除一个软件的时候也会删除对该软件具有依赖关系的包。(符合预期)
yum -y remove ntp # 删除系统自带ntp
#进行测试:——验证成功,说法正确。
#当前虚机环境:centos74

这个ntpdate是ntp的依赖包:

如果删除了这个依赖包的话,用到这个包的软件均会被删除:
注意:
#注意1: rpm -e --nodeps PACKAGE_NAME #不考虑依赖包单独删除某个包

FAQ
yum是依赖于python2的
案例:前端前台构建需要依赖python3环境-2024.8.16(已解决)
1、报错现象
[root@localhost kuailemao-blog]#     pnpm install
Lockfile is up to date, resolution step is skipped
Packages: +742
+++++++++++++++++++++++++++++++++++++++++++++++++++++++++++++++++++++++++++++++++++++++++++++++++++++++++++++++++++++++++++++++++++++++++++++++++++++++++++++++++++++++++++++++++++++++++++++++

   ╭─────────────────────────────────────────────────────────────────╮
   │                                                                 │
   │                Update available! 8.12.0 → 9.7.1.                │
   │   Changelog: https://github.com/pnpm/pnpm/releases/tag/v9.7.1   │
   │                Run "pnpm add -g pnpm" to update.                │
   │                                                                 │
   │     Follow @pnpmjs for updates: https://twitter.com/pnpmjs      │
   │                                                                 │
   ╰─────────────────────────────────────────────────────────────────╯

Downloading mirrors.huaweicloud.com/element-plus/2.7.6: 8.71 MB/8.71 MB, done
Downloading mirrors.huaweicloud.com/echarts/5.5.1: 10.36 MB/10.36 MB, done
Progress: resolved 742, reused 0, downloaded 742, added 742, done
node_modules/.pnpm/vue-demi@0.14.8_vue@3.4.31/node_modules/vue-demi: Running postinstall script, done in 220ms
node_modules/.pnpm/esbuild@0.18.20/node_modules/esbuild: Running postinstall script, done in 101ms
node_modules/.pnpm/node-sass@9.0.0/node_modules/node-sass: Running install script, done in 22s
node_modules/.pnpm/node-sass@9.0.0/node_modules/node-sass: Running postinstall script, failed in 301ms
.../node_modules/node-sass postinstall$ node scripts/build.js
│ Building: /usr/local/nodejs/bin/node /root/ruyu-blog/blog-frontend/kuailemao-blog/node_modules/.pnpm/node-gyp@8.4.1/node_modules/node-gyp/bin/node-gyp.js rebuild --verbose --libsass_ext= -…
│ gyp info it worked if it ends with ok
│ gyp verb cli [
│ gyp verb cli   '/usr/local/nodejs/bin/node',
│ gyp verb cli   '/root/ruyu-blog/blog-frontend/kuailemao-blog/node_modules/.pnpm/node-gyp@8.4.1/node_modules/node-gyp/bin/node-gyp.js',
│ gyp verb cli   'rebuild',
│ gyp verb cli   '--verbose',
│ gyp verb cli   '--libsass_ext=',
│ gyp verb cli   '--libsass_cflags=',
│ gyp verb cli   '--libsass_ldflags=',
│ gyp verb cli   '--libsass_library='
│ gyp verb cli ]
│ gyp info using node-gyp@8.4.1
│ gyp info using node@16.20.2 | linux | x64
│ gyp verb command rebuild []
│ gyp verb command clean []
│ gyp verb clean removing "build" directory
│ gyp verb command configure []
│ gyp verb find Python Python is not set from command line or npm configuration
│ gyp verb find Python Python is not set from environment variable PYTHON
│ gyp verb find Python checking if "python3" can be used
│ gyp verb find Python - executing "python3" to get executable path
│ gyp verb find Python - "python3" is not in PATH or produced an error
│ gyp verb find Python checking if "python" can be used
│ gyp verb find Python - executing "python" to get executable path
│ gyp verb find Python - executable path is "/usr/bin/python"
│ gyp verb find Python - executing "/usr/bin/python" to get version
│ gyp verb find Python - version is "2.7.5"
│ gyp verb find Python - version is 2.7.5 - should be >=3.6.0
│ gyp verb find Python - THIS VERSION OF PYTHON IS NOT SUPPORTED
│ gyp ERR! find Python
│ gyp ERR! find Python Python is not set from command line or npm configuration
│ gyp ERR! find Python Python is not set from environment variable PYTHON
│ gyp ERR! find Python checking if "python3" can be used
│ gyp ERR! find Python - "python3" is not in PATH or produced an error
│ gyp ERR! find Python checking if "python" can be used
│ gyp ERR! find Python - executable path is "/usr/bin/python"
│ gyp ERR! find Python - version is "2.7.5"
│ gyp ERR! find Python - version is 2.7.5 - should be >=3.6.0
│ gyp ERR! find Python - THIS VERSION OF PYTHON IS NOT SUPPORTED
│ gyp ERR! find Python
│ gyp ERR! find Python **********************************************************
│ gyp ERR! find Python You need to install the latest version of Python.
│ gyp ERR! find Python Node-gyp should be able to find and use Python. If not,
│ gyp ERR! find Python you can try one of the following options:
│ gyp ERR! find Python - Use the switch --python="/path/to/pythonexecutable"
│ gyp ERR! find Python   (accepted by both node-gyp and npm)
│ gyp ERR! find Python - Set the environment variable PYTHON
│ gyp ERR! find Python - Set the npm configuration variable python:
│ gyp ERR! find Python   npm config set python "/path/to/pythonexecutable"
│ gyp ERR! find Python For more information consult the documentation at:
│ gyp ERR! find Python https://github.com/nodejs/node-gyp#installation
│ gyp ERR! find Python **********************************************************
│ gyp ERR! find Python
│ gyp ERR! configure error
│ gyp ERR! stack Error: Could not find any Python installation to use
│ gyp ERR! stack     at PythonFinder.fail (/root/ruyu-blog/blog-frontend/kuailemao-blog/node_modules/.pnpm/node-gyp@8.4.1/node_modules/node-gyp/lib/find-python.js:330:47)
│ gyp ERR! stack     at PythonFinder.runChecks (/root/ruyu-blog/blog-frontend/kuailemao-blog/node_modules/.pnpm/node-gyp@8.4.1/node_modules/node-gyp/lib/find-python.js:159:21)
│ gyp ERR! stack     at PythonFinder.<anonymous> (/root/ruyu-blog/blog-frontend/kuailemao-blog/node_modules/.pnpm/node-gyp@8.4.1/node_modules/node-gyp/lib/find-python.js:266:16)
│ gyp ERR! stack     at PythonFinder.execFileCallback (/root/ruyu-blog/blog-frontend/kuailemao-blog/node_modules/.pnpm/node-gyp@8.4.1/node_modules/node-gyp/lib/find-python.js:297:7)
│ gyp ERR! stack     at ChildProcess.exithandler (node:child_process:394:7)
│ gyp ERR! stack     at ChildProcess.emit (node:events:513:28)
│ gyp ERR! stack     at maybeClose (node:internal/child_process:1100:16)
│ gyp ERR! stack     at Process.ChildProcess._handle.onexit (node:internal/child_process:304:5)
│ gyp ERR! System Linux 3.10.0-957.el7.x86_64
│ gyp ERR! command "/usr/local/nodejs/bin/node" "/root/ruyu-blog/blog-frontend/kuailemao-blog/node_modules/.pnpm/node-gyp@8.4.1/node_modules/node-gyp/bin/node-gyp.js" "rebuild" "--verbose" "…
│ gyp ERR! cwd /root/ruyu-blog/blog-frontend/kuailemao-blog/node_modules/.pnpm/node-sass@9.0.0/node_modules/node-sass
│ gyp ERR! node -v v16.20.2
│ gyp ERR! node-gyp -v v8.4.1
│ gyp ERR! not ok
│ Build failed with error code: 1
└─ Failed in 301ms at /root/ruyu-blog/blog-frontend/kuailemao-blog/node_modules/.pnpm/node-sass@9.0.0/node_modules/node-sass
 ELIFECYCLE  Command failed with exit code 1.
[root@localhost kuailemao-blog]#


这个如何解决呢?
2、解决办法
gpt回答
根据你提供的错误信息,node-gyp 找不到合适的 Python 版本。它找到的 Python 版本是 2.7.5,而 node-gyp 需要 Python 3.6 或更高版本。以下是解决此问题的步骤:
- 安装 Python 3
首先,你需要在系统中安装 Python 3。如果你的系统已经安装了 Python 3,请确保它在 PATH 中。
在 CentOS 或 RHEL 系统上,你可以使用以下命令安装 Python 3:
sudo yum -y install python3 --disablerepo=epel
- 设置
PYTHON环境变量
安装 Python 3 之后,设置 PYTHON 环境变量以指向 Python 3 可执行文件。
export PYTHON=$(which python3)
- 配置 npm 使用 Python 3
你还可以配置 npm 以使用 Python 3:
npm config set python $(which python3)

pnpm config set python $(which python3)
- 重试
pnpm install
现在重新运行 pnpm install:
pnpm install
- 验证安装
如果问题仍然存在,确保你的 python3 确实在 PATH 中并可以正确执行:
python3 --version
你应该看到类似于 Python 3.x.x 的输出(确保版本是 3.6 或更高)。
总结
通过以上步骤,你应该能解决 node-gyp 找不到合适 Python 版本的问题。确保 Python 3 安装并配置正确后,pnpm install 应该能顺利完成。
如果还有问题,可以检查以下几点:
- 确认
python3是否在PATH中,可以通过which python3来验证路径。 - 确认 npm 配置正确,可以通过
npm config get python来查看配置。
希望这些步骤能帮助你解决问题!
本yum安装python3方法
    ##安装python3
    sudo yum -y install python3 --disablerepo=epel
安装python3后现象:
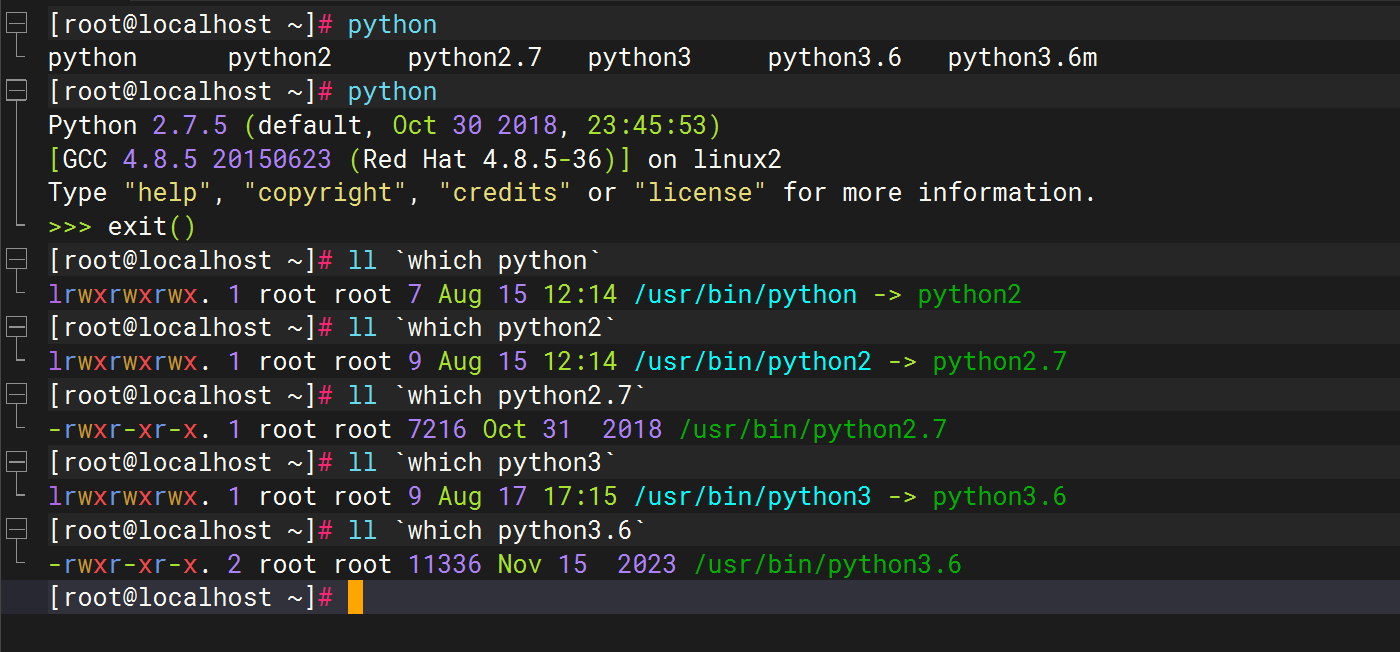
[root@localhost ~]# python
python      python2     python2.7   python3     python3.6   python3.6m
[root@localhost ~]# python
Python 2.7.5 (default, Oct 30 2018, 23:45:53)
[GCC 4.8.5 20150623 (Red Hat 4.8.5-36)] on linux2
Type "help", "copyright", "credits" or "license" for more information.
>>> exit()
[root@localhost ~]# ll `which python`
lrwxrwxrwx. 1 root root 7 Aug 15 12:14 /usr/bin/python -> python2
[root@localhost ~]# ll `which python2`
lrwxrwxrwx. 1 root root 9 Aug 15 12:14 /usr/bin/python2 -> python2.7
[root@localhost ~]# ll `which python2.7`
-rwxr-xr-x. 1 root root 7216 Oct 31  2018 /usr/bin/python2.7
[root@localhost ~]# ll `which python3`
lrwxrwxrwx. 1 root root 9 Aug 17 17:15 /usr/bin/python3 -> python3.6
[root@localhost ~]# ll `which python3.6`
-rwxr-xr-x. 2 root root 11336 Nov 15  2023 /usr/bin/python3.6
[root@localhost ~]#
ruyu-blog需要python3环境时配置
pnpm config set python $(which python3)
python3 --version
扩展:给某个文件做软连接 -s -f -n选项
sudo ln -sfn /usr/bin/python3.6 /usr/bin/python #注意,这个命令时有风险的哦!!!
sudo ln -sfn /usr/bin/python3.6 /usr/bin/python 这条命令用于创建一个符号链接,使 /usr/bin/python 指向 /usr/bin/python3.6。以下是每个参数的含义:
sudo: 提权命令,意味着需要以超级用户权限执行该命令。ln: 创建链接命令。-s: 创建符号链接(软链接),而不是硬链接。-f: 强制删除已经存在的目标文件(如果/usr/bin/python已经存在,会被删除)。-n: 如果目标是一个符号链接,直接覆盖它,而不是在其上创建新的链接。/usr/local/bin/python3.8: 链接的源文件,即要指向的实际文件路径。/usr/bin/python: 链接的目标文件,即符号链接的路径。
这个命令的最终效果是使系统在执行 python 命令时,实际上运行的是 python3.8。
**这种做法在需要特定版本的 Python 并且不想直接更改系统默认 python 版本的情况下非常有用。**然而,需注意以下几点:
- 系统依赖:许多系统工具和脚本依赖于特定版本的 Python(经常是 Python 2.x),将
/usr/bin/python修改为指向 Python 3.x 可能会导致这些工��具和脚本无法正常工作。(例如yum) - 环境管理:使用
pyenv或者虚拟环境(virtualenv,venv)工具来管理不同版本的 Python 和依赖项通常是更安全和优雅的方法。
如果你确定没有上述问题,或者你已经做好了相应的准备和测试,那么可以使用这条命令来更改默认的 python 版本。
这里我们来测试下:
配置前:
[root@localhost ~]# python
python      python2     python2.7   python3     python3.6   python3.6m
[root@localhost ~]# python
Python 2.7.5 (default, Oct 30 2018, 23:45:53)
[GCC 4.8.5 20150623 (Red Hat 4.8.5-36)] on linux2
Type "help", "copyright", "credits" or "license" for more information.
>>> exit()
[root@localhost ~]# ll `which python`
lrwxrwxrwx. 1 root root 7 Aug 15 12:14 /usr/bin/python -> python2
[root@localhost ~]# ll `which python2`
lrwxrwxrwx. 1 root root 9 Aug 15 12:14 /usr/bin/python2 -> python2.7
[root@localhost ~]# ll `which python2.7`
-rwxr-xr-x. 1 root root 7216 Oct 31  2018 /usr/bin/python2.7
[root@localhost ~]# ll `which python3`
lrwxrwxrwx. 1 root root 9 Aug 17 17:15 /usr/bin/python3 -> python3.6
[root@localhost ~]# ll `which python3.6`
-rwxr-xr-x. 2 root root 11336 Nov 15  2023 /usr/bin/python3.6
[root@localhost ~]#
配置后:
ln -sfn /usr/bin/python3.6 /usr/bin/python
ln: 创建链接命令。-s: 创建符号链接(软链接)��,而不是硬链接。-f: 强制删除已经存在的目标文件(如果/usr/bin/python已经存在,会被删除)。-n: 如果目标是一个符号链接,直接覆盖它,而不是在其上创建新的链接。

如何恢复呢?(已恢复)
#原来内容
ln -sfn python2 /usr/bin/python

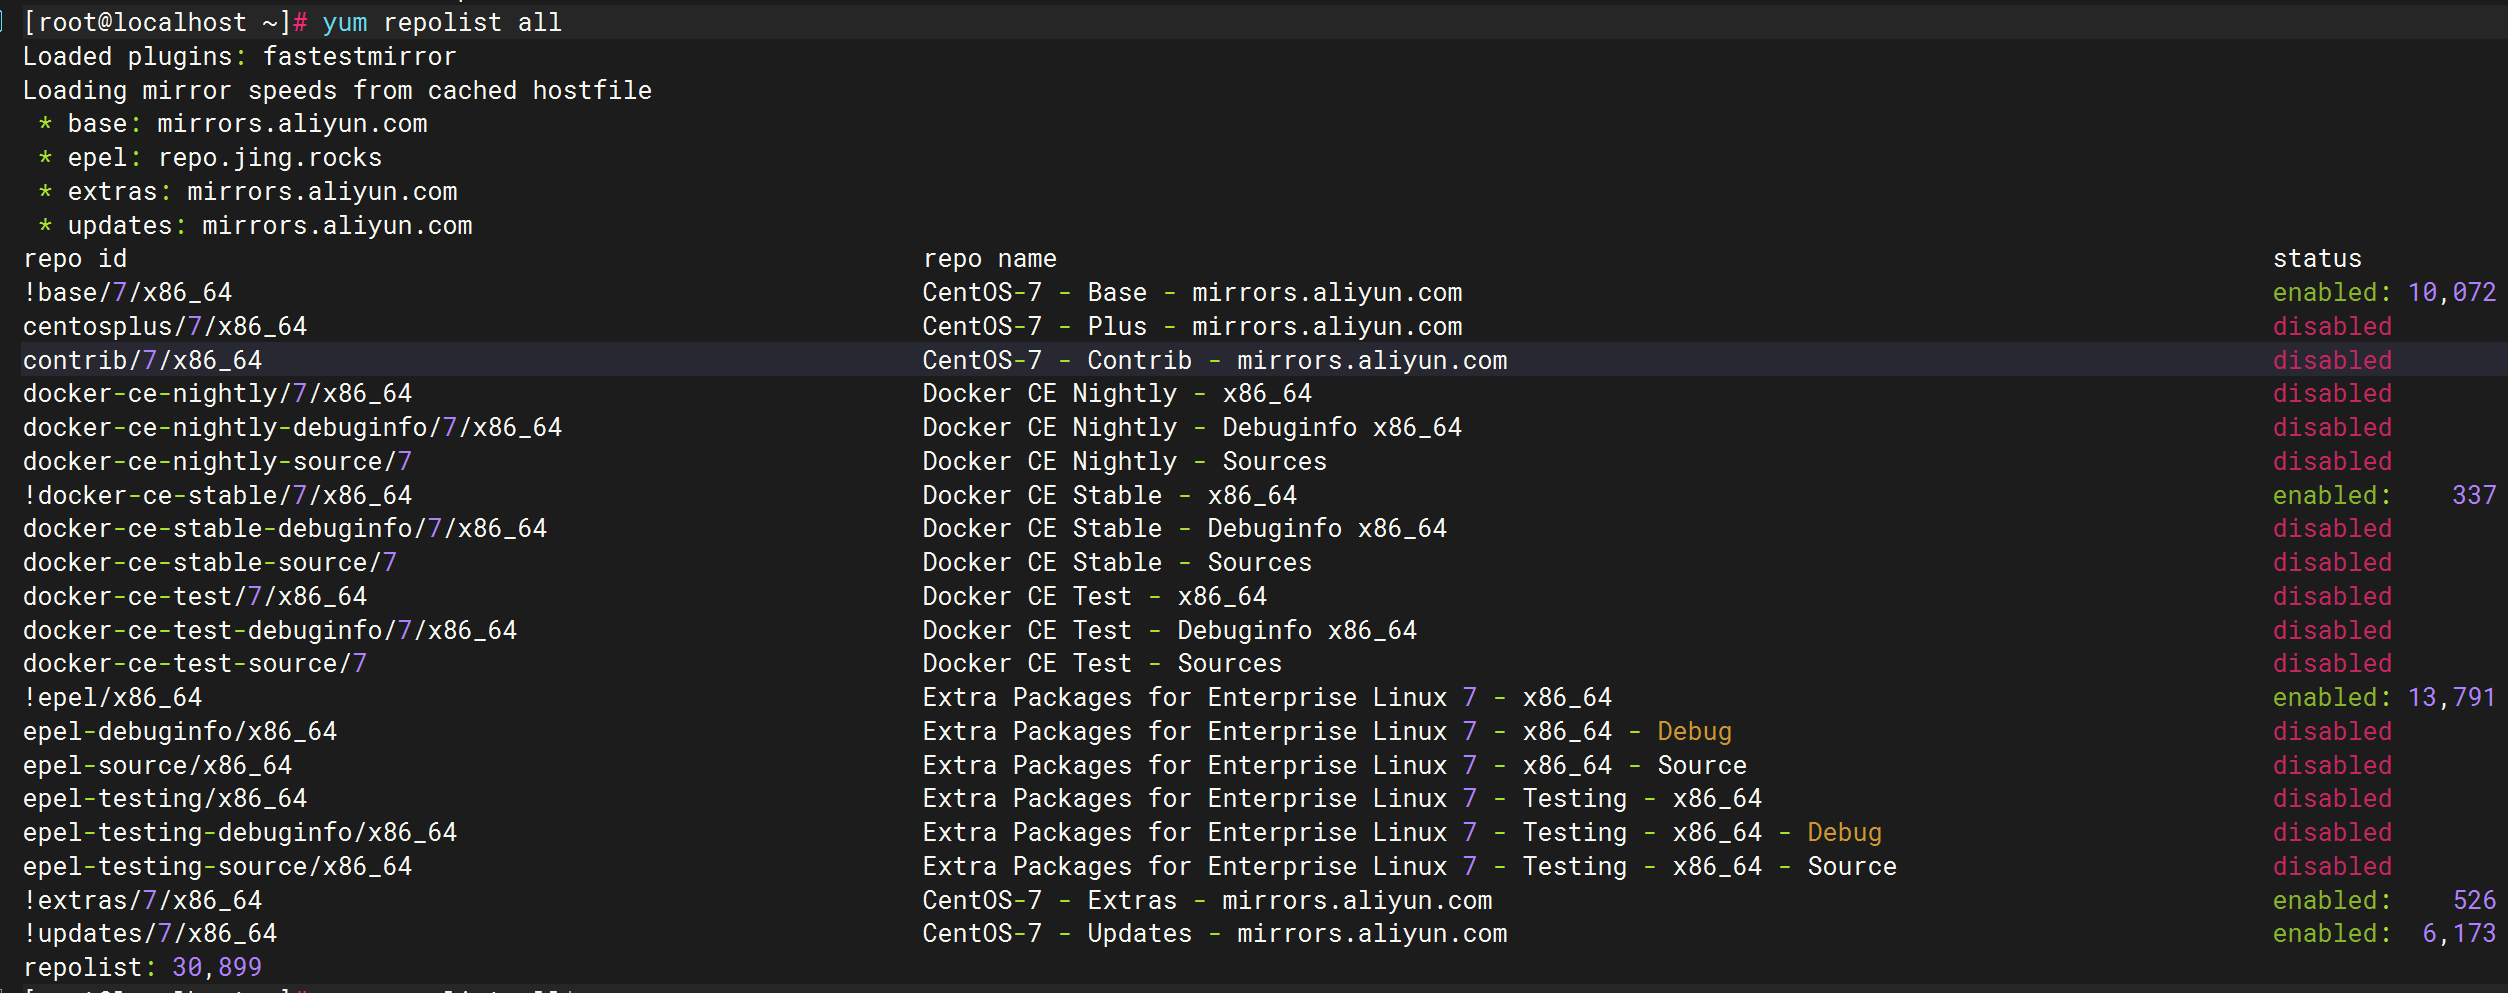
3、验证效果
关于我
我的博客主旨:
- 排版美观,语言精炼;
- 文档即手册,步骤明细,拒绝埋坑,提供源码;
- 本人实战文档都是亲测成功的,各位小伙伴在实际操作过程中如有什么疑问,可随时联系本人帮您解决问题,让我们一起进步!
🍀 微信二维码
x2675263825 (舍得), qq:2675263825。

🍀 微信公众号
《云原生架构师实战》

🍀 个人博客站点

🍀 语雀
https://www.yuque.com/xyy-onlyone
🍀 csdn
https://blog.csdn.net/weixin_39246554?spm=1010.2135.3001.5421

🍀 知乎
https://www.zhihu.com/people/foryouone

最后
好了,关于本次就到这里了,感谢大家阅读,最后祝大家生活快乐,每天都过的有意义哦,我们下期见!
