实战-centos上安装Go软件-2023.12.12-测试��成功
更新于:2023年12月12日
实战-centos上安装Go软件-2023.12.12-测试成功

目录
[toc]
环境
- 实验环境
centos7.9
go1.19.13
- 实验软件
链接:https://pan.baidu.com/s/1igJFzVfgXgi8vT-RwTxxew?pwd=qrt9
提取码:qrt9
2023.12.12-实战-centos上安装Go软件

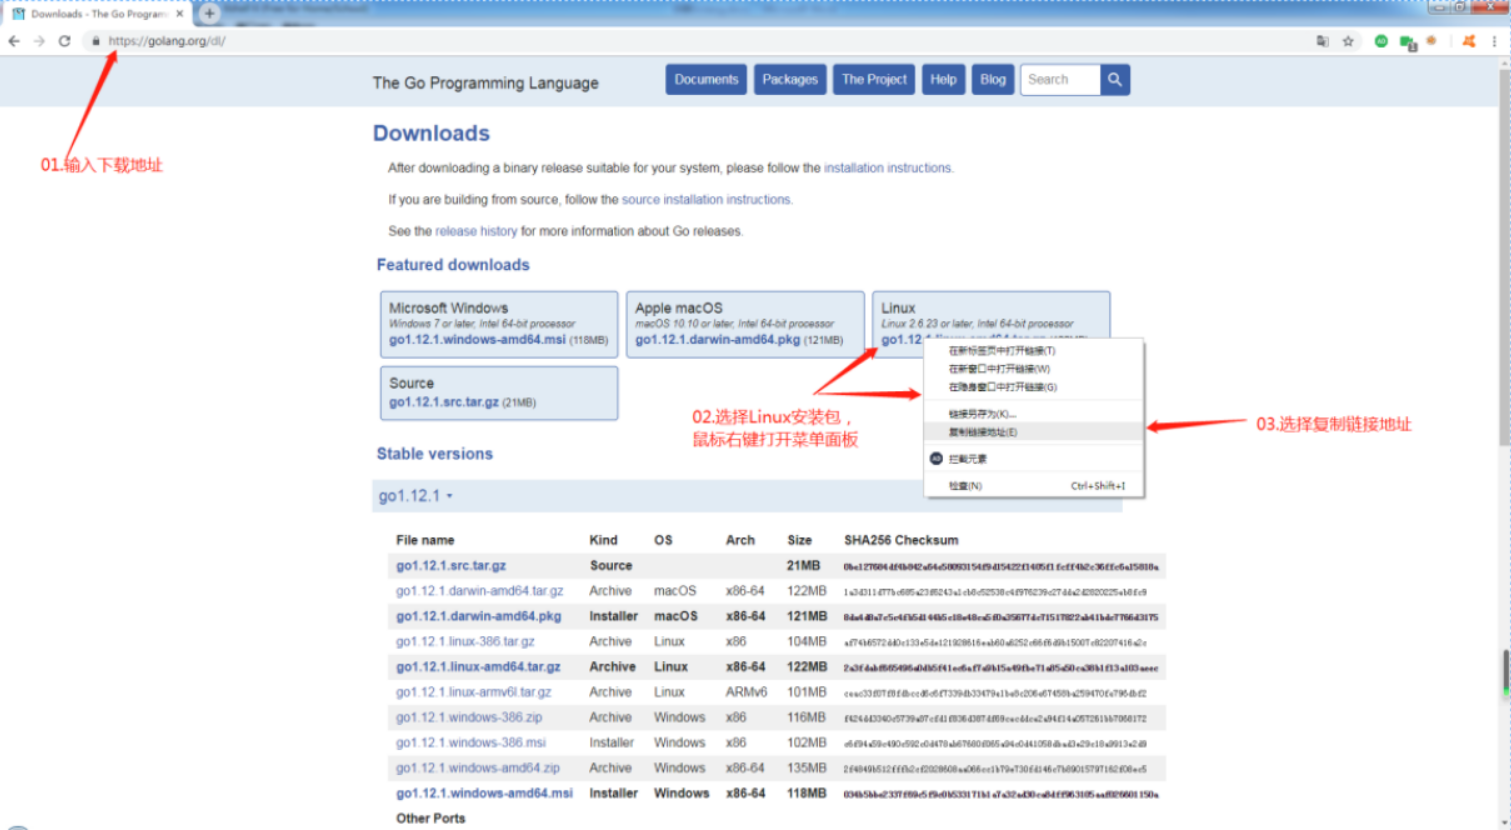
1、下载
把Linux的go.tar.gz包下载到本地:
2、安装
- 将下载好的linux安装包上传到服务器:
#wget https://golang.google.cn/dl/go1.16.2.linux-amd64.tar.gz

[root@gitlab-runner ~]#ll -h go1.16.2.linux-amd64.tar.gz
-rw-r--r-- 1 root root 124M May 18 21:05 go1.16.2.linux-amd64.tar.gz
- 将包解压到/usr/local目录下:
[root@gitlab-runner ~]#tar xf go1.16.2.linux-amd64.tar.gz -C /usr/local/
[root@docker ~]#cd /usr/local/go/
[root@gitlab-runner go]# ll -h
total 220K
drwxr-xr-x.  2 root root 4.0K Mar 12  2021 api
-rw-r--r--.  1 root root  55K Mar 12  2021 AUTHORS
drwxr-xr-x.  2 root root   27 Mar 12  2021 bin #go二进制目录
-rw-r--r--.  1 root root 1.4K Mar 12  2021 CONTRIBUTING.md
-rw-r--r--.  1 root root 100K Mar 12  2021 CONTRIBUTORS
drwxr-xr-x.  2 root root   76 Mar 12  2021 doc #go文档目录
-rw-r--r--.  1 root root 5.6K Mar 12  2021 favicon.ico
drwxr-xr-x.  3 root root   17 Mar 12  2021 lib
-rw-r--r--.  1 root root 1.5K Mar 12  2021 LICENSE
drwxr-xr-x. 12 root root 4.0K Mar 12  2021 misc
-rw-r--r--.  1 root root 1.3K Mar 12  2021 PATENTS
drwxr-xr-x.  6 root root   72 Mar 12  2021 pkg #go第三方包目录
-rw-r--r--.  1 root root 1.5K Mar 12  2021 README.md
-rw-r--r--.  1 root root   26 Mar 12  2021 robots.txt
-rw-r--r--.  1 root root  397 Mar 12  2021 SECURITY.md
drwxr-xr-x. 48 root root 4.0K Mar 12  2021 src #go源码目录
drwxr-xr-x. 23 root root  12K Mar 12  2021 test
-rw-r--r--.  1 root root    8 Mar 12  2021 VERSION
- 开始配置环境变量:
#(1)先创建GOPATH路径:
[root@gitlab-runner ~]#mkdir -p /opt/goDir
[root@gitlab-runner profile.d]# vim /etc/profile
……
export GOROOT=/usr/local/go
export GOPATH=/opt/goDir
export PATH=${PATH}:${GOROOT}/bin:${GOPATH}
[root@gitlab-runner profile.d]# source /etc/profile

#环境变量配置后查看go版本及其go环境变量
root@localhost profile.d]# go version
go version go1.16.2 linux/amd64
[root@localhost profile.d]# go env
GO111MODULE="" #注意
GOARCH="amd64"
GOBIN=""
GOCACHE="/root/.cache/go-build"
GOENV="/root/.config/go/env"
GOEXE=""
GOFLAGS=""
GOHOSTARCH="amd64"
GOHOSTOS="linux"
GOINSECURE=""
GOMODCACHE="/root/go/pkg/mod"
GONOPROXY=""
GONOSUMDB=""
GOOS="linux"
GOPATH="/root/go"
GOPRIVATE=""
GOPROXY="https://proxy.golang.org,direct" #注意
GOROOT="/usr/local/go"
GOSUMDB="sum.golang.org"
GOTMPDIR=""
GOTOOLDIR="/usr/local/go/pkg/tool/linux_amd64"
GOVCS=""
GOVERSION="go1.16.2"
GCCGO="gccgo"
AR="ar"
CC="gcc"
CXX="g++"
CGO_ENABLED="1"
GOMOD="/dev/null"
CGO_CFLAGS="-g -O2"
CGO_CPPFLAGS=""
CGO_CXXFLAGS="-g -O2"
CGO_FFLAGS="-g -O2"
CGO_LDFLAGS="-g -O2"
PKG_CONFIG="pkg-config"
GOGCCFLAGS="-fPIC -m64 -pthread -fmessage-length=0 -fdebug-prefix-map=/tmp/go-build1637796377=/tmp/go-build -gno-record-gcc-switches"
[root@localhost profile.d]#

#(2)go env -w命令设置如下2个环境变量
[root@localhost profile.d]# go env -w GO111MODULE=on
[root@localhost profile.d]# go env -w GOPROXY=https://goproxy.cn,direct

#设置后再次查看现象:
[root@localhost profile.d]# go env
GO111MODULE="on" #
GOARCH="amd64"
GOBIN=""
GOCACHE="/root/.cache/go-build"
GOENV="/root/.config/go/env"
GOEXE=""
GOFLAGS=""
GOHOSTARCH="amd64"
GOHOSTOS="linux"
GOINSECURE=""
GOMODCACHE="/root/go/pkg/mod"
GONOPROXY=""
GONOSUMDB=""
GOOS="linux"
GOPATH="/root/go"
GOPRIVATE=""
GOPROXY="https://goproxy.cn,direct" #
GOROOT="/usr/local/go"
GOSUMDB="sum.golang.org"
GOTMPDIR=""
GOTOOLDIR="/usr/local/go/pkg/tool/linux_amd64"
GOVCS=""
GOVERSION="go1.16.2"
GCCGO="gccgo"
AR="ar"
CC="gcc"
CXX="g++"
CGO_ENABLED="1"
GOMOD="/dev/null"
CGO_CFLAGS="-g -O2"
CGO_CPPFLAGS=""
CGO_CXXFLAGS="-g -O2"
CGO_FFLAGS="-g -O2"
CGO_LDFLAGS="-g -O2"
PKG_CONFIG="pkg-config"
GOGCCFLAGS="-fPIC -m64 -pthread -fmessage-length=0 -fdebug-prefix-map=/tmp/go-build118089821=/tmp/go-build -gno-record-gcc-switches"
[root@localhost profile.d]#
3、测试
将在windows编写好的go源码上传到Linux机器进行编译运行:(可成功运行代码)
helloworld.go
[root@localhost ~]#ll helloworld.go
-rw-r--r-- 1 root root 75 Jan  7 22:20 helloworld.go
[root@localhost ~]#cat helloworld.go
package main

import "fmt"

func main() {
    fmt.Println("hello world")
}
[root@localhost ~]#go build helloworld.go
[root@localhost ~]#ll  -h helloworld
-rwxr-xr-x 1 root root 1.9M Jan  7 22:21 helloworld
[root@localhost ~]#./helloworld
hello world
4、卸载
删除文件/删除环境变量配置。
rm -rf /usr/local/go
rm -rf /opt/goDir
#删除/etc/profile里面配置的go环境变量
部署脚本😘
- go 1.19.13��部署
##经测试,脚本可一键粘贴使用:(2023年12月12日-测试成功)
##1、下载二进制包
wget https://golang.google.cn/dl/go1.19.13.linux-amd64.tar.gz

##/2、配置
tar xf go1.19.13.linux-amd64.tar.gz -C /usr/local/
mkdir -p /opt/goDir

echo "export GOROOT=/usr/local/go" >>/etc/profile
echo "export GOPATH=/opt/goDir" >>/etc/profile
echo 'export PATH=${PATH}:${GOROOT}/bin:${GOPATH}' >>/etc/profile

source /etc/profile

go env -w GO111MODULE=on
go env -w GOPROXY=https://goproxy.cn,direct

##3、验证
go version
go env|grep GO111MODULE
go env|grep GOPROXY
- go 1.16.2部署
##经测试,脚本可一键粘贴使用:(2023年12月12日-测试成功)
##1、下载二进制包
wget https://golang.google.cn/dl/go1.16.2.linux-amd64.tar.gz

##/2、配置
tar xf go1.16.2.linux-amd64.tar.gz -C /usr/local/
mkdir -p /opt/goDir

echo "export GOROOT=/usr/local/go" >>/etc/profile
echo "export GOPATH=/opt/goDir" >>/etc/profile
echo 'export PATH=${PATH}:${GOROOT}/bin:${GOPATH}' >>/etc/profile

source /etc/profile

go env -w GO111MODULE=on
go env -w GOPROXY=https://goproxy.cn,direct

##3、验证
go version
go env|grep GO111MODULE
go env|grep GOPROXY
关于我
我的博客主旨:
- 排版美观,语言精炼;
- 文档即手册,步骤明细,拒绝埋坑,提供源码;
- 本人实战文档都是亲测成功的,各位小伙伴在实际操作过程中如有什么疑问,可随时联系本人帮您解决问题,让我们一起进步!
🍀 微信二维码 x2675263825 (舍得), qq:2675263825。

🍀 微信公众号 《云原生架构师实战》

🍀 博客 www.onlyyou520.com

🍀 csdn https://blog.csdn.net/weixin_39246554?spm=1010.2135.3001.5421

🍀 知乎 https://www.zhihu.com/people/foryouone

最后
好了,关于本次就到这里了,感谢大家阅读,最后祝大家生活快乐,每天都过的有意义哦,我们下期见!